Configure GW-to-GW authentication and routing
By the end of this guide, you will have validated Caller Context, Target Authentication, and Policy enforcement across a live GW-to-GW MCP connection, with log evidence confirming behaviour at each hop.
This guide adds a Caller Context element (Authentication Method: API Key (secret store)) and a Policy element to Agent GW 1’s MCP surface, and a Target Authentication configuration to Agent GW 2’s Managed Agent node, then works through scenarios that exercise each combination end-to-end. For background on how two gateways route traffic to each other, see Gateways →.
Without validating these independently, a mismatched HTTP Header Name, a missing Policy element, or an incorrect secret between the two gateways is only visible in a live cross-organisation failure. Each scenario isolates one failure mode so problems are caught in a controlled environment before they reach production traffic.
Use this guide when:
- You have connected two gateways and need to confirm authentication behaviour end-to-end.
- You are building a cross-organisation MCP workflow and need a validation checklist before deployment.
You do not need to run every scenario if you are only validating routing without authentication: Scenario 2 alone confirms that.
What you are building
- Company A hosts Agent GW 1 with MCP surface A.
- Company B hosts Agent GW 2 with MCP surface B.
- Gateways are connected through a DIDComm gateway connection.
- Agent GW 2 routes requests to Agent GW 1.
- Agent GW 1 forwards to an MCP backend service.
This pattern supports automated AI-driven workflows across company boundaries while keeping authentication and policy controls explicit.
Architecture overview
flowchart LR
  C[Client or Agent in Company B] --> B[Agent GW 2\nMCP Surface B]
  B -->|Gateway connection routing| A[Agent GW 1\nMCP Surface A]
  A -->|Target endpoint| M[MCP backend service]

  subgraph Auth checks
    S1[Caller Context + Policy on Surface A]
    T1[Target Authentication on Surface B's Managed Agent]
  end

  B --> T1
  A --> S1
How authentication is enforced across the two hops
Three elements apply at different points in the request path:
- Caller Context: a canvas element dropped on the caller → Access Point edge. It extracts and validates an inbound caller’s credentials (JWT, API key, or DID Auth) before any policy or payment gate runs. mTLS is visible in the Authentication Method dropdown but not currently selectable.
- Policy: a canvas element, also dropped on the caller → Access Point edge, that reads the Caller Context result (
input.source_auth) and decides whether to allow or deny the request. Caller Context alone does not block a request. A missing or invalid credential is recorded asinput.source_auth.method == "failed"and the request still reaches the Managed Agent unless a Policy element denies it explicitly. See OPA policies reference for the fullinput.source_authschema. - Target Authentication: a section on the Managed Agent node. It injects credentials into outbound traffic before the gateway forwards to a target endpoint, whether that target is a direct URL or another gateway reached via a gateway connection.
In GW-to-GW MCP flows, use this mental model:
- Agent GW 2 receives a request on MCP surface B.
- If surface B’s Managed Agent node has Target Authentication configured, Agent GW 2 injects the configured header before forwarding over the gateway connection.
- Agent GW 1 receives the forwarded request on MCP surface A. If surface A has a Caller Context element, it extracts and validates the credential; if surface A also has a Policy element, that policy decides whether to allow or deny based on the validation result.
- If the request is allowed, or no Caller Context or Policy element is configured, Agent GW 1 forwards it to the MCP backend using its own Managed Agent node’s endpoint configuration.
- MCP backend logs show the request and any injected header values expected by your test.
Prerequisites
- You are logged in to the Agent Gateway dashboard for both Agent GW 1 and Agent GW 2, with permission to create and edit surfaces.
- Agent GW 1 and Agent GW 2 are already connected: open Connections → Gateways on either gateway and confirm the connection status badge reads ACTIVE.
- Both gateways have MCP surfaces created:
- Surface A on Agent GW 1.
- Surface B on Agent GW 2.
- MCP backend service reachable from Agent GW 1’s Managed Agent target endpoint.
- You can view:
- Gateway logs/monitoring.
- MCP backend logs.
- A gateway secret that holds the test API key value. Follow Secrets to create a secret on Agent GW 1 with your chosen key value (for example,
keyA). Note the secret ID: you will select it in Step 1. If you are testing Scenario 7 or 8 (Target Authentication), create a matching secret on Agent GW 2 too.
Steps
Configure Agent GW 1’s MCP surface A
Open Surfaces on Agent GW 1’s dashboard and select MCP surface A.
Select the Managed Agent node and set Target Endpoint URL to your MCP backend address.
For scenarios that exercise source-side authentication (Scenarios 3, 4, 6, and 8): in the left palette, drag a Caller Context element onto the edge between the caller and the Access Point node.
Select the Caller Context node. In Authentication Method, select API Key (secret store).
Select Configure… to open the full editor, then set:
- HTTP Header Name: the header callers must include in every request, for example
X-API-Key. - Secret ID: the secret you created in Prerequisites.
- HTTP Header Name: the header callers must include in every request, for example
Close the editor.
For scenarios that expect a missing or invalid key to actually be denied (Scenarios 3, 6, and 8): add a Policy element from the Security & Policy palette category and drop it on the same edge as Caller Context. Set Policy Definition to a policy with this rule.
package surface.policy

default allow = false

allow if {
  input.source_auth.method == "api_key"
}
Caller Context validates the key but does not block the request on its own. Without a Policy element, a missing or invalid key still reaches the MCP backend.
Select the disk-icon Save button (tooltip: Save changes).
Configure Agent GW 2’s MCP surface B
- Open Surfaces on Agent GW 2’s dashboard and select MCP surface B.
- Select the Managed Agent node.
- Set Endpoint Type to via Gateway Connection.
- Select Agent GW 1 from the Gateway dropdown, then select Surface A from the Agent Surface on Gateway dropdown.
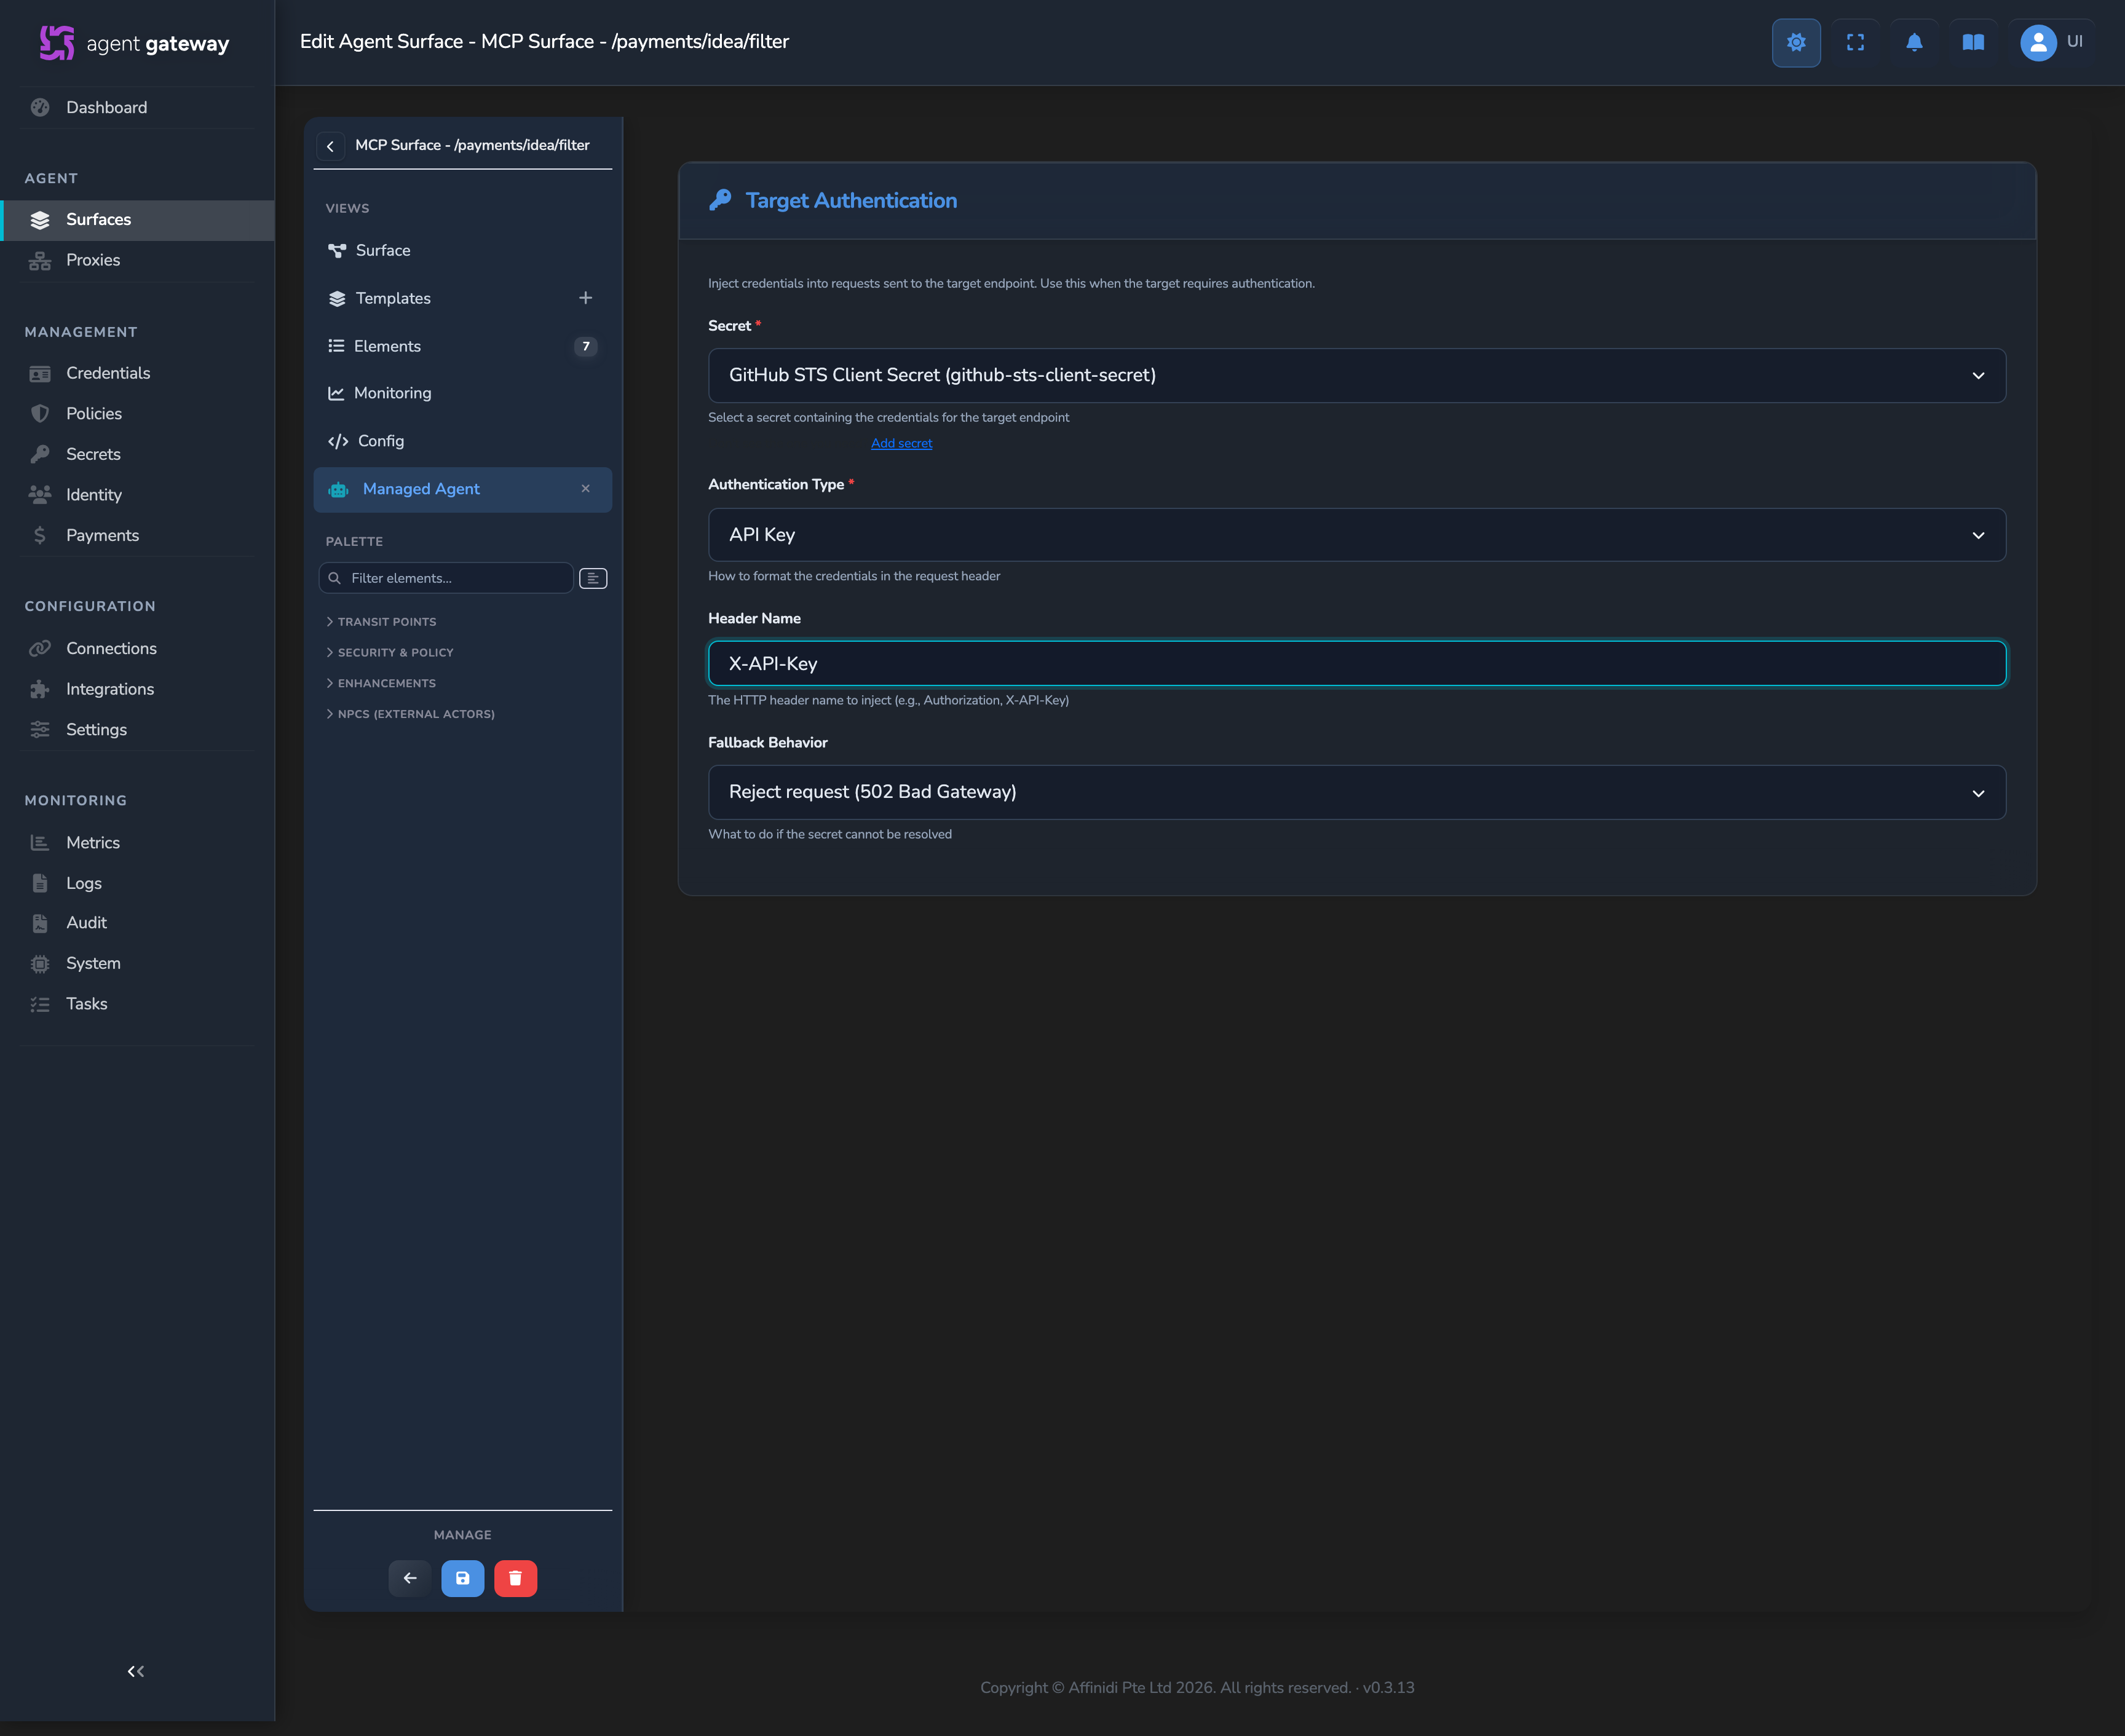
- For scenarios that exercise target-side authentication (Scenarios 7 and 8): under Target Authentication, set Authentication Type to API Key, then select Configure….
- In the full editor, set:
- Secret: the secret holding
keyAon Agent GW 2 (see Prerequisites). - Header Name: must match the HTTP Header Name configured on Surface A’s Caller Context element, for example
X-API-Key.
- Secret: the secret holding
- Close the editor.
- Select the disk-icon Save button (tooltip: Save changes).
Never hardcode the API key value in a request script or commit it to source control. Store it only as a gateway secret, rotate it through the secrets manager once a scenario run is finished, and confirm your test logs and monitoring output never echo the raw secret value.
Scenario playbooks
Each scenario below is written as a runbook: setup, action, expected outcome, and validation checks.
Scenario 1: Target Authentication and secret injection
Given: Agent GW 1’s MCP surface A has Target Authentication configured (Authentication Type: API Key) on its own Managed Agent node, pointing at the MCP backend.
When: A request is sent through Agent GW 1’s MCP surface A.
Then:
- The gateway injects the configured header before the backend call.
- MCP backend logs include the expected header value.
Validate:
- Send an MCP request through Agent GW 1’s MCP surface A.
- Confirm the request succeeds.
- Check the backend log for the configured header name and value pattern.
Scenario 2: Gateway-to-Gateway communication
Given: Agent GW 2 is connected to Agent GW 1 and MCP surface B routes to MCP surface A, with no Caller Context, Policy, or Target Authentication configured on either surface.
When: Agent GW 2 sends a request to Agent GW 1.
Then:
- The request is processed successfully end to end.
- MCP backend logs are visible.
Validate:
- Send a request to Agent GW 2’s MCP surface B.
- Confirm the response is a success.
- Confirm Agent GW 1’s logs show the routed inbound request.
- Confirm the MCP backend request log exists.
Scenario 3: Missing source authentication
Given: Agent GW 1’s MCP surface A has a Caller Context element (API Key (secret store)) and a Policy element that denies when authentication fails.
When: A request is sent without the API key header.
Then:
- Caller Context records the credential as missing (
input.source_auth.method == "failed"). - The Policy element denies the request; the caller receives
403.
Validate:
- Remove the API key header from the test request.
- Send the request through Agent GW 1 directly, or through Agent GW 2 routing to Surface A.
- Confirm the response is
403. - Confirm Agent GW 1’s logs show the Policy denial.
If Surface A has Caller Context but no Policy element, this test fails: the request still reaches the backend with no credential asserted. See Troubleshooting.
Scenario 4: Valid source authentication
Given: Agent GW 1’s MCP surface A has a Caller Context element (API Key (secret store)) and a Policy element, as in Scenario 3.
When: A request is sent with a valid API key.
Then:
- Caller Context records
input.source_auth.method == "api_key"; the Policy element allows the request. - The request is processed successfully.
Validate:
- Send a request with the correct header, for example
X-API-Key: keyA(or your configured header name). - Confirm a success response.
- Confirm Agent GW 1’s logs show the allowed Policy decision.
Scenario 5: Cross-gateway request with valid API key
Given:
- Agent GW 1’s MCP surface A requires
keyA(Caller Context and Policy, as in Scenario 3). - Agent GW 2’s MCP surface B has no Caller Context of its own; it is only the caller here.
When: A client sends a request to Agent GW 2’s MCP surface B with the correct key, and Agent GW 2 forwards it to Agent GW 1.
Then:
- The request succeeds end to end.
Validate:
- Send a request to MCP surface B including the configured header and value (
keyA), either set directly by the calling client or injected by Target Authentication (see Scenario 7). - Confirm the response is a success.
- Confirm Agent GW 1’s Policy decision is an allow.
Scenario 6: Cross-gateway request without API key
Given:
- Agent GW 1’s MCP surface A requires
keyA(Caller Context and Policy, as in Scenario 3). - Agent GW 2’s MCP surface B has no Caller Context of its own.
When: Agent GW 2 sends a request without an API key.
Then:
- The Policy element on Agent GW 1 denies the request.
Validate:
- Send a request to MCP surface B with no API key.
- Confirm a non-success status.
- Confirm Agent GW 1’s logs show a Policy denial with
input.source_auth.method == "failed".
Scenario 7: Target Authentication configuration
Given:
- Agent GW 1’s MCP surface A requires API key
keyA(Caller Context and Policy, as in Scenario 3). - Agent GW 2’s MCP surface B Managed Agent node has Target Authentication configured: Authentication Type API Key, Header Name matching Surface A’s HTTP Header Name, Secret holding
keyA.
When: A client sends a request to MCP surface B without setting any API key header itself.
Then:
- Agent GW 2 injects the header automatically before forwarding.
- The request succeeds without the client manually adding an API key on every call.
Validate:
- Confirm Target Authentication is configured on Surface B’s Managed Agent node with the matching secret.
- Send a request to MCP surface B with no API key header set by the client.
- Confirm a success response.
- Confirm Agent GW 1’s Policy decision is an allow.
Scenario 8: Incorrect authentication configuration
Given:
- Agent GW 1’s MCP surface A requires API key
keyA(Caller Context and Policy, as in Scenario 3). - Agent GW 2’s MCP surface B Target Authentication is misconfigured (wrong Header Name, wrong Secret, or an Authentication Type Surface A does not expect).
When: A request is sent.
Then:
- The response is
403, because the Policy element on Surface A denies the mismatched credential.
Validate:
- Misconfigure one field intentionally on Surface B’s Target Authentication (wrong Header Name, wrong Secret, or wrong Authentication Type).
- Send the request.
- Confirm the response is
403. - Confirm Agent GW 1’s logs identify the mismatch as a Policy denial with
input.source_auth.method == "failed".
This test only produces a 403 because Surface A has a Policy element. If Surface A has Caller Context without a Policy element, an incorrect key still reaches the backend with no error.
Confirm
Test 1: cross-gateway request without a valid key returns 403
From Scenario 3 or Scenario 6, Agent GW 1’s Policy element should have denied the request when the API key header was absent. Confirm Agent GW 1’s logs show a Policy denial for that request, with input.source_auth.method equal to failed.
Test 2: cross-gateway request with a valid key succeeds end-to-end
From Scenario 4 or Scenario 5, the request with the correct API key header should have succeeded. Confirm that Agent GW 2, Agent GW 1, and the MCP backend all show the request reaching the backend.
Test 3: Target Authentication injection is visible in backend logs
From Scenario 1 or Scenario 7, the MCP backend logs should include the expected header and its value. If the header is absent, Target Authentication is not configured on the correct hop’s Managed Agent node.
Logging and observability
Before running the scenarios, confirm a successful request produces one log trail on Agent GW 2 (outbound) and Agent GW 1 (inbound/forward), and that the MCP backend logs include request receipt. Configuration changes made in the surface builder apply immediately through hot reload after you save, so you can move straight from a save action to a test request.
Use logs from three places for every test:
- Agent GW 2 logs: request accepted, routing decision to the gateway connection, outbound attempt, and any Target Authentication header injection.
- Agent GW 1 logs: Caller Context validation result, Policy decision, inbound handling, forward decision.
- MCP backend logs: request arrival and expected injected header behaviour.
Best practices:
- Keep a consistent correlation key in request payload/metadata for traceability.
- Validate both status code and log trail before marking a test as passed.
- Store auth-related logs in your runbook evidence for operational audits.
Troubleshooting
| Symptom | Likely cause | Fix |
|---|---|---|
| Request from B to A fails with a 403 unexpectedly | HTTP Header Name or Secret ID on Surface A’s Caller Context does not match what Surface B sends | Confirm the HTTP Header Name and Secret ID configured on Surface A’s Caller Context match the Header Name and Secret configured in Surface B’s Target Authentication, then resend. |
Request succeeds with 200 even though the API key is missing or wrong | Surface A has a Caller Context element but no Policy element denying input.source_auth.method == "failed" | Add a Policy element on the same edge as Caller Context with a rule that denies when authentication fails, as shown in Configure Agent GW 1’s MCP surface A. |
| Request fails after enabling Target Authentication | Secret mismatched, or the wrong Header Name/Authentication Type is set on Surface B’s Managed Agent node | Re-check the Secret and Header Name in Surface B’s Target Authentication editor. |
| No logs in backend | Routing not pointing to the intended target endpoint | Re-check Surface A’s Managed Agent Target Endpoint URL, and Surface B’s Gateway / Agent Surface on Gateway selection. |
| Intermittent pass/fail in tests | Mixed test inputs and stale browser/session state | Use explicit test payloads and rerun with clean request inputs. |
Implementation notes from field experience
- Start with one strict, Policy-enforced boundary first (Caller Context and Policy on Agent GW 1), then layer Target Authentication injection on Agent GW 2.
- Use one canonical API key per scenario set during initial testing to reduce false negatives.
- Keep the HTTP Header Name explicit and documented across teams. Most cross-company failures come from a header name or secret mismatch, not routing.
- A Caller Context element without a Policy element is the most common false negative: the scenario looks like it passed because nothing crashed, but the key was never actually enforced.
- Validate with logs at every hop, not just response status.
Next steps
- Connect two gateways: review the connection setup if any gateway-level failures were encountered during scenario testing.
- Apply OPA policies to your gateway and surfaces: add further OPA Rego access control rules on top of the Caller Context and Target Authentication you have validated.
Related
- Connect two gateways: create and approve the gateway connection tunnel first.
- OPA policies reference: the full
input.source_authschema and the Policy element’s fields. - Secrets: store the credentials used by Caller Context and Target Authentication.
- Observability: understand how to monitor runtime request and auth behaviour.
Glad to hear it! Please tell us how we can improve more.
Sorry to hear that. Please tell us how we can improve.
Thank you for sharing your feedback so we can improve your experience.