Connect two gateways
By the end of this guide, two Agent Gateway instances will have an active DIDComm tunnel between them. Surfaces on either gateway can then forward requests to the other using the via Gateway Connection routing mode.
A gateway connection creates an encrypted DIDComm channel that identifies each gateway by its DID and routes inter-gateway traffic through a mediator. For background on the connection model and fabric:// routing, see Gateways.
Without a connection, surfaces can only route requests to directly reachable URLs. You cannot forward traffic to a surface on a separate gateway instance unless a DIDComm tunnel is established and approved by both sides.
Use this guide when:
- You need surfaces on two separate gateway instances to exchange requests.
- You are building a multi-organisation workflow where each participant runs their own gateway.
Prerequisites
- You have access to the dashboard on both the initiating gateway and the receiving gateway.
- Both gateways are running and their dashboards are accessible.
- A DIDComm v2.1 mediator is deployed and reachable at a public URL for each gateway. The gateway resolves the mediator’s DID document during Part 1 and must be able to reach the mediator’s authentication endpoint over the network.
- The mediator deployed for each gateway is on version 0.17.x or later. Gateway-to-gateway federation does not work with an older mediator version.
Steps
Add a mediator
Every connection point requires a DIDComm v2.1 mediator. Perform the following steps on both gateways before continuing to Part 2.
In the dashboard sidebar, select Connections, then open the Mediators tab.
Select Add Mediator. A four-step wizard opens.
On the Enter DID step, enter the mediator’s DID in the Mediator DID field, for example
did:web:mediator.example.com. Select Next.The Resolve step fetches and validates the mediator’s DID document, then checks that the authentication endpoint is reachable. Review the resolved service endpoints. When resolution succeeds, select Next.
On the Configure step, enter a Mediator Name (required) and an optional Description. Select Create Mediator.
The Complete step confirms the mediator was added successfully. Select Back to Mediators to return to the Mediators tab.
If the Resolve step completes but the authentication check fails, the gateway cannot reach the mediator’s authentication endpoint. Confirm that the gateway has network access to the endpoint URL shown in the service endpoints list.
Repeat steps 1 to 6 on the second gateway, then continue to Part 2.
Create a connection point (initiating gateway)
On the initiating gateway’s dashboard, select Connections in the sidebar, then open the Gateways tab.
Select Create Connection Point. A four-step wizard opens.
On the Select Mediator step, choose a mediator from the list. Only mediators registered in Part 1 appear here. Select Next.
On the Enter Details step, fill in the fields.
Field Required Description Gateway Yes Select the self gateway. Auto-selected if only one self gateway exists. Connection Point Name Yes A descriptive label, for example Link to partner gateway.Description No An optional note on this connection point’s purpose. DID Method No The DID method for this connection point’s identity. Options: Web (did:web),WebVH (did:webvh),Peer (did:peer). Defaults toWeb (did:web).Connection Secret Yes A pre-shared secret the receiving gateway must supply. Auto-generated as a UUID. You can replace it or regenerate it using the refresh button. Expiry Date & Time Yes When the invitation expires. Defaults to 24 hours from now. Select Next.
On the Integrations step, optionally choose an integration from the Select Integration (optional) dropdown to receive alerts when the connection point is used. Select Create. This creates the connection point directly; there is no separate skip-forward step.
On the Complete step, the wizard displays two values.
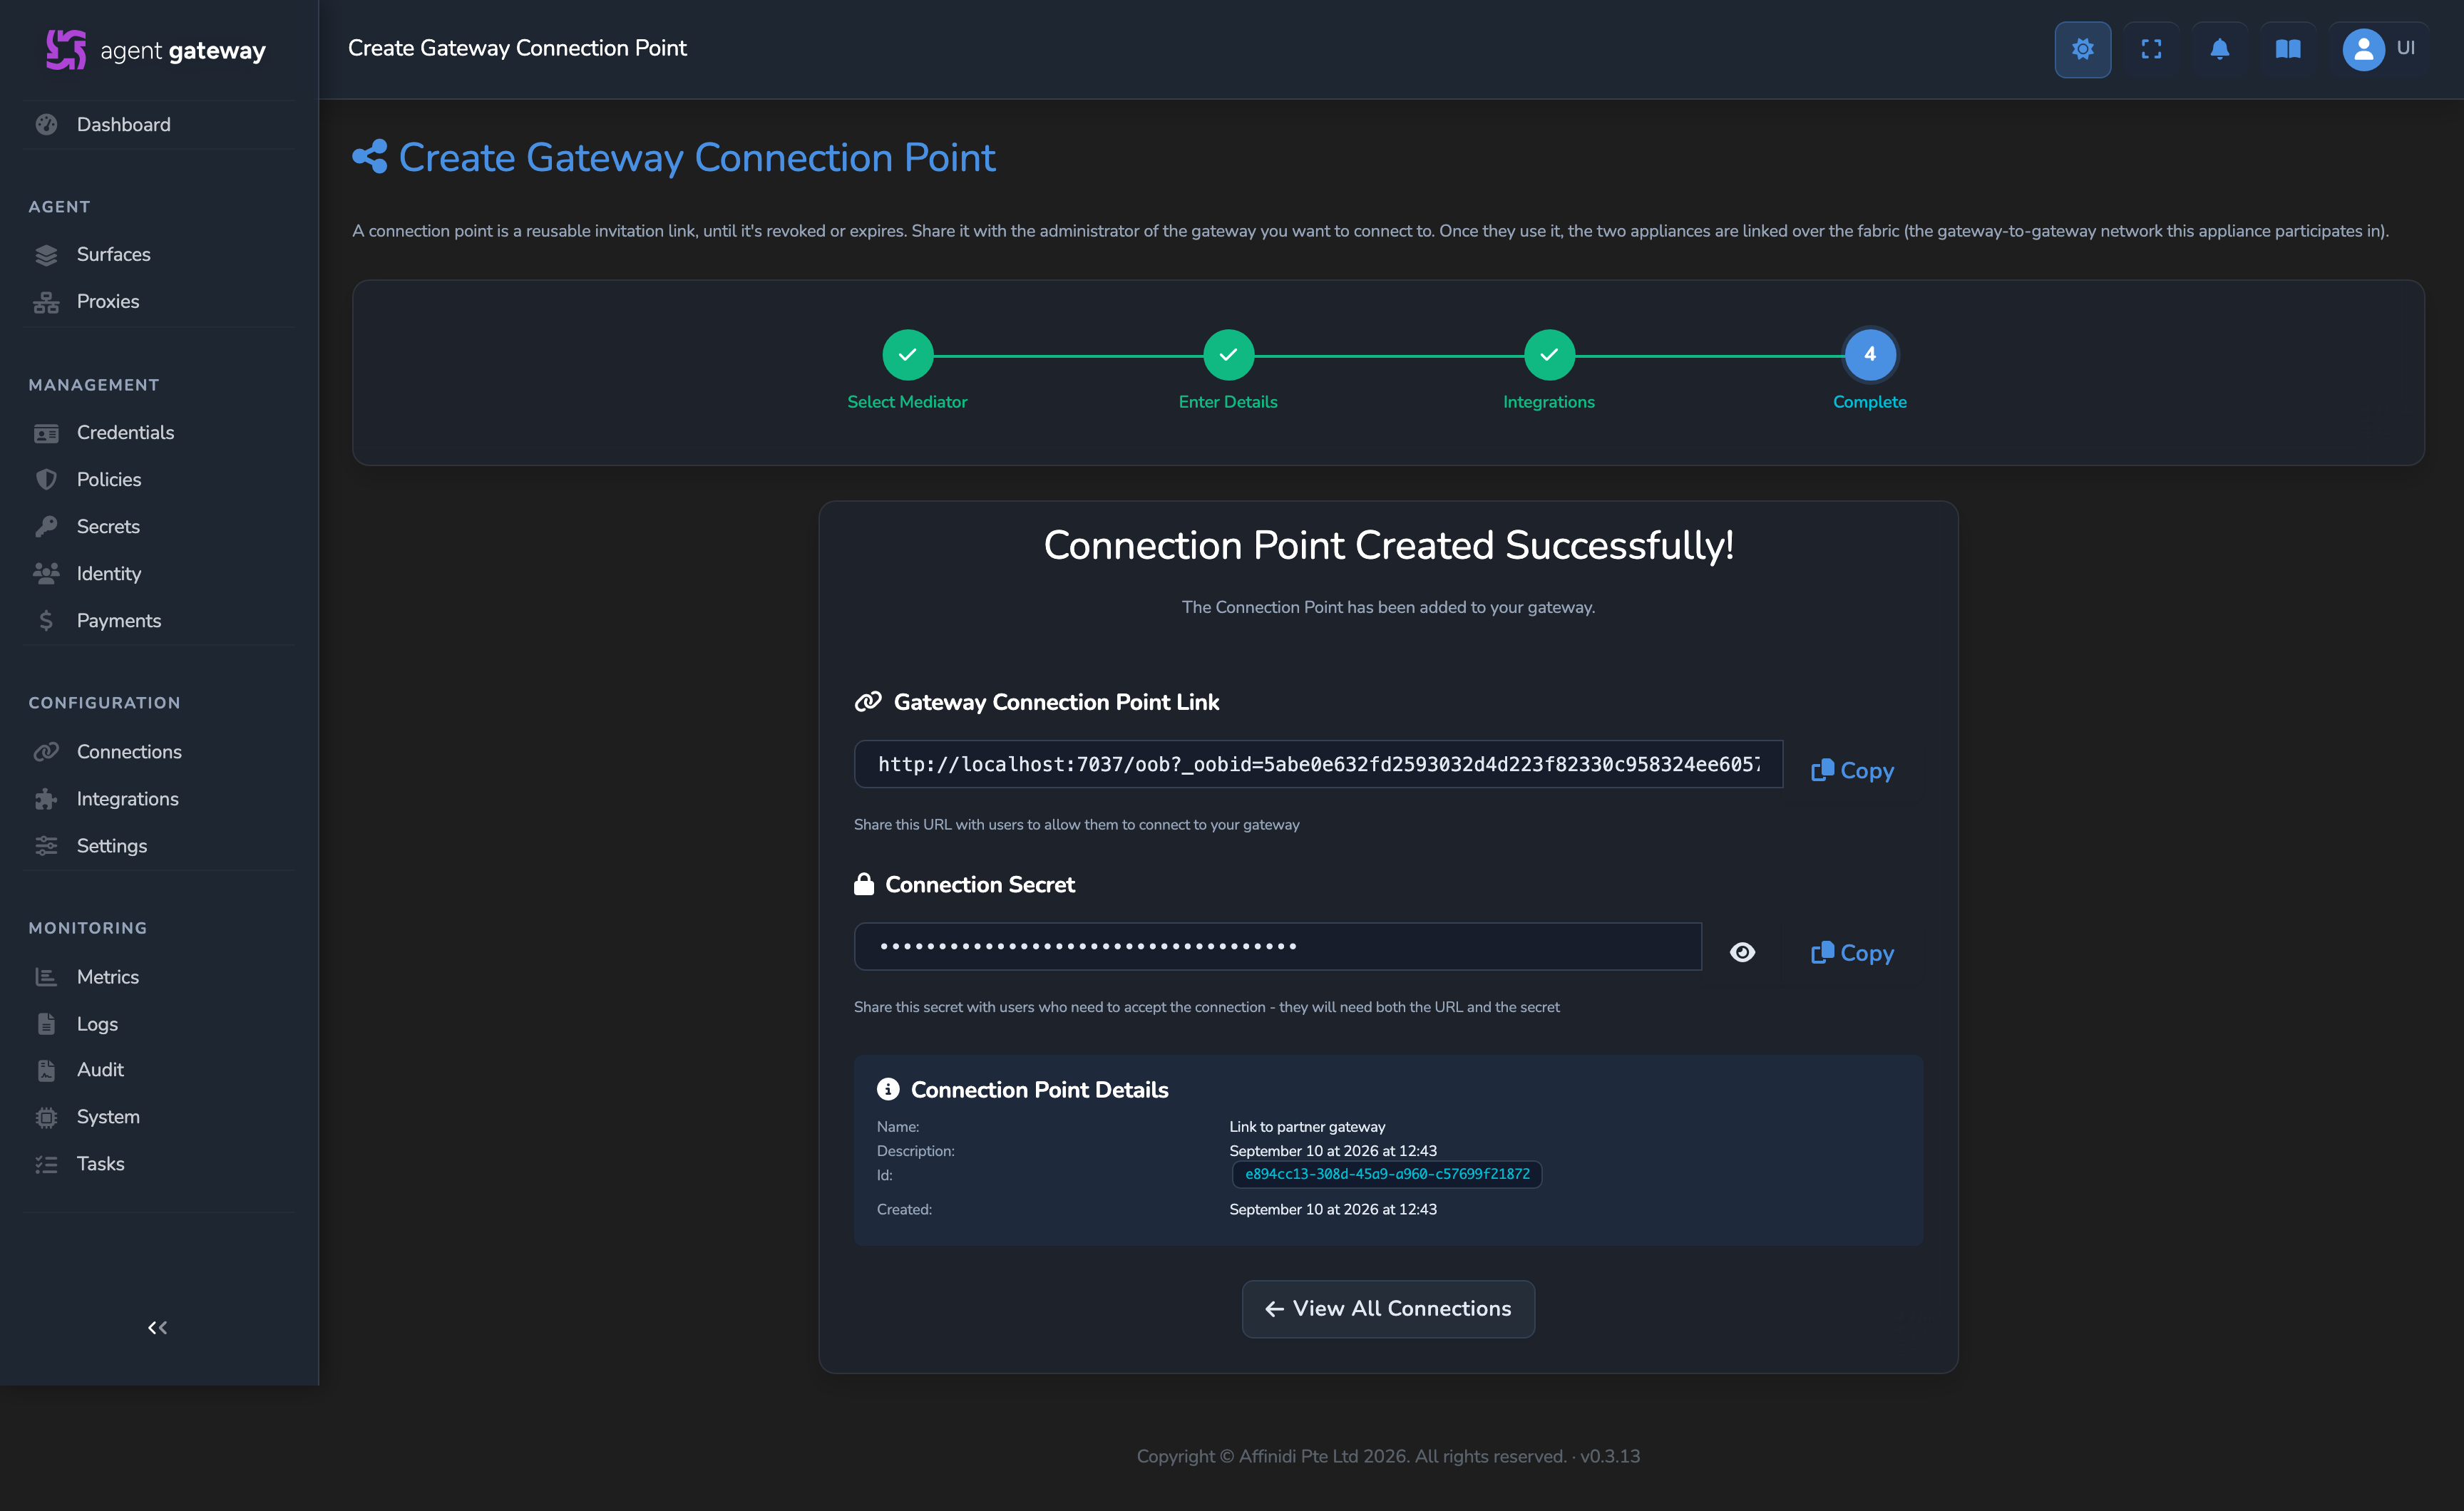
Copy both values before leaving this screen. Share them with the receiving gateway operator through a secure channel. Anyone who holds both values can establish a connection to your gateway.
| Value | Description |
|---|---|
| Gateway Connection Point Link | The OOB invitation URL. Paste this into the receiving gateway. |
| Connection Secret | The pre-shared secret set in step 4. The receiving gateway operator must enter this value when importing the invitation. |
Select View All Connections to return to the Gateways tab.
Connect to the initiating gateway (receiving gateway)
On the receiving gateway’s dashboard, select Connections in the sidebar, then open the Gateways tab.
Select Add Gateway. A four-step wizard opens.
On the Enter Details step, fill in the fields.
Field Required Description Gateway Name Yes A local label for the remote gateway, for example Partner gateway.Description No An optional note about this connection. DID Method No The DID method for the receiving gateway’s connection identity. Options: Web (did:web),WebVH (did:webvh),Peer (did:peer). Defaults toWeb (did:web).Select Next.
On the Enter Connection Point Link step, enter the values provided by the initiating gateway operator.
Field Description Connection Point Link Paste the Gateway Connection Point Link from Part 2. Connection Secret Enter the Connection Secret from Part 2. Select Next.
The Connect step initiates the DIDComm handshake automatically. The wizard advances to the Complete step when the connection succeeds.
On the Complete step, the remote gateway record is created with status PENDING on the receiving gateway. Select Back to Connections to return to the Gateways tab.
Approve the connection (initiating gateway)
After the receiving gateway connects, the initiating gateway creates a gateway record in the AWAITING APPROVAL state.
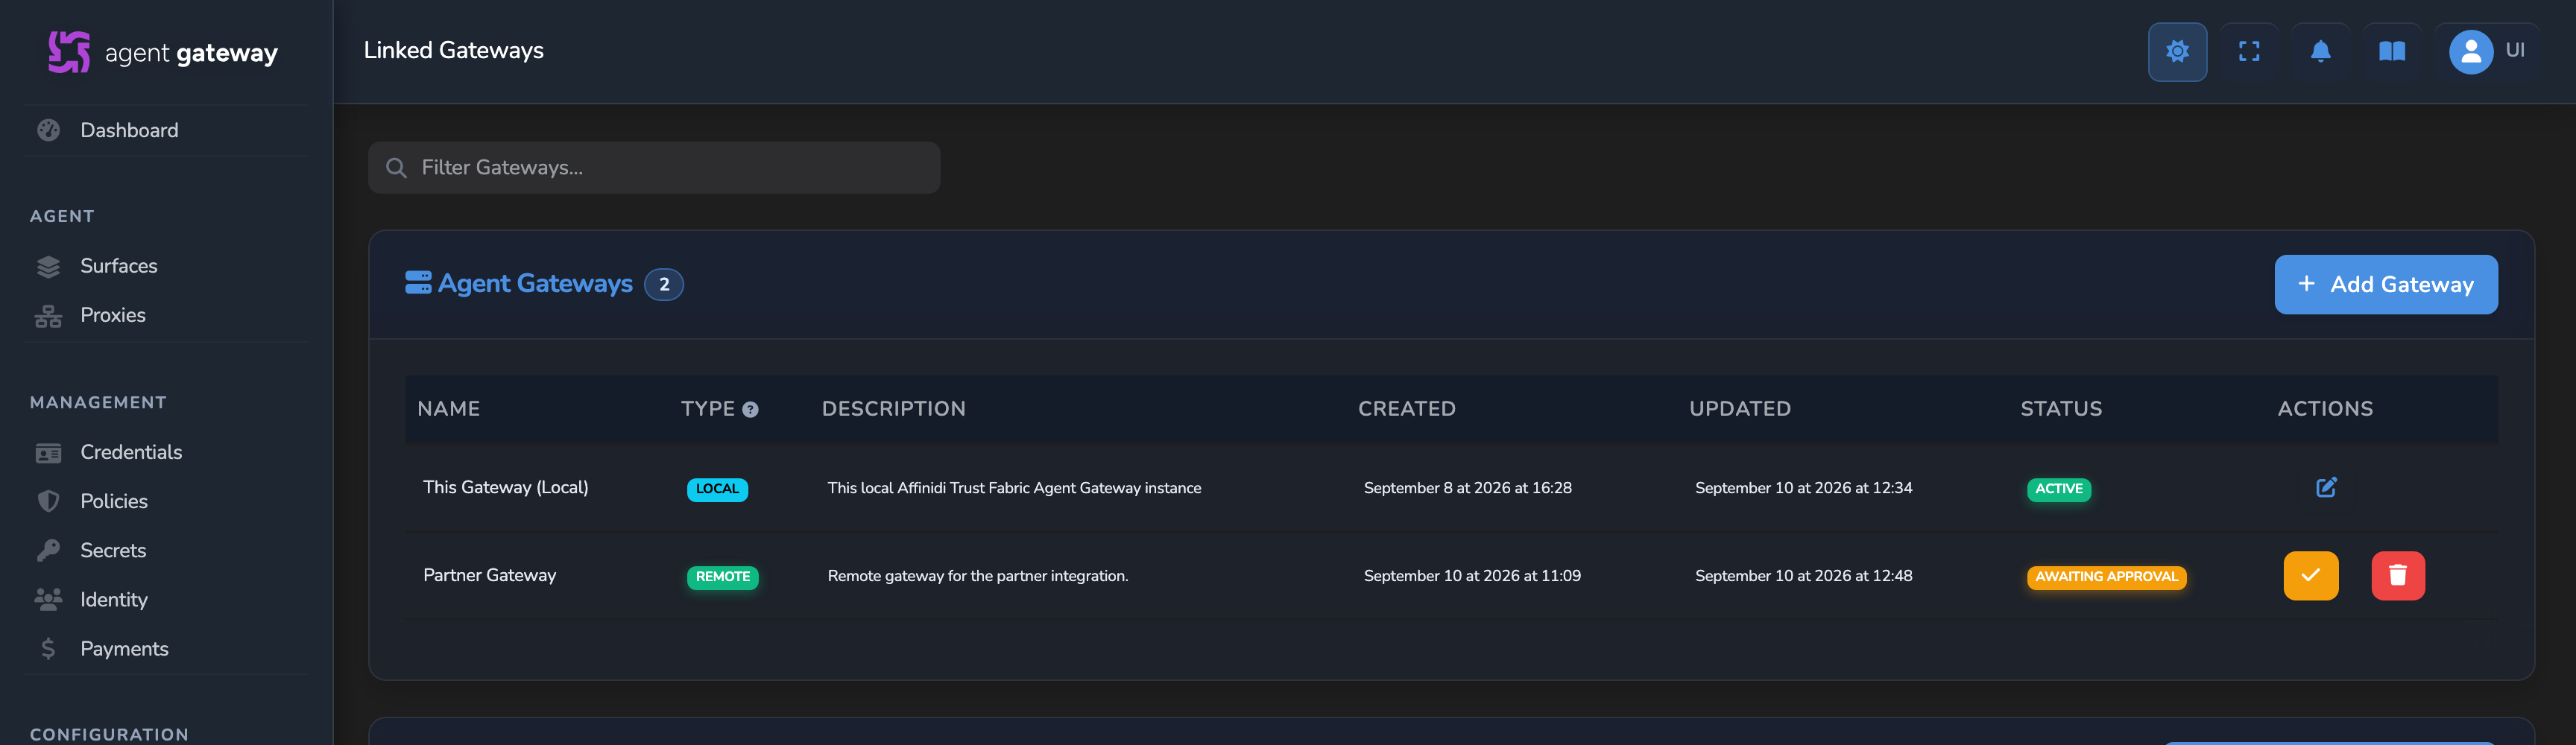
On the initiating gateway’s dashboard, select Connections in the sidebar, then open the Gateways tab.
In the Agent Gateways table, find the gateway record showing the AWAITING APPROVAL status badge. In the Actions column, select the yellow check-mark icon button. It has no visible text label; hovering over it shows the tooltip “Approve Gateway Connection”. A three-step wizard opens.
On the Enter Details step, review or edit the remote gateway’s Gateway Name and Description. Select Next.
On the Approve step, review the remote gateway’s DID shown on screen. Select Approve Connection.
On the Complete step, the connection is active on both gateways. Select Back to Connections to return to the Gateways tab.
Confirm
Test 1: receiving gateway appears in routing dropdown
- On the initiating gateway, open any surface and select the Managed Agent element on the canvas.
- In the configuration panel, set Endpoint Type to via Gateway Connection.
- Open the Gateway dropdown.
Expected: the receiving gateway appears in the list.
If the gateway does not appear, the connection is not yet active. Return to Part 4, step 2 and confirm the approval completed successfully.
Test 2: connection status is Active on both gateways
On both the initiating and receiving gateways, open Connections → Gateways and locate the remote gateway record.
Expected: the Status column shows ACTIVE on both sides.
Edit a connection point
After a connection point is established, you can view its metadata and attach notification integrations.
View connection point metadata
- In the dashboard sidebar, select Connections, then open the Gateways tab.
- In the Connection Points table, select the connection point record.
- Open the Metadata tab.
The Metadata tab shows:
| Field | Description |
|---|---|
| Connection Point ID | Unique identifier for this connection point. |
| Expires | When the connection point expires. Shown only if an expiry is set. The date is shown in red and bold once the connection point has expired. |
A separate Mediator Information section on the same tab shows the mediator’s live status and service count as badges, plus its Mediator Name, Description, and DID as read-only fields.
Attach notification integrations to connection events
- Select the connection point, then open the Integrations tab.
- Choose an integration from the Select Integration (optional) dropdown to add it to this connection point.
- Select Save.
To configure the integrations themselves, see Set up event notifications.
Troubleshooting
| Symptom | Likely cause | Fix |
|---|---|---|
| The Resolve step fails with a DID resolution error. | The mediator’s DID is unreachable or the DID document is malformed. | Confirm the DID is correct and that the mediator is running with its DID document accessible at the expected URL. |
| The Resolve step succeeds but the authentication check fails. | The gateway cannot reach the mediator’s authentication endpoint. | Confirm the gateway has network access to the endpoint URL shown in the resolved service endpoints. |
| No mediators appear on the Select Mediator step. | No mediators have been added to this gateway. | Return to Part 1 and add a mediator before creating a connection point. |
| The Connect step fails with an invalid link error. | The connection point link is malformed or the invitation has expired. | Generate a new connection point on the initiating gateway. |
| The Connect step fails with an authentication error. | The Connection Secret does not match. | Confirm the secret was copied correctly. Generate a new connection point if needed. |
| The receiving gateway does not appear in the Gateway dropdown after approval. | The dashboard may be showing a cached list. | Reload the surface editor page. |
| Connection point shows a status other than active after approval. | Network connectivity issue between the two gateways. | Confirm both gateways are running and can reach each other on their configured endpoints. |
Next steps
- Configure GW-to-GW authentication and routing: add source authentication, target authentication, and request validation for cross-gateway traffic.
- Set up event notifications: configure alerts on connection point events.
Related
- Gateways: Conceptual overview of gateway types, DIDs, connection points, the DIDComm tunnel, and the
fabric://scheme. - Gateway reference: Field-level reference for the gateway editor.
- Connection point: Field-level reference for the connection point editor.
- Set up event notifications: Configure event notifications for connection point events.
Glad to hear it! Please tell us how we can improve more.
Sorry to hear that. Please tell us how we can improve.
Thank you for sharing your feedback so we can improve your experience.