AWS Marketplace (self-hosted)
Creating a mediator instance from AWS Marketplace gives you full control over the configuration, scaling, and resource usage of your mediator, allowing you to achieve more scalability and performance based on your requirements.
Once the setup is complete, you will have a fully functional DIDComm Mediator running in your AWS account, ready to handle and route DIDComm messages securely and privately.
1. Prerequisites
- An active AWS account with permissions to create CloudFormation stack, Secrets Manager entries, and ECS resources.
- A Hosted Zone in AWS Route53 for your base domain name to host the mediator instance.
- The DID secrets containing the private key associated with the DID and JWT secret to securely store in AWS Secrets Manager during deployment.
2. Generate DIDs and secrets
This step requires Rust (1.85.0 2024 Edition) to be installed on your machine. If you haven’t installed it yet, please follow the installation guide.
To configure and successfully deploy the DIDComm Mediator from the AWS Marketplace, you have to generate the did:web, along with the corresponding DID and JWT secrets for the mediator instance and the did:peer of the mediator admin user.
Follow the steps below to generate these using our open-sourced mediator project:
- Clone the GitHub repo on your local.
git clone git@github.com:affinidi/affinidi-tdk-rs.git- Navigate to the
crates/affinidi-messagingfolder.
cd affinidi-tdk-rs/crates/affinidi-messaging- Run the
generate_mediator_configscript to generate the DIDs and secrets.
cargo run --bin generate_mediator_config -- --host <HOST_DOMAIN_NAME>Replace
<HOST_DOMAIN_NAME>with the full domain name where you’ll host the mediator instance, e.g.,mediator.goodcompany.com.
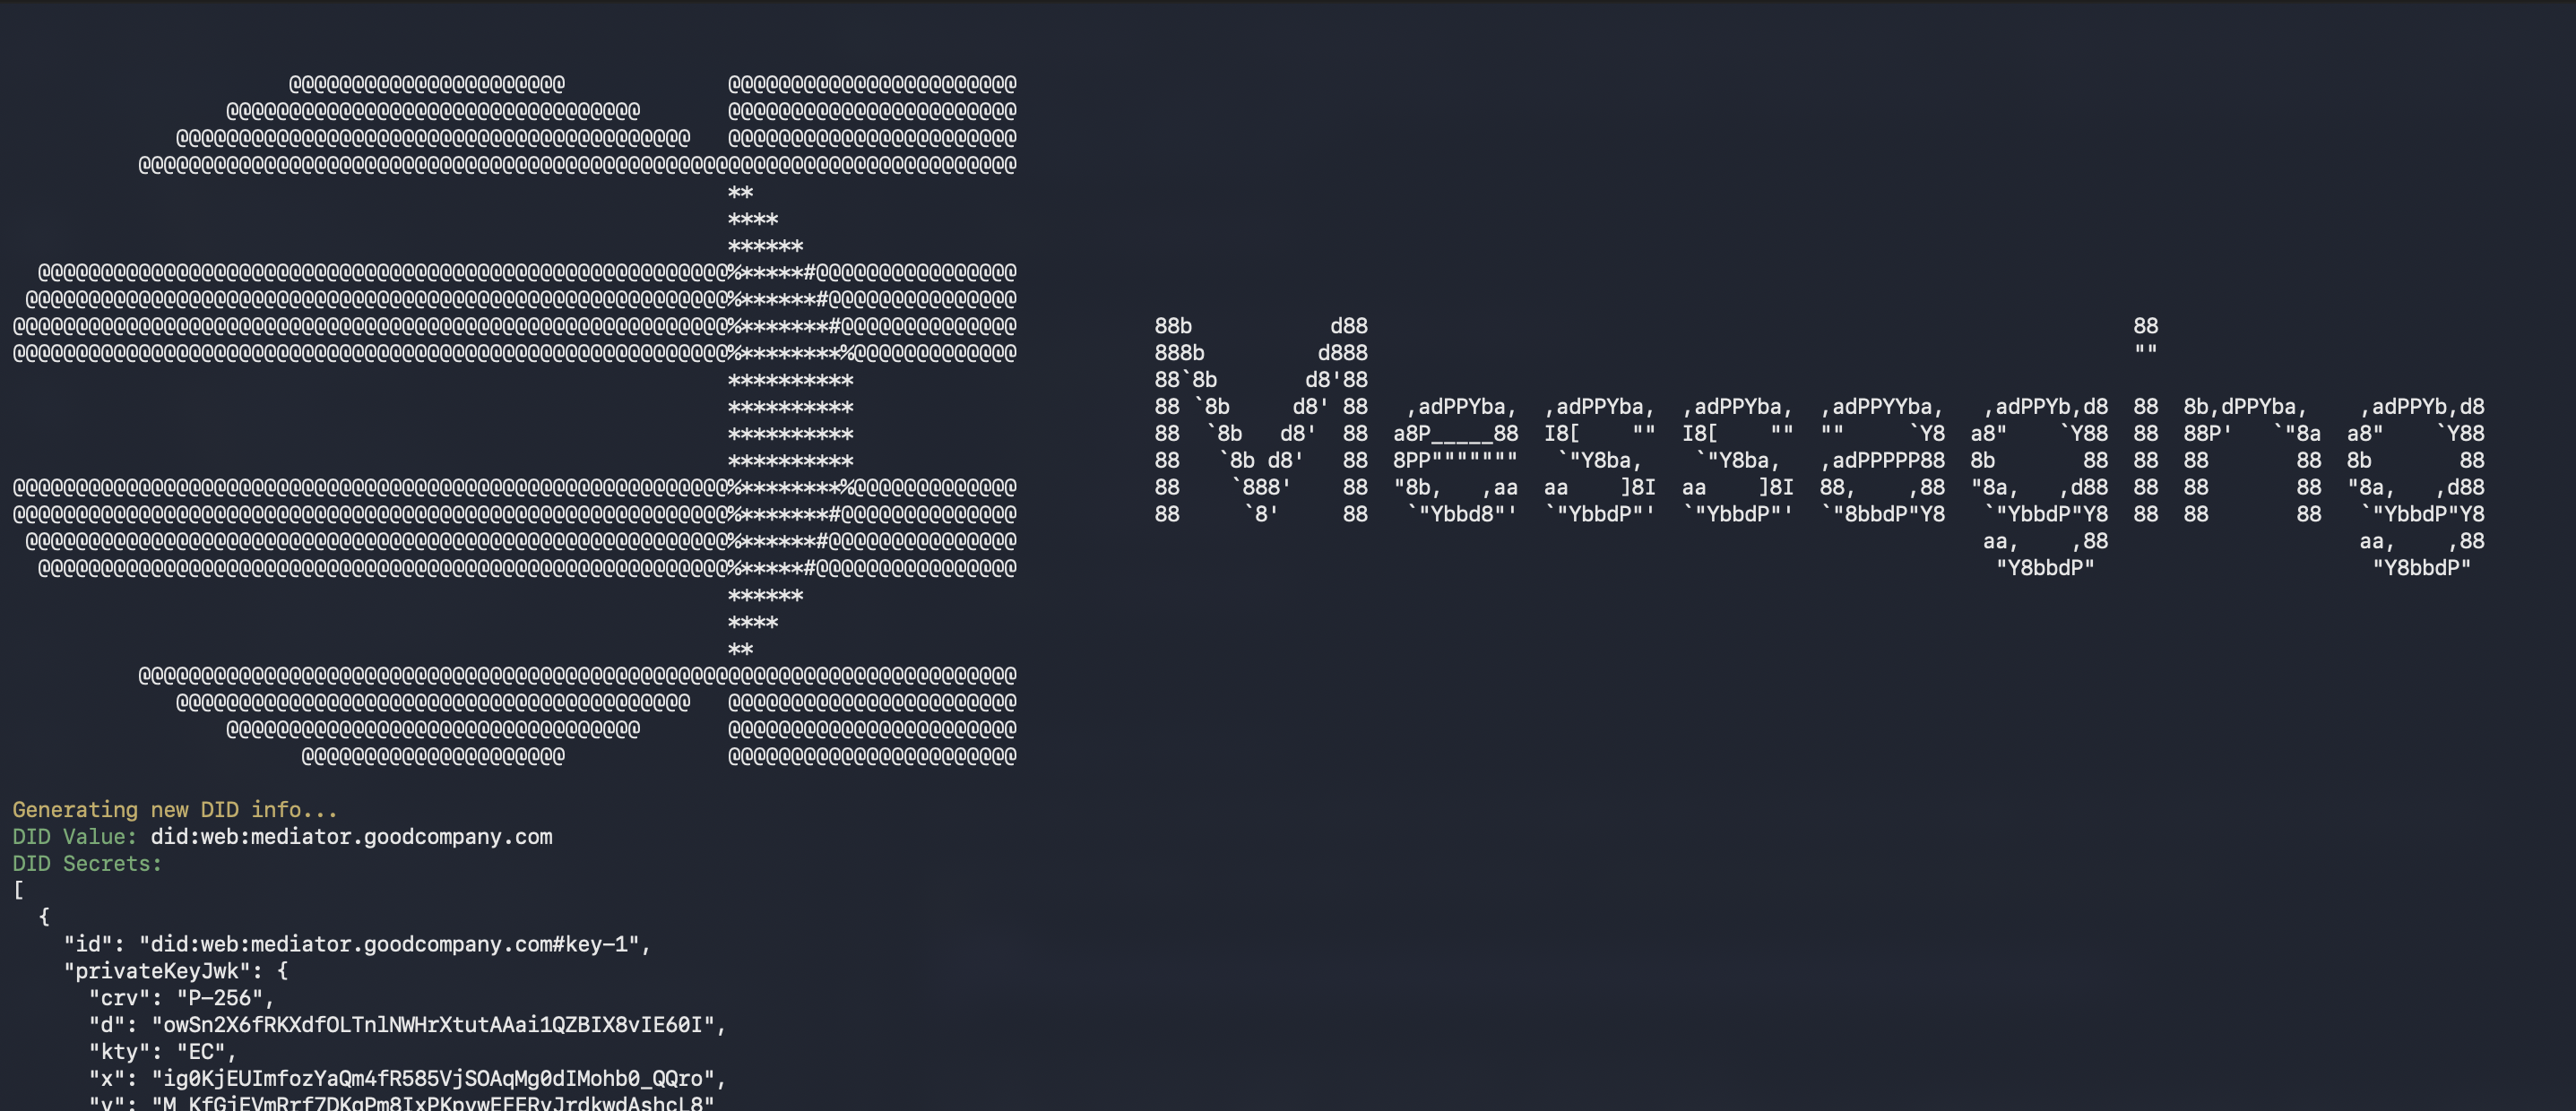
Sample output from generate_mediator_config command
We will need the JSON-encoded DID secret and JWT secret at a later stage of deployment.
3. Launch from Marketplace
To set up and host your own DIDComm Mediator from your AWS account, subscribe to the AWS Marketplace listing of Affinidi:
Go to AWS Marketplace.
Search and click DIDComm Mediator.
Click View Purchase Options to review details.
Click the Launch your software button to initiate the setup.
The AWS Marketplace DIDComm Mediator setup is available for free. The AWS infrastructure costs of running the server apply.
- Select the region in which you want to deploy the DIDComm Mediator server.
Currently available only in the Asia Pacific (Singapore) region. Stay tuned as we expand support for other regions for deployment.
- Click on the Launch with CloudFormation button to configure and create the stack.
4. Set up CloudFormation
On the Create stack page for CloudFormation, you can view the Infrastructure Composer to adjust some settings. We recommend keeping the default values to get started.
Click on the Next button to continue the setup.
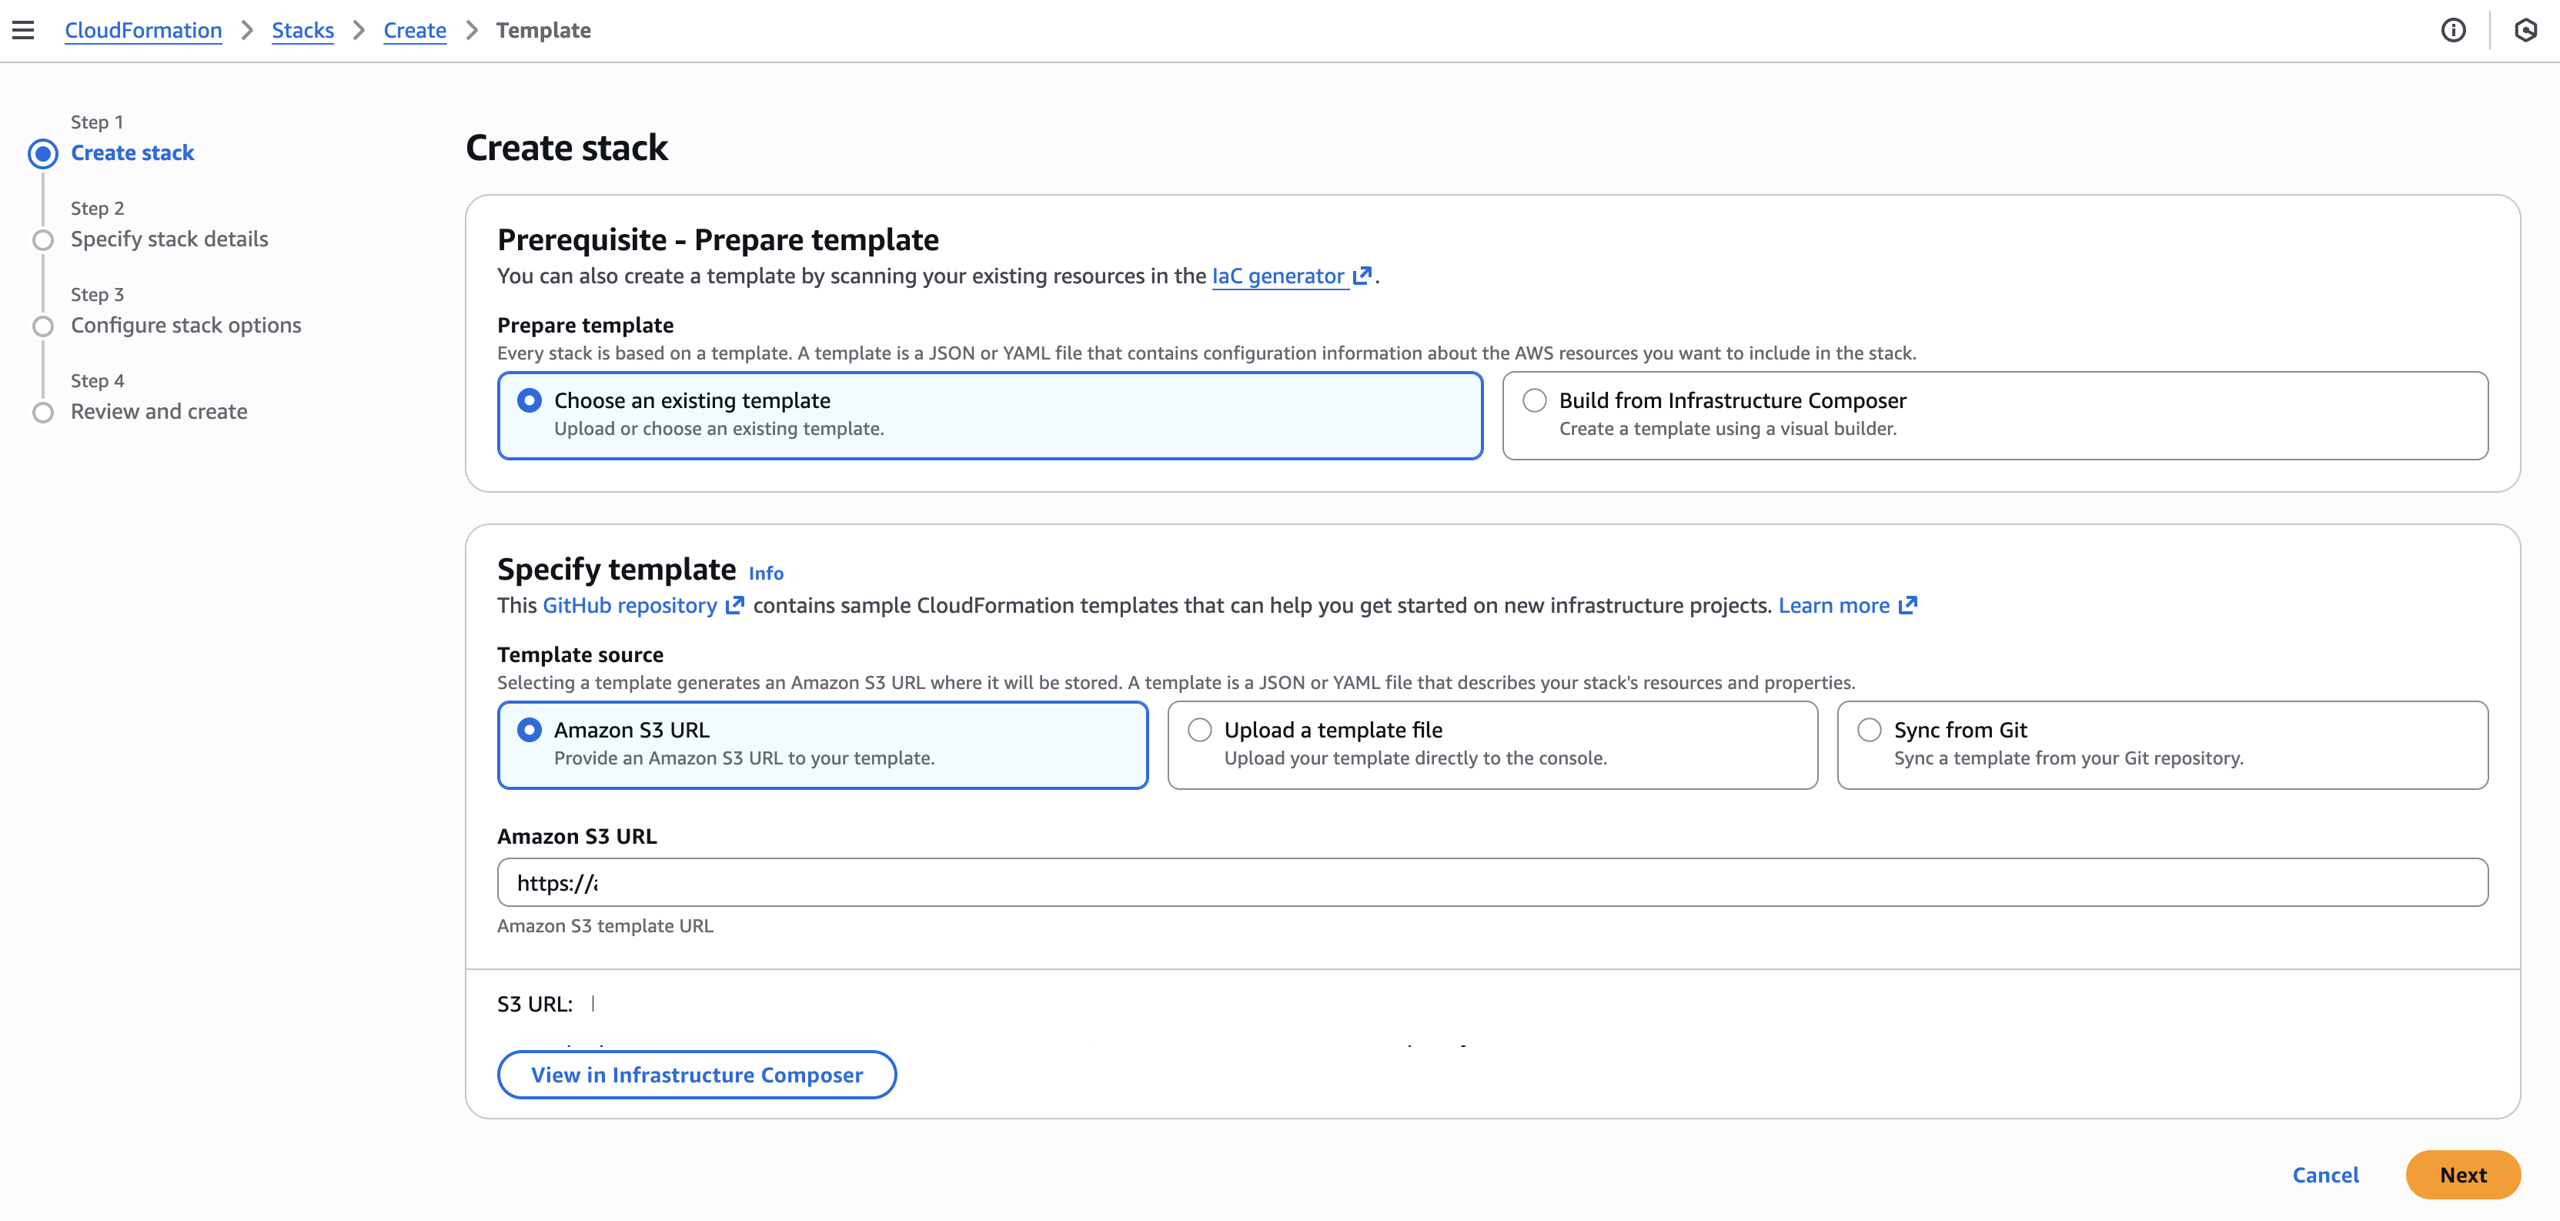
Creating the DIDComm Mediator CloudFormation Stack
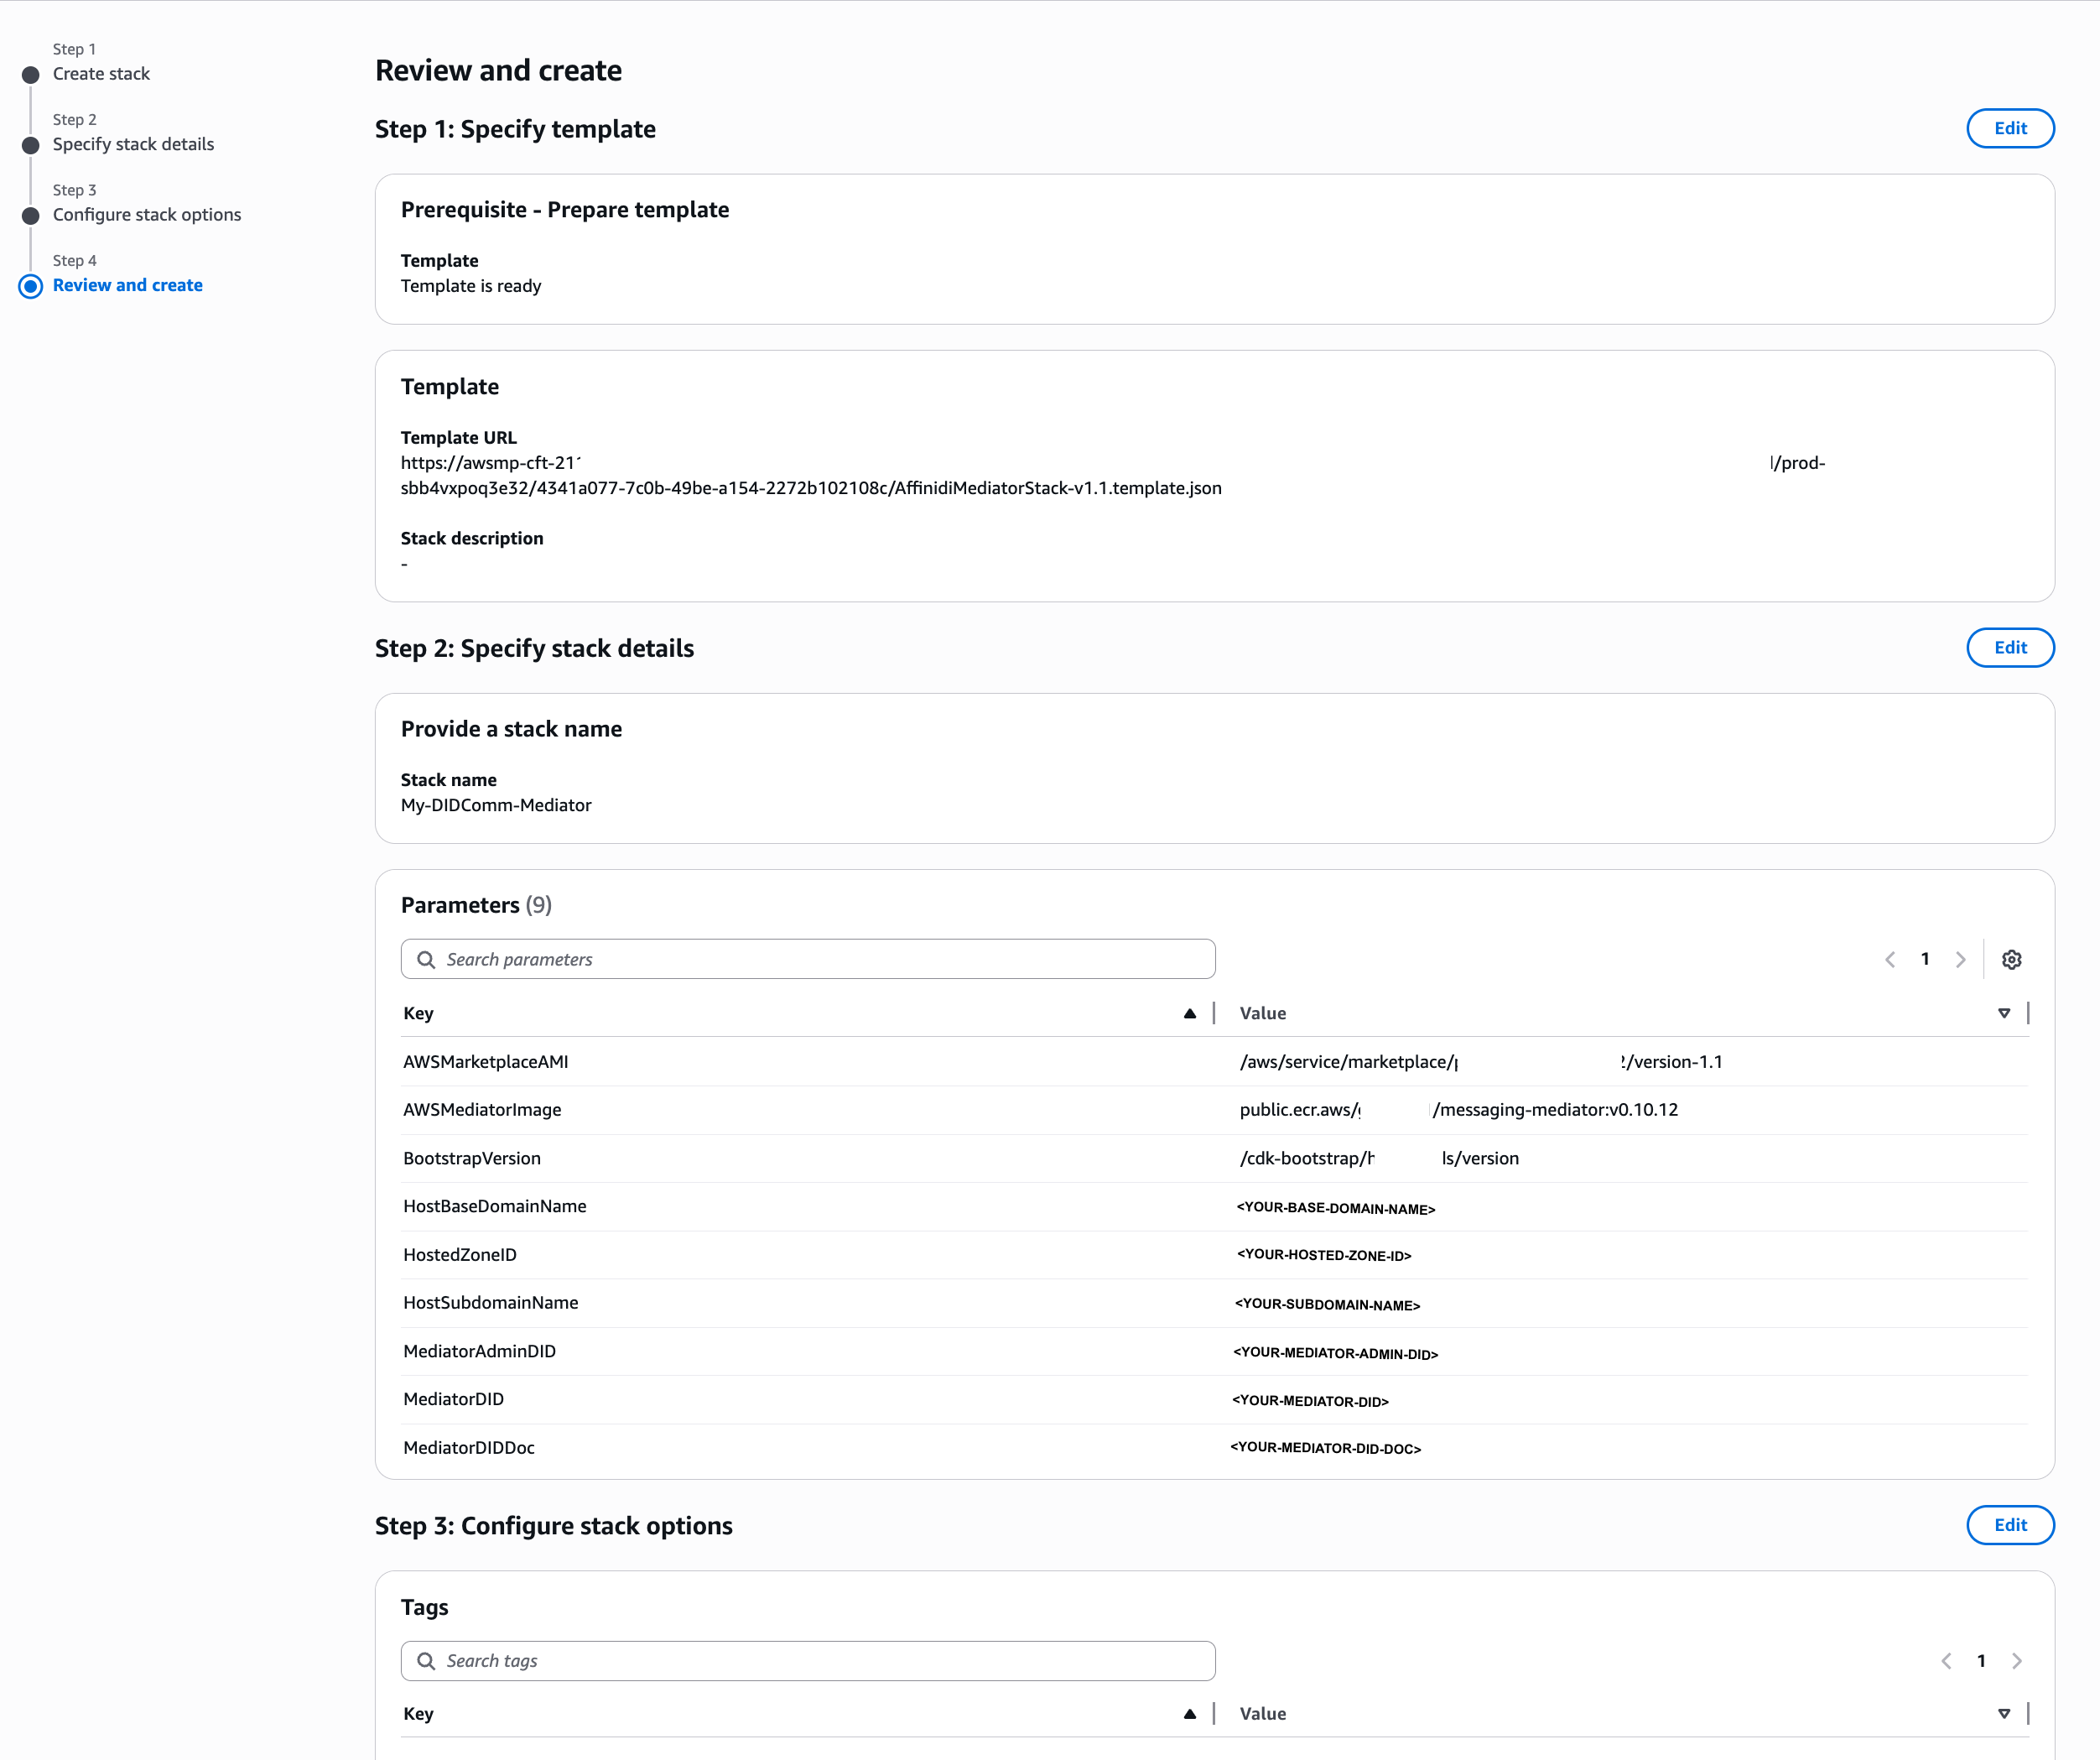
4.1 Specify stack details
In the stack details section, you can specify the stack name to easily identify its purpose. Additionally, set up the required parameters to be configured and create the DIDComm Mediator instance.
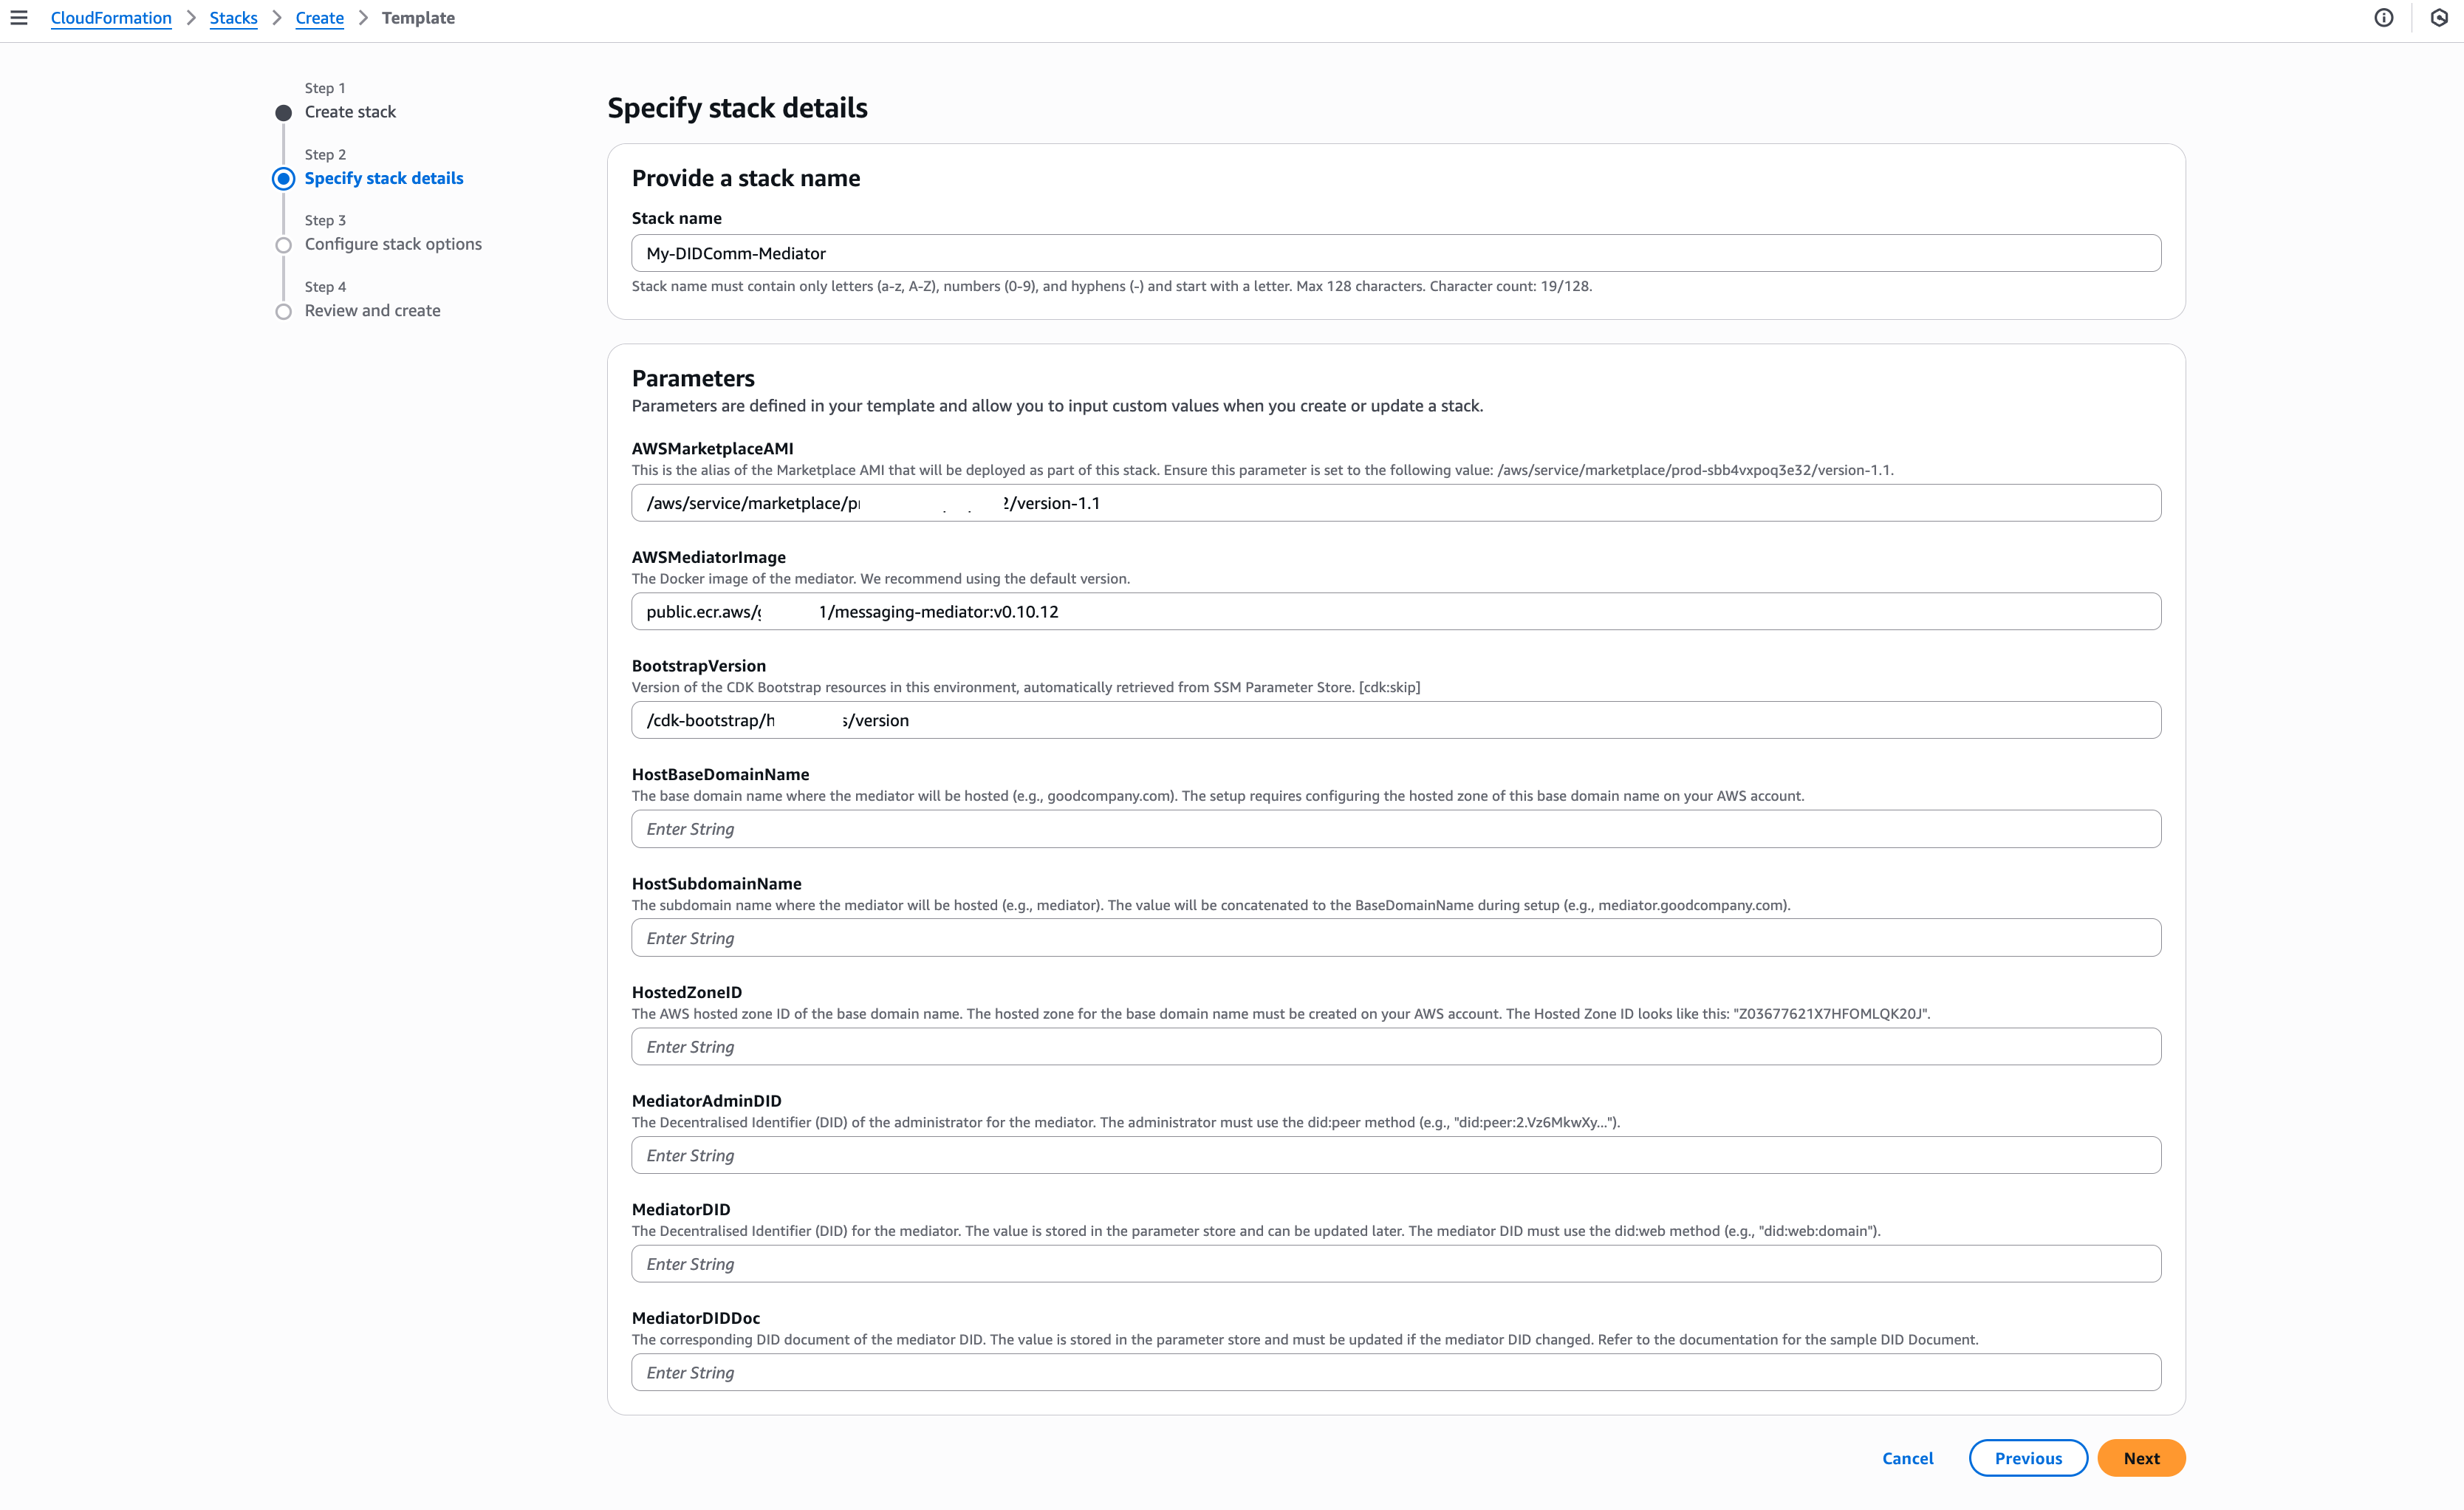
DIDComm Mediator CloudFormation Stack Details
At this stage, you must create a Hosted Zone in AWS for the BaseDomainName you will use to host the DIDComm Mediator server. Refer to this AWS documentation for more details about Hosted Zone setup.
| Field | Description |
|---|---|
| AWSMarketplaceAMI | AWS Marketplace requires the Marketplace AMI. This dummy AMI will not be launched when setting up the mediator. |
| AWSMediatorImage | The Docker image of the mediator. We recommend using the default version. |
| HostBaseDomainName | The base domain name where the mediator will be hosted (e.g., goodcompany.com). The setup requires configuring the hosted zone of this base domain name on your AWS account. |
| HostSubdomainName | The subdomain name where the mediator will be hosted (e.g., mediator). The value will be concatenated to the BaseDomainName during setup (e.g., mediator.goodcompany.com). |
| HostedZoneID | The hosted zone ID of the base domain name. The hosted zone for the base domain name must be created on your AWS account. The Hosted Zone ID looks like this: Z03677621X7HFOMLQK20J. |
| MediatorAdminDID | The Decentralised Identifier (DID) of the administrator for the mediator. The administrator must use the did:peer method (e.g., did:peer:2.Vz6MkwXy...). |
| MediatorDID | The Decentralised Identifier (DID) for the mediator. The value is stored in the parameter store and can be updated later. The mediator DID must use the did:web method (e.g., did:web:mediator.goodcompany.com). |
| MediatorDIDDoc | The corresponding DID document of the mediator DID. The value is stored in the parameter store and must be updated if the mediator DID changed. Refer to the documentation for the sample DID Document. |
Sample mediator DID document
        {
  "@context": [
    "https://www.w3.org/ns/did/v1",
    "https://w3id.org/security/suites/jws-2020/v1"
  ],
  "assertionMethod": [
    "did:web:mediator.goodcompany.com#key-1",
    "did:web:mediator.goodcompany.com#key-2"
  ],
  "authentication": [
    .....
  ],
  "id": "did:web:mediator.goodcompany.com",
  "keyAgreement": [
    .....
  ],
  "service": [
    {
      "id": "did:web:mediator.goodcompany.com#service",
      "serviceEndpoint": [
        {
          "accept": [
            "didcomm/v2"
          ],
          "routingKeys": [],
          "uri": "https://mediator.goodcompany.com"
        },
        {
          "accept": [
            "didcomm/v2"
          ],
          "routingKeys": [],
          "uri": "wss://mediator.goodcompany.com/ws"
        }
      ],
      "type": "DIDCommMessaging"
    },
    {
      "id": "did:web:mediator.goodcompany.com#auth",
      "serviceEndpoint": "https://mediator.goodcompany.com/authenticate",
      "type": "Authentication"
    }
  ],
  "verificationMethod": [
    {
      "controller": "did:web:mediator.goodcompany.com",
      "id": "did:web:mediator.goodcompany.com#key-1",
      "publicKeyJwk": {
        "crv": "P-256",
        "kty": "EC",
        "x": "t_urdyvDKJLgYxJMrV6u0...",
        "y": "DWciV1aBxqHXH2jW..."
      },
      "type": "JsonWebKey2020"
    },
    .....
  ]
}
4.2 Select IAM role & deploy
After setting up the required parameters, click the Next button to finalise the CloudFormation template. On this page, you must select the CDK IAM Role that can be used by the CloudFormation to create the stack.
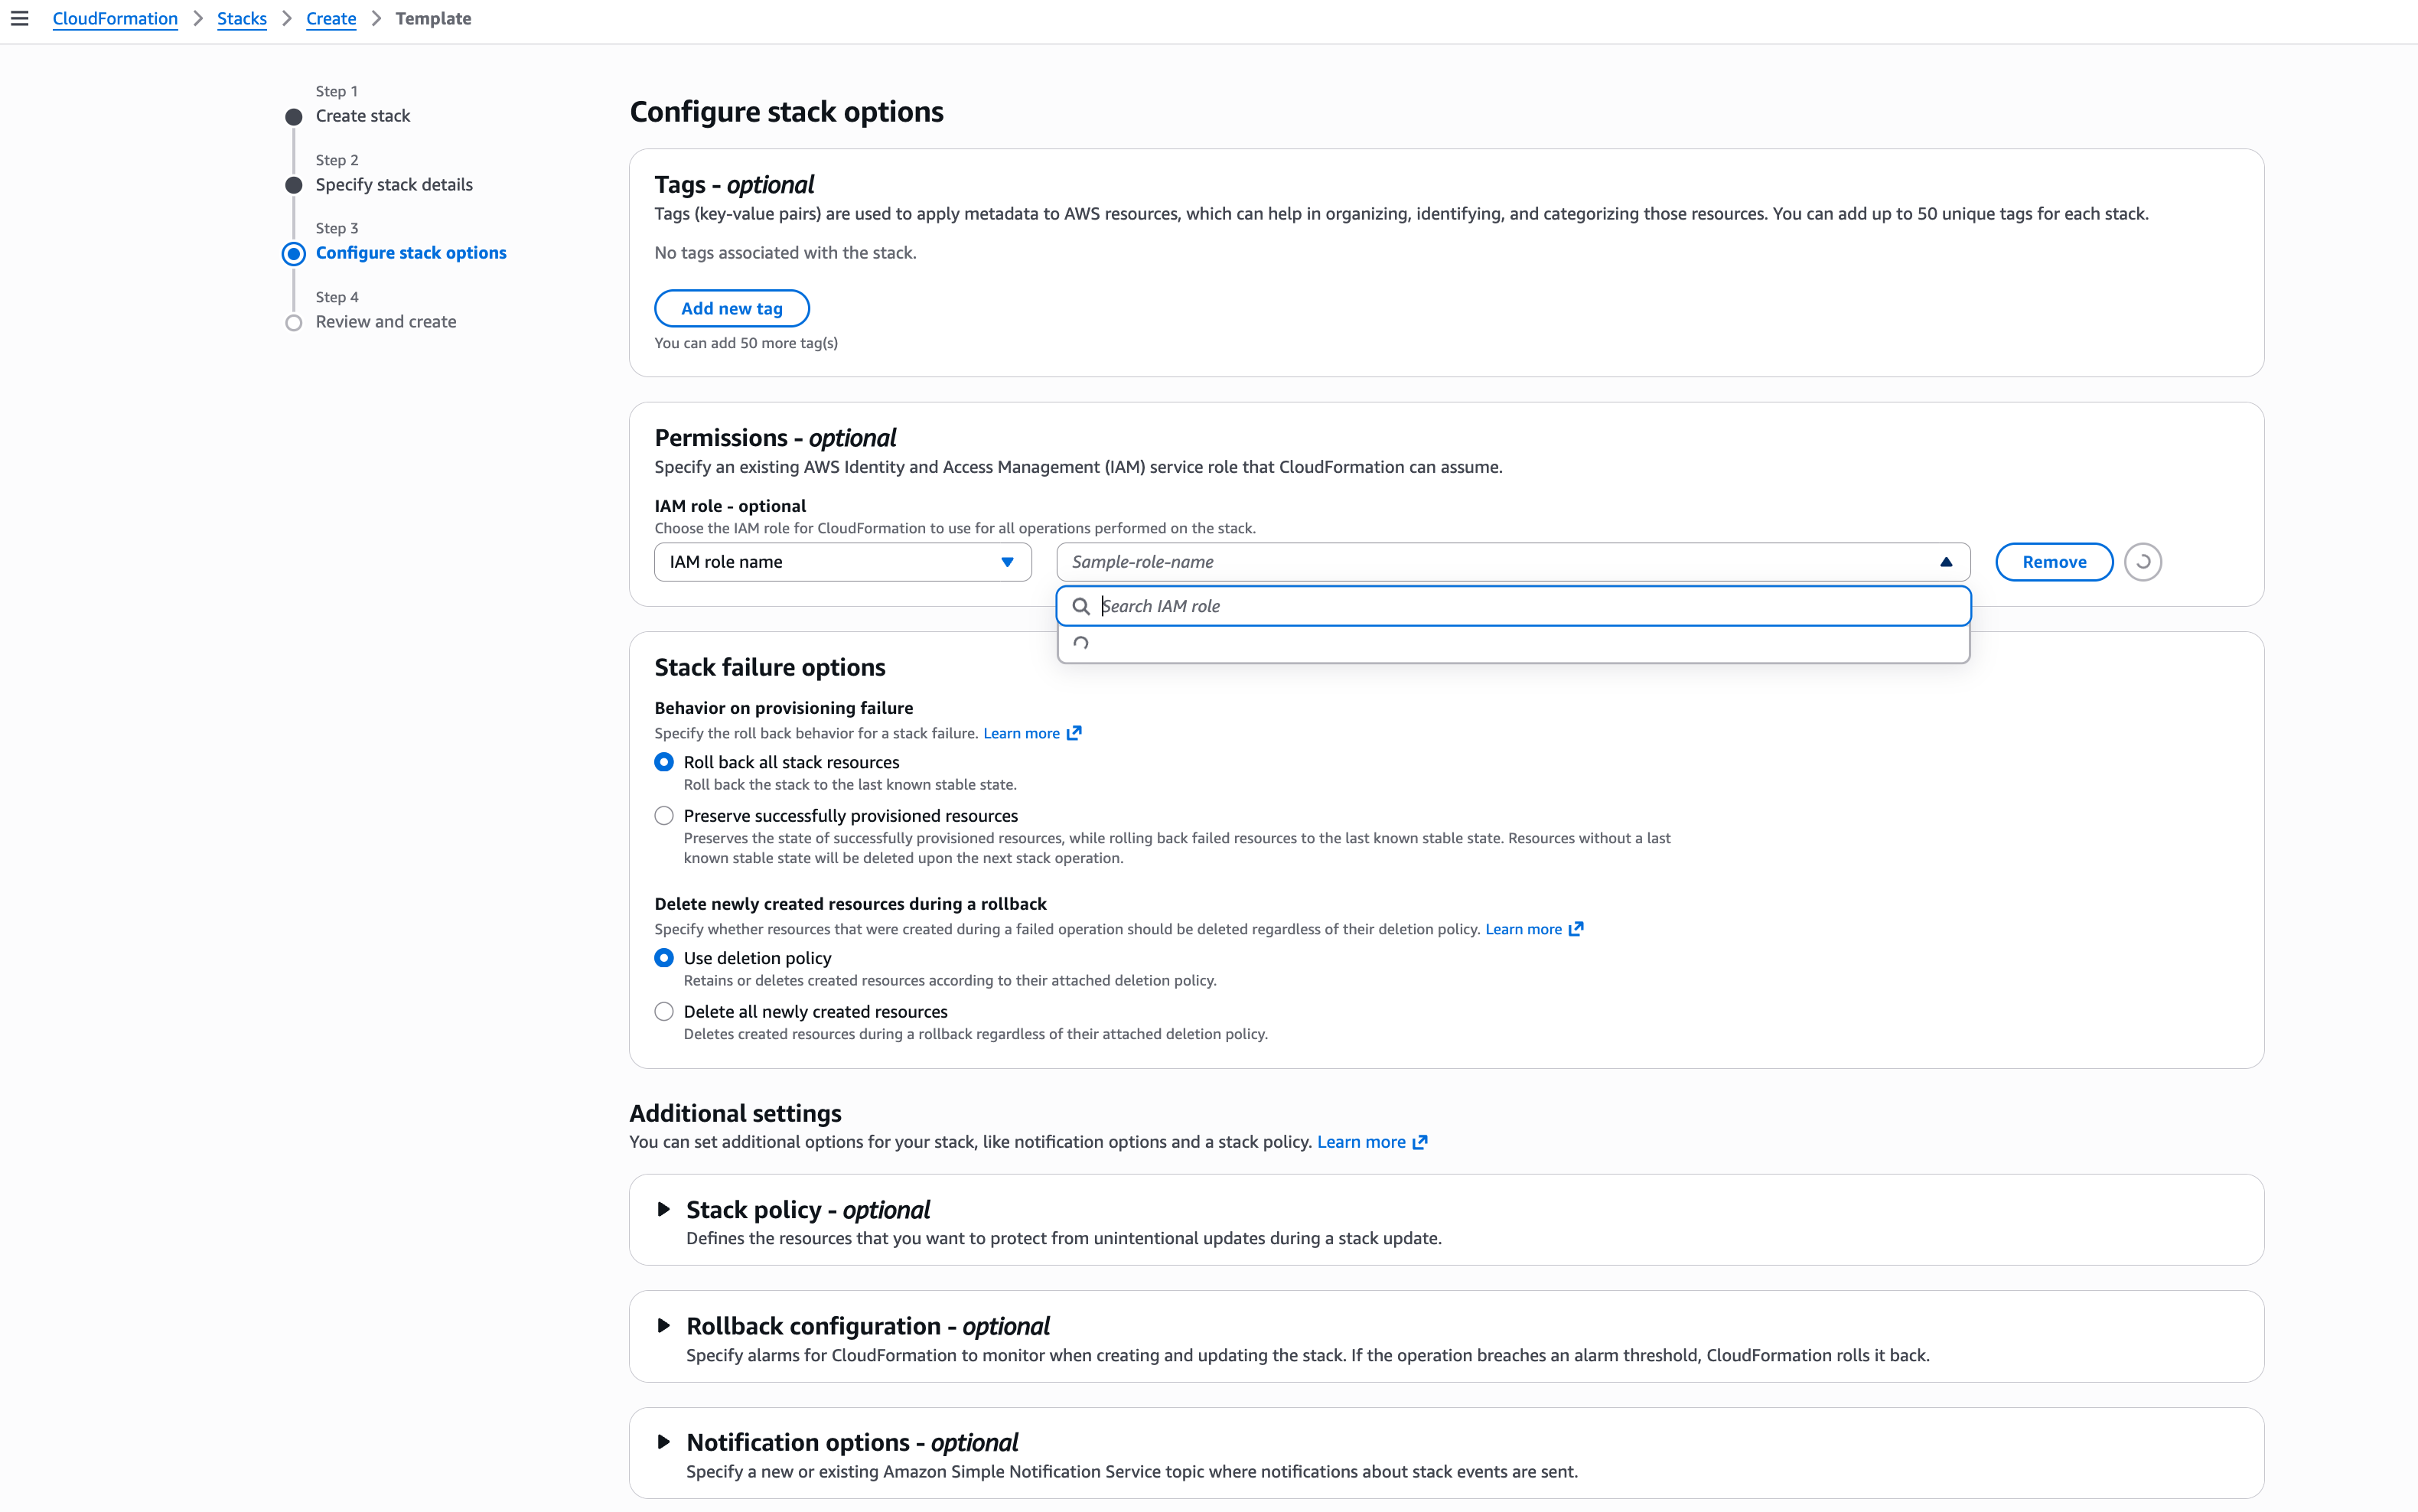
DIDComm Mediator CloudFormation IAM Policy Setup
Check on the acknowledgement section and then, click on Next button.
The last page shows you all the setting you have configured for final review. Once you are done with the review, click on the Submit button to start the deployment.
DIDComm Mediator CloudFormation Review
5. Configure mediator secrets
The mediator requires the setup of AWS Secrets Manager to enable it to successfully process messages forwarded to the server by the sender and route them securely to the recipient.
During deployment, CloudFormation automatically generates the following secret names in the AWS Secrets Manager:
mediator/atn/atm/mediator/global/secrets/devmediator/atn/atm/mediator/global/jwt_secret/dev
Paste the value for DID and JWT secret in the AWS Secrets Manager record as plaintext.
5.1 Mediator DID secrets
Copy the mediator’s JSON-encoded DID document secret generated in Step 2 as the value of mediator/atn/atm/mediator/global/secrets/dev.
The DID secret contains the private key information of the mediator DID to decrypting and verifying messages addressed to the mediator.
Sample DID Secret:
        [
  {
    "id": "did:web:mediator.goodcompany.com#key-1",
    "privateKeyJwk": {
      "crv": "P-256",
      "d": "soi0RdleEYyzCX...",
      "kty": "EC",
      "x": "t_urdyvDKJLgYxJM...",
      "y": "DWciV1aBxqHXH2..."
    },
    "type": "JsonWebKey2020"
  },
  {
    "id": "did:web:mediator.goodcompany.com#key-2",
    "privateKeyJwk": {
      "crv": "Ed25519",
      "d": "qjRq7akRjv22RSus...",
      "kty": "OKP",
      "x": "tuJadwaoBEb7vTD..."
    },
    "type": "JsonWebKey2020"
  },
  {
    "id": "did:web:mediator.goodcompany.com#key-3",
    "privateKeyJwk": {
      "crv": "secp256k1",
      "d": "5GIxIbn03X_...",
      "kty": "EC",
      "x": "mrR3O-sqRKsuJ9q...",
      "y": "CJy9Ss70LW2..."
    },
    "type": "JsonWebKey2020"
  },
  {
    "id": "did:web:mediator.goodcompany.com#key-4",
    "privateKeyJwk": {
      "crv": "P-256",
      "d": "rT2pIZMaOIF2HebA...",
      "kty": "EC",
      "x": "DlDk3EALp_kZl-...",
      "y": "AH9aYsXlTJ8Qi2..."
    },
    "type": "JsonWebKey2020"
  }
]
5.2 Mediator JWT secret
Copy the mediator’s JWT secret generated in Step 2 as the value of mediator/atn/atm/mediator/global/jwt_secret/dev.
Sample JWT Secret
MFECAQEwBQYDK2VwBCIEIN_YPGCcfxWJAJ1bKp91GsQbfZuDr737ARJ65lmyAbMDgSEA1n9cHIy4Ivu55FVfph4t0...6. Test mediator connection
After deployment, you can verify the mediator by opening https://<HOST_DOMAIN_NAME>/.well-known/did.json in your web browser. This page should display the mediator’s DID document.
Once you’ve completed deployment, refer to the Test Mediator Connection page for additional options to verify your deployment and configuration.
By default, the DIDComm Mediator server applies a MODE_EXPLICIT_ALLOW policy at the DID-level ACL, permitting message delivery only from explicitly authorised DIDs. This mitigates unsolicited communication and potential spam from unknown or untrusted DIDs.
What’s next
Glad to hear it! Please tell us how we can improve more.
Sorry to hear that. Please tell us how we can improve.
Thank you for sharing your feedback so we can improve your experience.