Deploy WebVH Hosting appliance
Affinidi-hosted WebVH Hosting is available through the WebVH Hosting Early Access Programme. Join the Early Access Programme with the email linked to your Portal account, wait for the approval email, then activate it on your project from Beta access in Affinidi Portal. A Basic appliance is deleted automatically 14 days after creation, and you can create a new configuration afterwards.
By the end of this guide, you will have an active Affinidi-hosted WebVH Hosting appliance, linked to your VTA.
Affinidi provisions and operates the underlying infrastructure. You link the appliance to your Verifiable Trust Agent (VTA) and mediator when you create it, then activate it with one PNM command that grants its temporary setup DID access to your VTA.
Use this guide when you want Affinidi to manage hosting infrastructure on your behalf. To run WebVH Hosting on your own infrastructure instead, see Self-hosted (open source): unified daemon or Self-hosted (open source): standalone services.
Prerequisites
- Rust 1.95 or later installed on your machine, to compile the PNM CLI.
- A running Verifiable Trust Agent (VTA) with a
did:webvhDID. Your VTA creates, signs, and publishes your DIDs to the WebVH Hosting appliance. - A Mediator DID for DIDComm-based message routing, based on
did:web,did:webvh, ordid:peer. See Affinidi DIDComm Mediator. If the mediator’s Mediator ACL mode is Explicit Allow, your VTA DID must be on its allow list. See Deploy VTA appliance for how to add it. - Super-admin access to your VTA, which creating the
webvhcontext in Step 3 requires. See Deploy VTA appliance.
Step 1. Install the PNM CLI
PNM connects to your VTA and runs the command that activates the appliance. Install the same PNM version the VTA documentation uses, so PNM, your VTA, and the appliance work together:
cargo install pnm-cli@0.23.1 --locked --registry crates-ioConfirm the installation
pnm helpIf PNM is already installed at this version and connected to your VTA, skip to Step 2.
Step 2. Provision the appliance in Affinidi Portal
Log in to Affinidi Portal and select your project.
Under Affinidi Elements in the left sidebar, select WebVH Hosting.
Click Create configuration and fill in the fields:
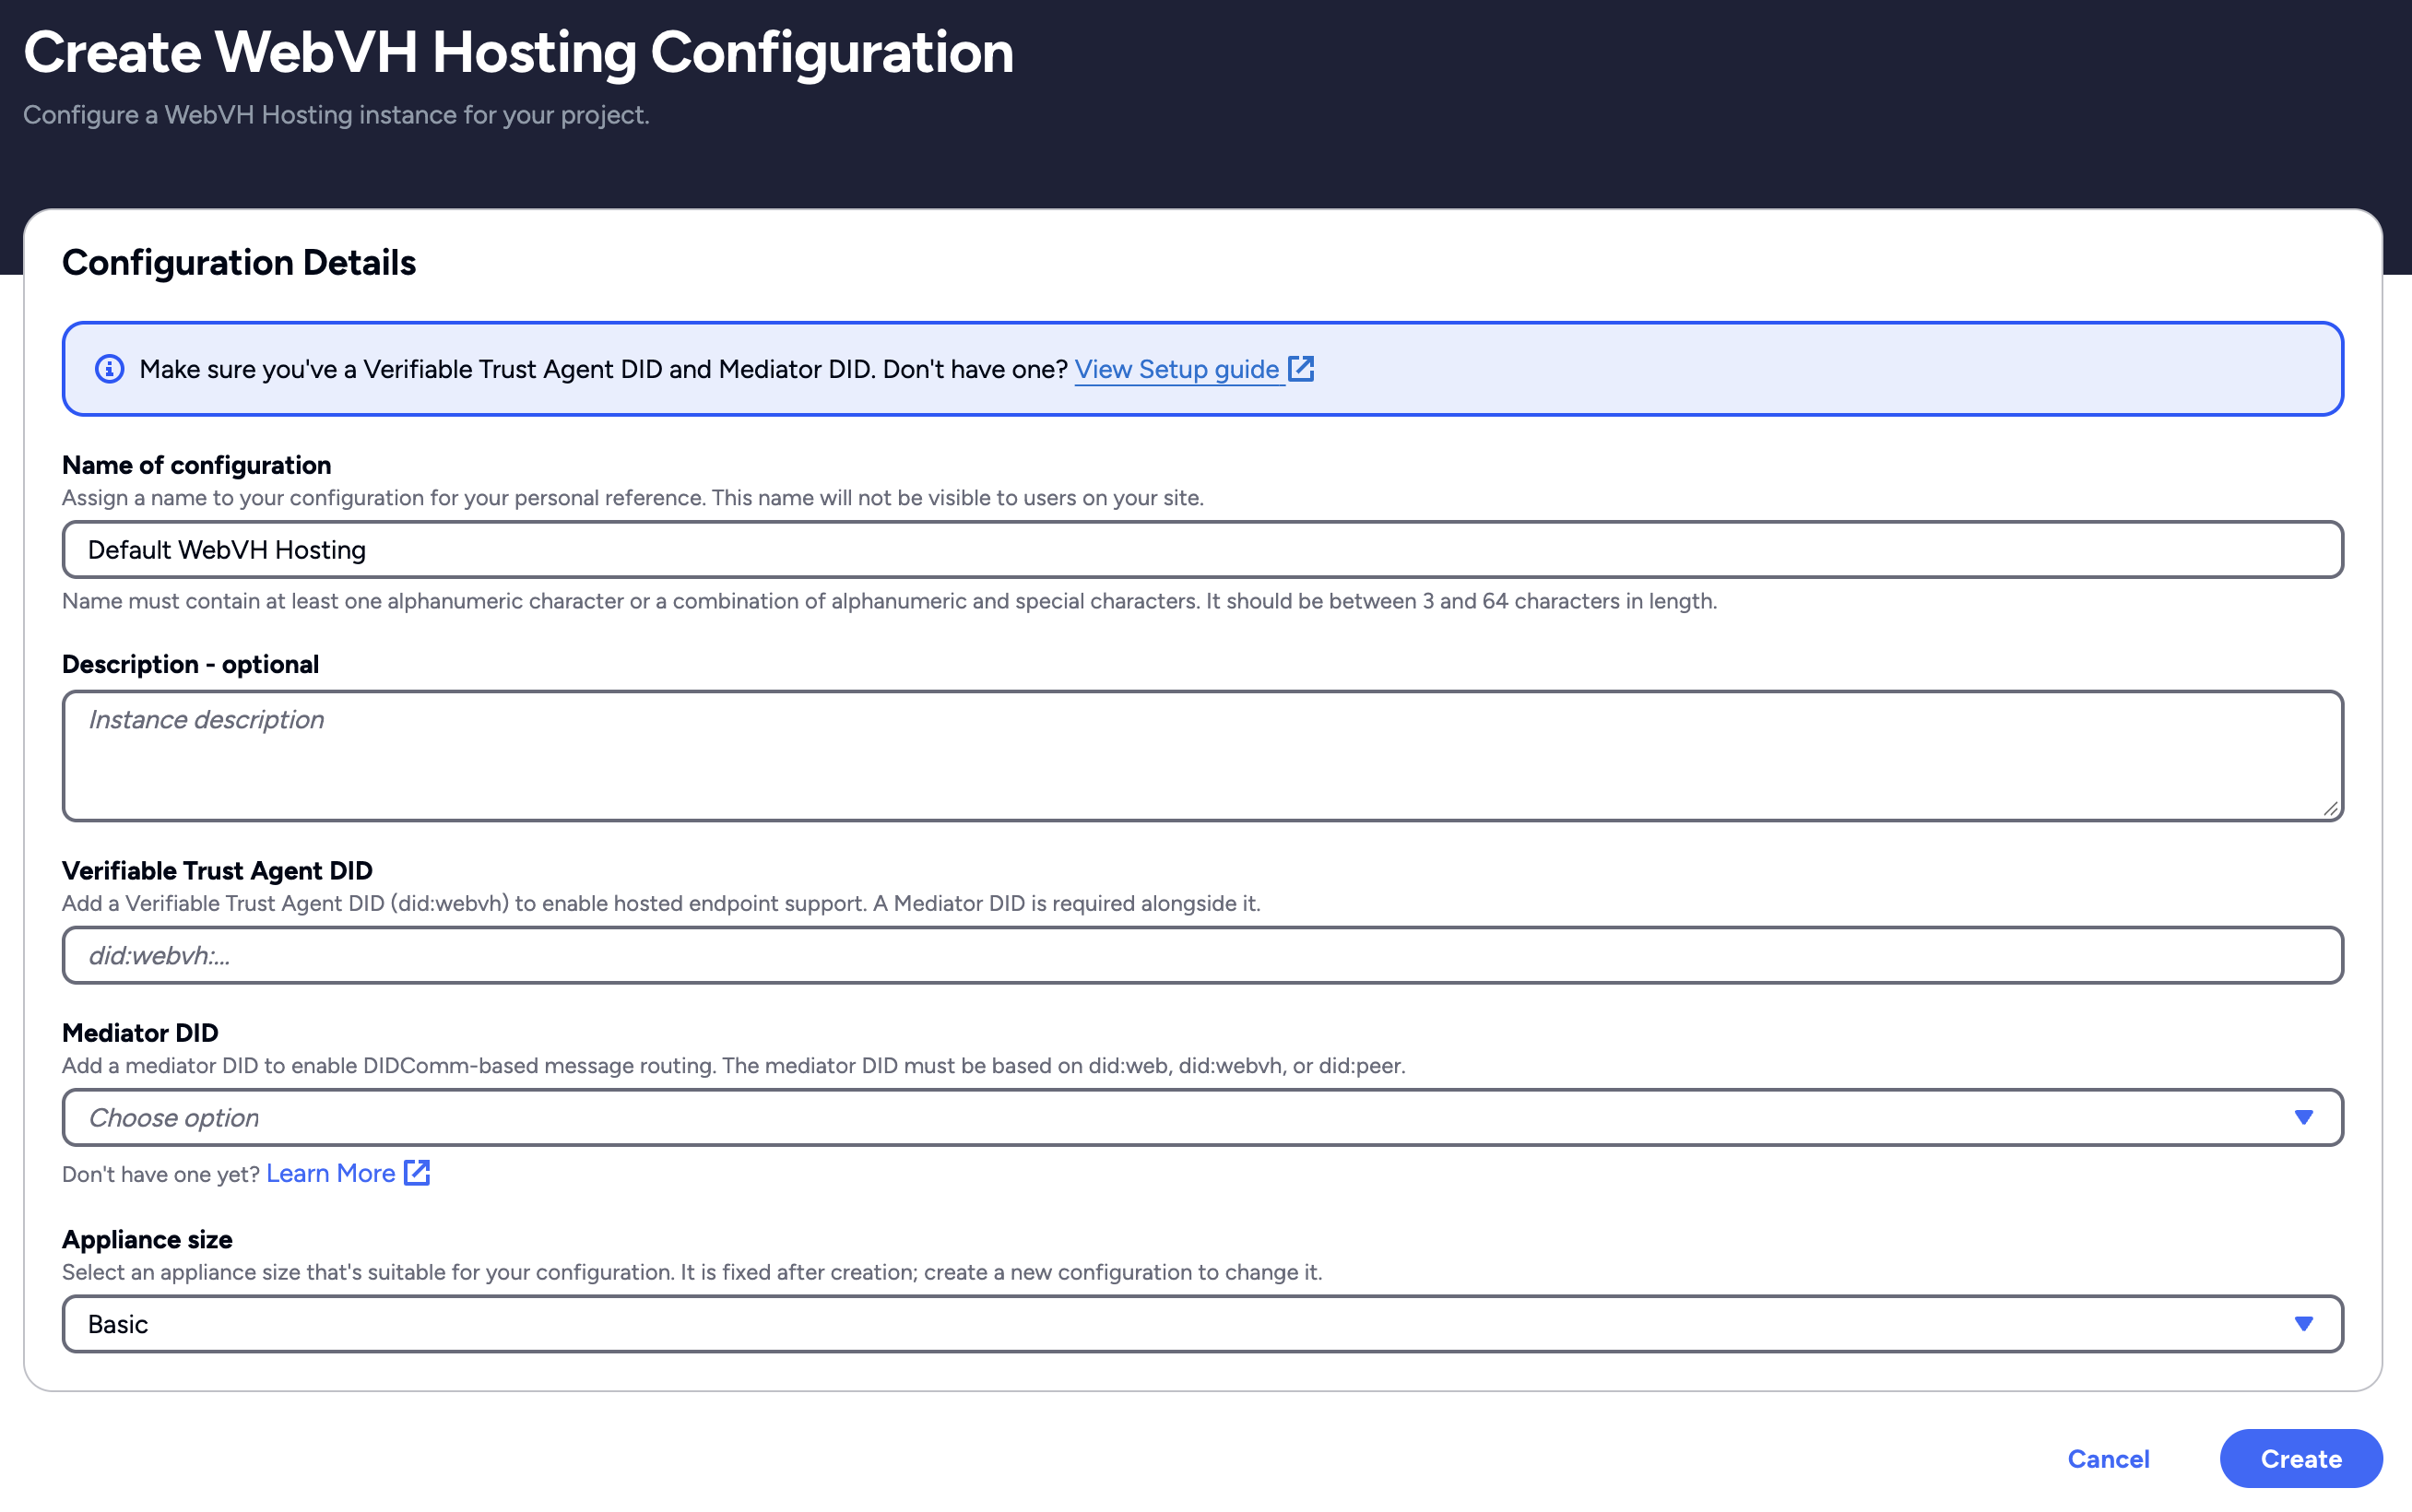
Create WebVH Hosting configuration in Affinidi Portal
Field What to enter Name of configuration A name for your own reference, 3 to 64 characters, including at least one letter or number. Defaults to Default WebVh Hosting. Description - optional A short note on the purpose of this instance. Verifiable Trust Agent DID Choose your VTA’s DID from the list, or select + Enter custom VTA DID and paste it. If the project has no VTAs, type the DID directly. Must be a did:webvhDID. Cannot be changed after creation.Mediator DID The mediator DID from Before you begin. Must be based on did:web,did:webvh, ordid:peer. Cannot be changed after creation. To deploy one, see Deploy an Affinidi-hosted mediator.Appliance size Select Basic, the default. Basic appliances are for testing and are deleted automatically after 14 days. Larger sizes are offered on some plans. The size is fixed after creation. Version Shown only when more than one version is available. Leave the default. Click Create. The Portal returns to the WebVH Hosting list, where the new configuration’s Deployment state shows Pending, then In Progress, while Affinidi provisions the infrastructure.
Click the configuration name to open its details page. Setup State shows Inactive until you complete Step 3.
Step 3. Activate the appliance with PNM
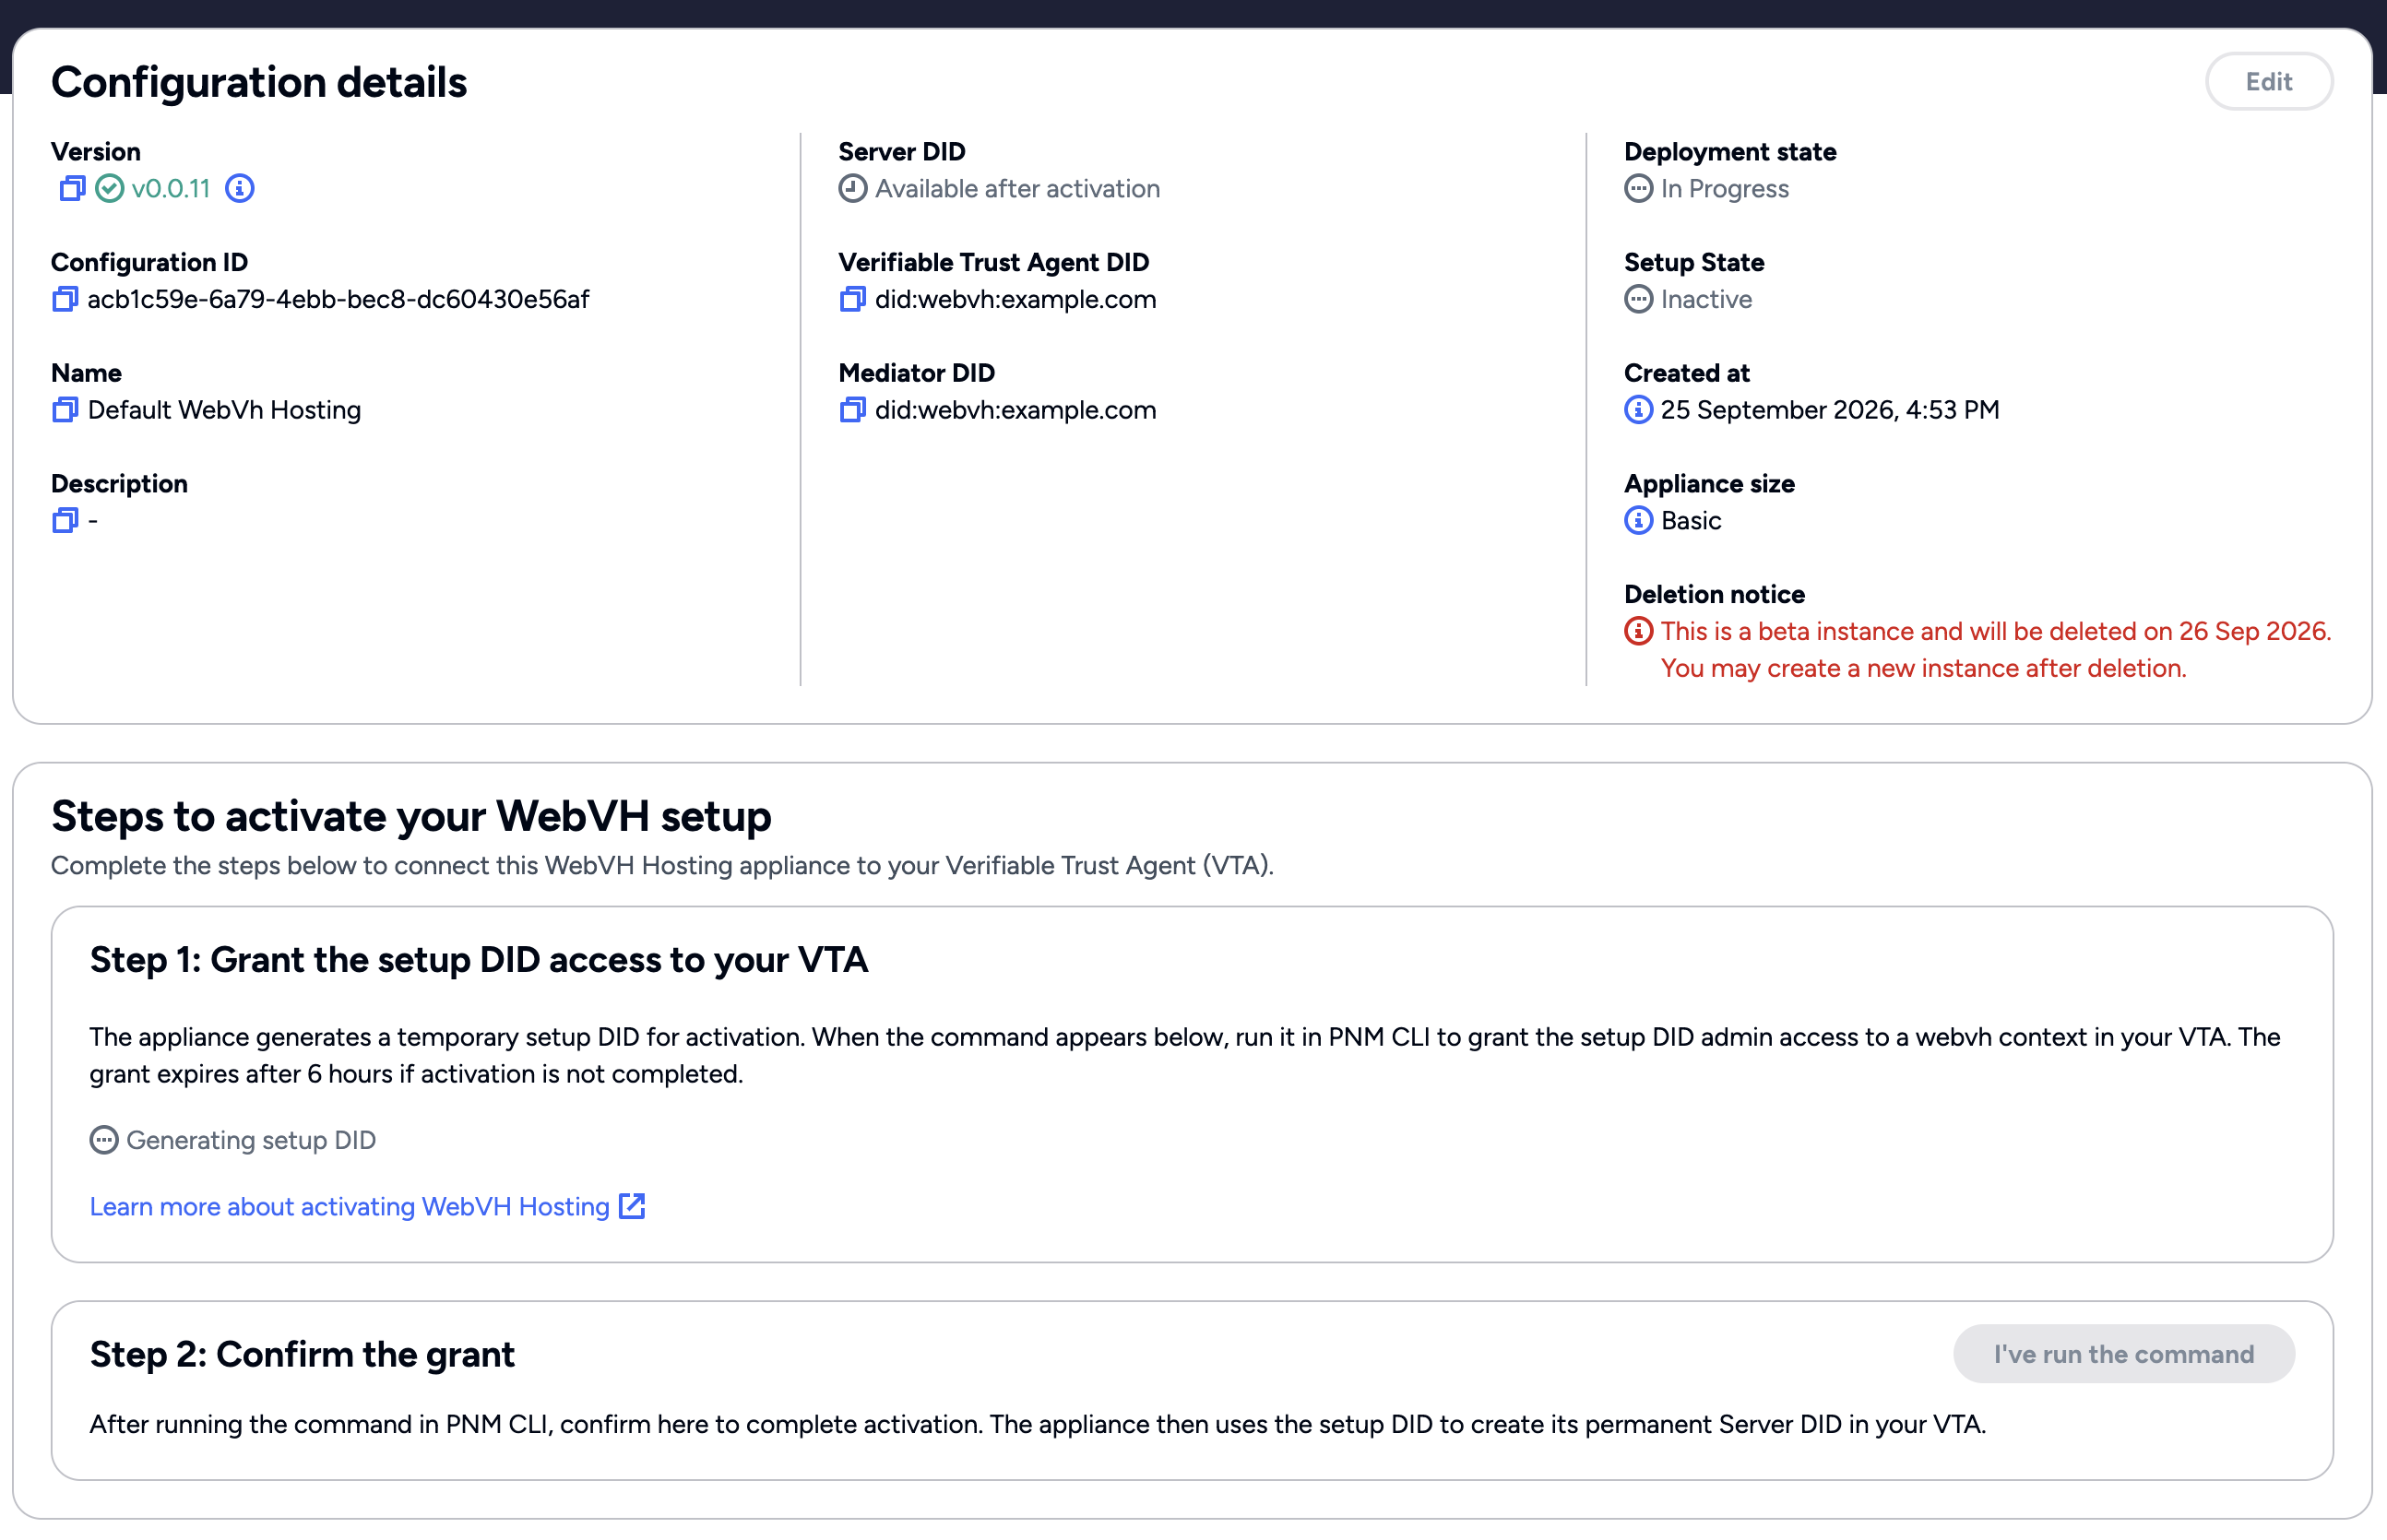
WebVH Hosting configuration details before deployment completes
The details page shows the activation steps under Steps to activate your WebVH setup.
The command in step 3 gives the appliance’s setup DID an admin grant that expires after 6 hours if the appliance has not claimed it. Run the command and click I’ve run the command promptly.
Wait for Deployment state to show Complete. Under Step 1: Grant the setup DID access to your VTA, Generating setup DID changes to the command generated for your appliance. The command grants the appliance’s temporary setup DID, a
did:key, admin access to awebvhcontext in your VTA.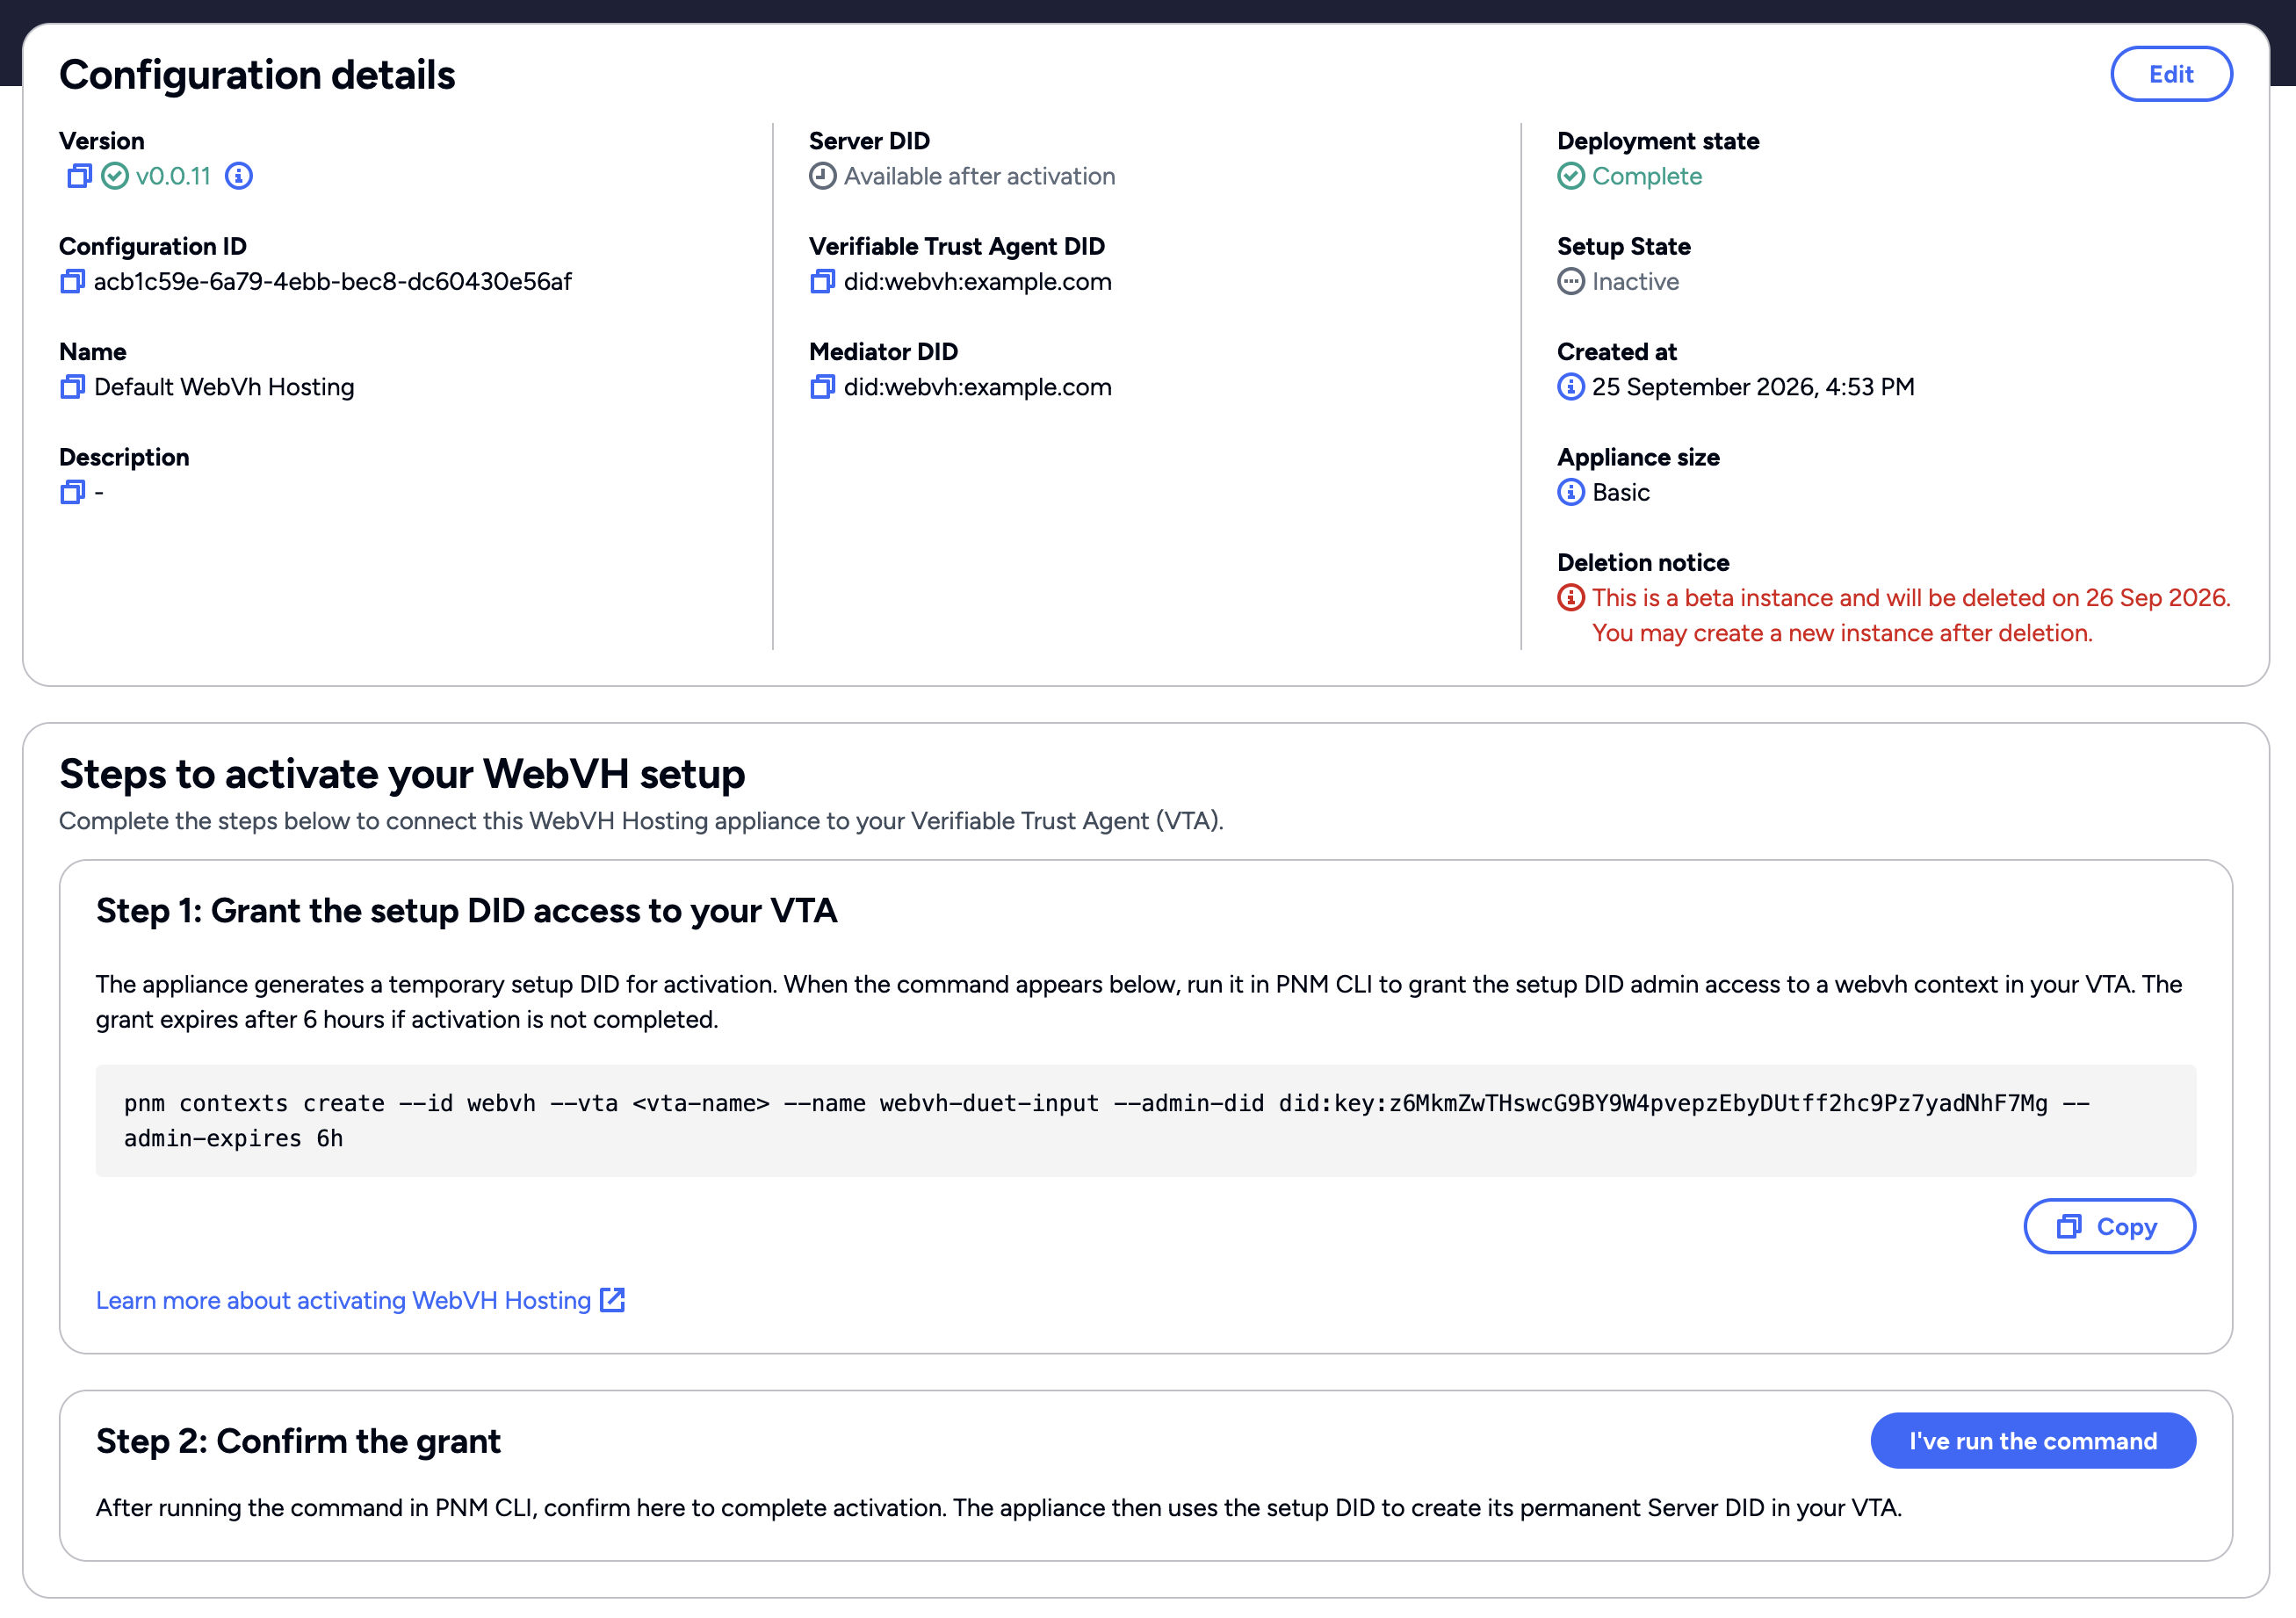
WebVH Hosting activation command after deployment completes
Click Copy. The copied command looks like this, with
--nameand--admin-didpre-filled for your appliance:pnm contexts create --id webvh --vta <vta-name> --name webvh-<subdomain> --admin-did <setup-did> --admin-expires 6hReplace
<vta-name>with your VTA’s slug, the local name PNM uses for your VTA, and run the command.Return to the configuration’s details page and, under Step 2: Confirm the grant, click I’ve run the command.
Wait while activation completes, which can take a few minutes. The page updates automatically: when activation succeeds, Setup State changes to Active, the activation steps disappear, and Server DID shows the appliance’s permanent
did:webvh.Mediator in Explicit Allow modeThe appliance connects to its mediator as its Server DID. A mediator in Explicit Deny mode, the default, accepts it without further setup. A mediator whose Mediator ACL mode is Explicit Allow accepts connections only from DIDs on its allow list, as described in Supported Access Control Lists (ACLs), so add the Server DID to that list as soon as it appears.
Portal keeps a saved DID on the list permanently, so check the DID before you save:
- In Affinidi Portal, select DIDComm Mediator in the left sidebar and open your mediator’s configuration.
- Under Access Controls, click Edit.
- Click Add DID, paste the Server DID into User’s DID, leave Blocked cleared, and click Save.
Confirm
Test 1: Setup State shows Active
Expected result: on the configuration’s details page, Setup State shows Active.
Note these two values for the next guide:
- Server DID: on the configuration’s details page. It shows Available after activation until Setup State is Active, then the appliance’s permanent
did:webvh. - WebVH URL: on the configuration card in the WebVH Hosting list. Its host is the domain of every DID you create on this appliance.
Troubleshooting
| Symptom | Likely cause | Fix |
|---|---|---|
| The WebVH Hosting page shows the Early Access activation panel instead of Configurations | The WebVH Hosting Early Access Programme is not active on this project. | Join the Early Access Programme and activate it on the project from Beta access. |
Create configuration is disabled with Configuration limit reached. | A project can have one WebVH Hosting configuration, and this project already has one. | Use the existing configuration, or delete it and create a new one. |
I’ve run the command is disabled with Wait for the setup DID to be generated | The appliance’s setup DID is still being generated. | Wait for the command to appear under Step 1, then run it. |
| Setup State remains Inactive after several minutes | Activation is still processing, the pnm contexts create command did not complete, or the setup admin grant expired unclaimed before you clicked I’ve run the command. | Confirm the command in Step 3 ran without error. If more than 6 hours have passed since you ran it, run it again. Then click I’ve run the command again. Contact Affinidi support if Setup State still does not change to Active. |
Next steps
- Create your first hosted DID: register the appliance with your VTA and publish a
did:webvhidentifier on it. - Create and manage DIDs: update, inspect, and delete DIDs on the appliance.
- Glossary: terms used across these pages and in
pnmoutput.
Glad to hear it! Please tell us how we can improve more.
Sorry to hear that. Please tell us how we can improve.
Thank you for sharing your feedback so we can improve your experience.