Deploy VTA appliance
Affinidi-hosted Verifiable Trust Agent (VTA) is available through the Early Access Programme. Join the Early Access Programme with the email linked to your Portal account, wait for the approval email, then activate it on your project from Beta access in Affinidi Portal. A Basic appliance is deleted automatically 14 days after creation, and you can create a new configuration afterwards.
By the end of this guide, you will have a running VTA provisioned through Affinidi Portal, with PNM connected and ready to use.
The VTA is hosted as a managed appliance by Affinidi. You define the configuration through the portal, and Affinidi provisions, runs, and operates the underlying infrastructure for you, inside a Trusted Execution Environment (TEE). See VTA overview for the full picture.
You need this guide if you are starting from scratch. If you already have a running VTA, skip to Create your first context.
Deployment overview
Deploying an Affinidi-hosted VTA has three phases: install the PNM CLI, deploy the VTA in Affinidi Portal, then bootstrap PNM against it. Instead of you registering an Administrator DID yourself, PNM verifies the enclave’s attestation on first connect and only installs your admin credential if it matches. This is a Trust On First Use (TOFU) bootstrap: it refuses to proceed on any mismatch.
| Phase | Where | What you do |
|---|---|---|
| 1 - Install the PNM CLI | Your machine | Install the pnm binary. You need it in Phase 3, after the VTA is deployed. |
| 2 - Deploy the VTA | Affinidi Portal | Create a VTA configuration and wait for the status to reach Complete. Copy the ready-made bootstrap command from the configuration page. |
| 3 - Bootstrap PNM against the VTA | PNM (Personal Network Manager) CLI | Run the copied pnm bootstrap connect command. It pins the enclave’s measurements, so PNM verifies the enclave before installing your admin credential. Confirm with pnm health. |
Want to run the infrastructure yourself instead? See Self-hosted (open source).
Prerequisites
- An Affinidi Portal account with access to the target project.
- Install Rust 1.95 or later on your machine (required for compiling the PNM CLI).
Step 1. Install the PNM CLI
To access and manage your VTA, you need the Personal Network Manager (PNM) CLI installed on your machine. You use it in Step 3 to connect to your VTA once it is deployed.
Install PNM
Run the command below to install a specific version of the PNM CLI from crates.io. Cargo fetches and builds the crate for you, so you do not need to clone the repository.
cargo install pnm-cli@0.23.1 --locked --registry crates-ioConfirm the installation
pnm helpYou should see a list of subcommands, including bootstrap, health, keys, and contexts.
Step 2. Create the VTA in the Affinidi Portal
Log in to Affinidi Portal and select your project.
Go to Verifiable Trust Agent in the left sidebar.
Click Create configuration and fill in the fields:
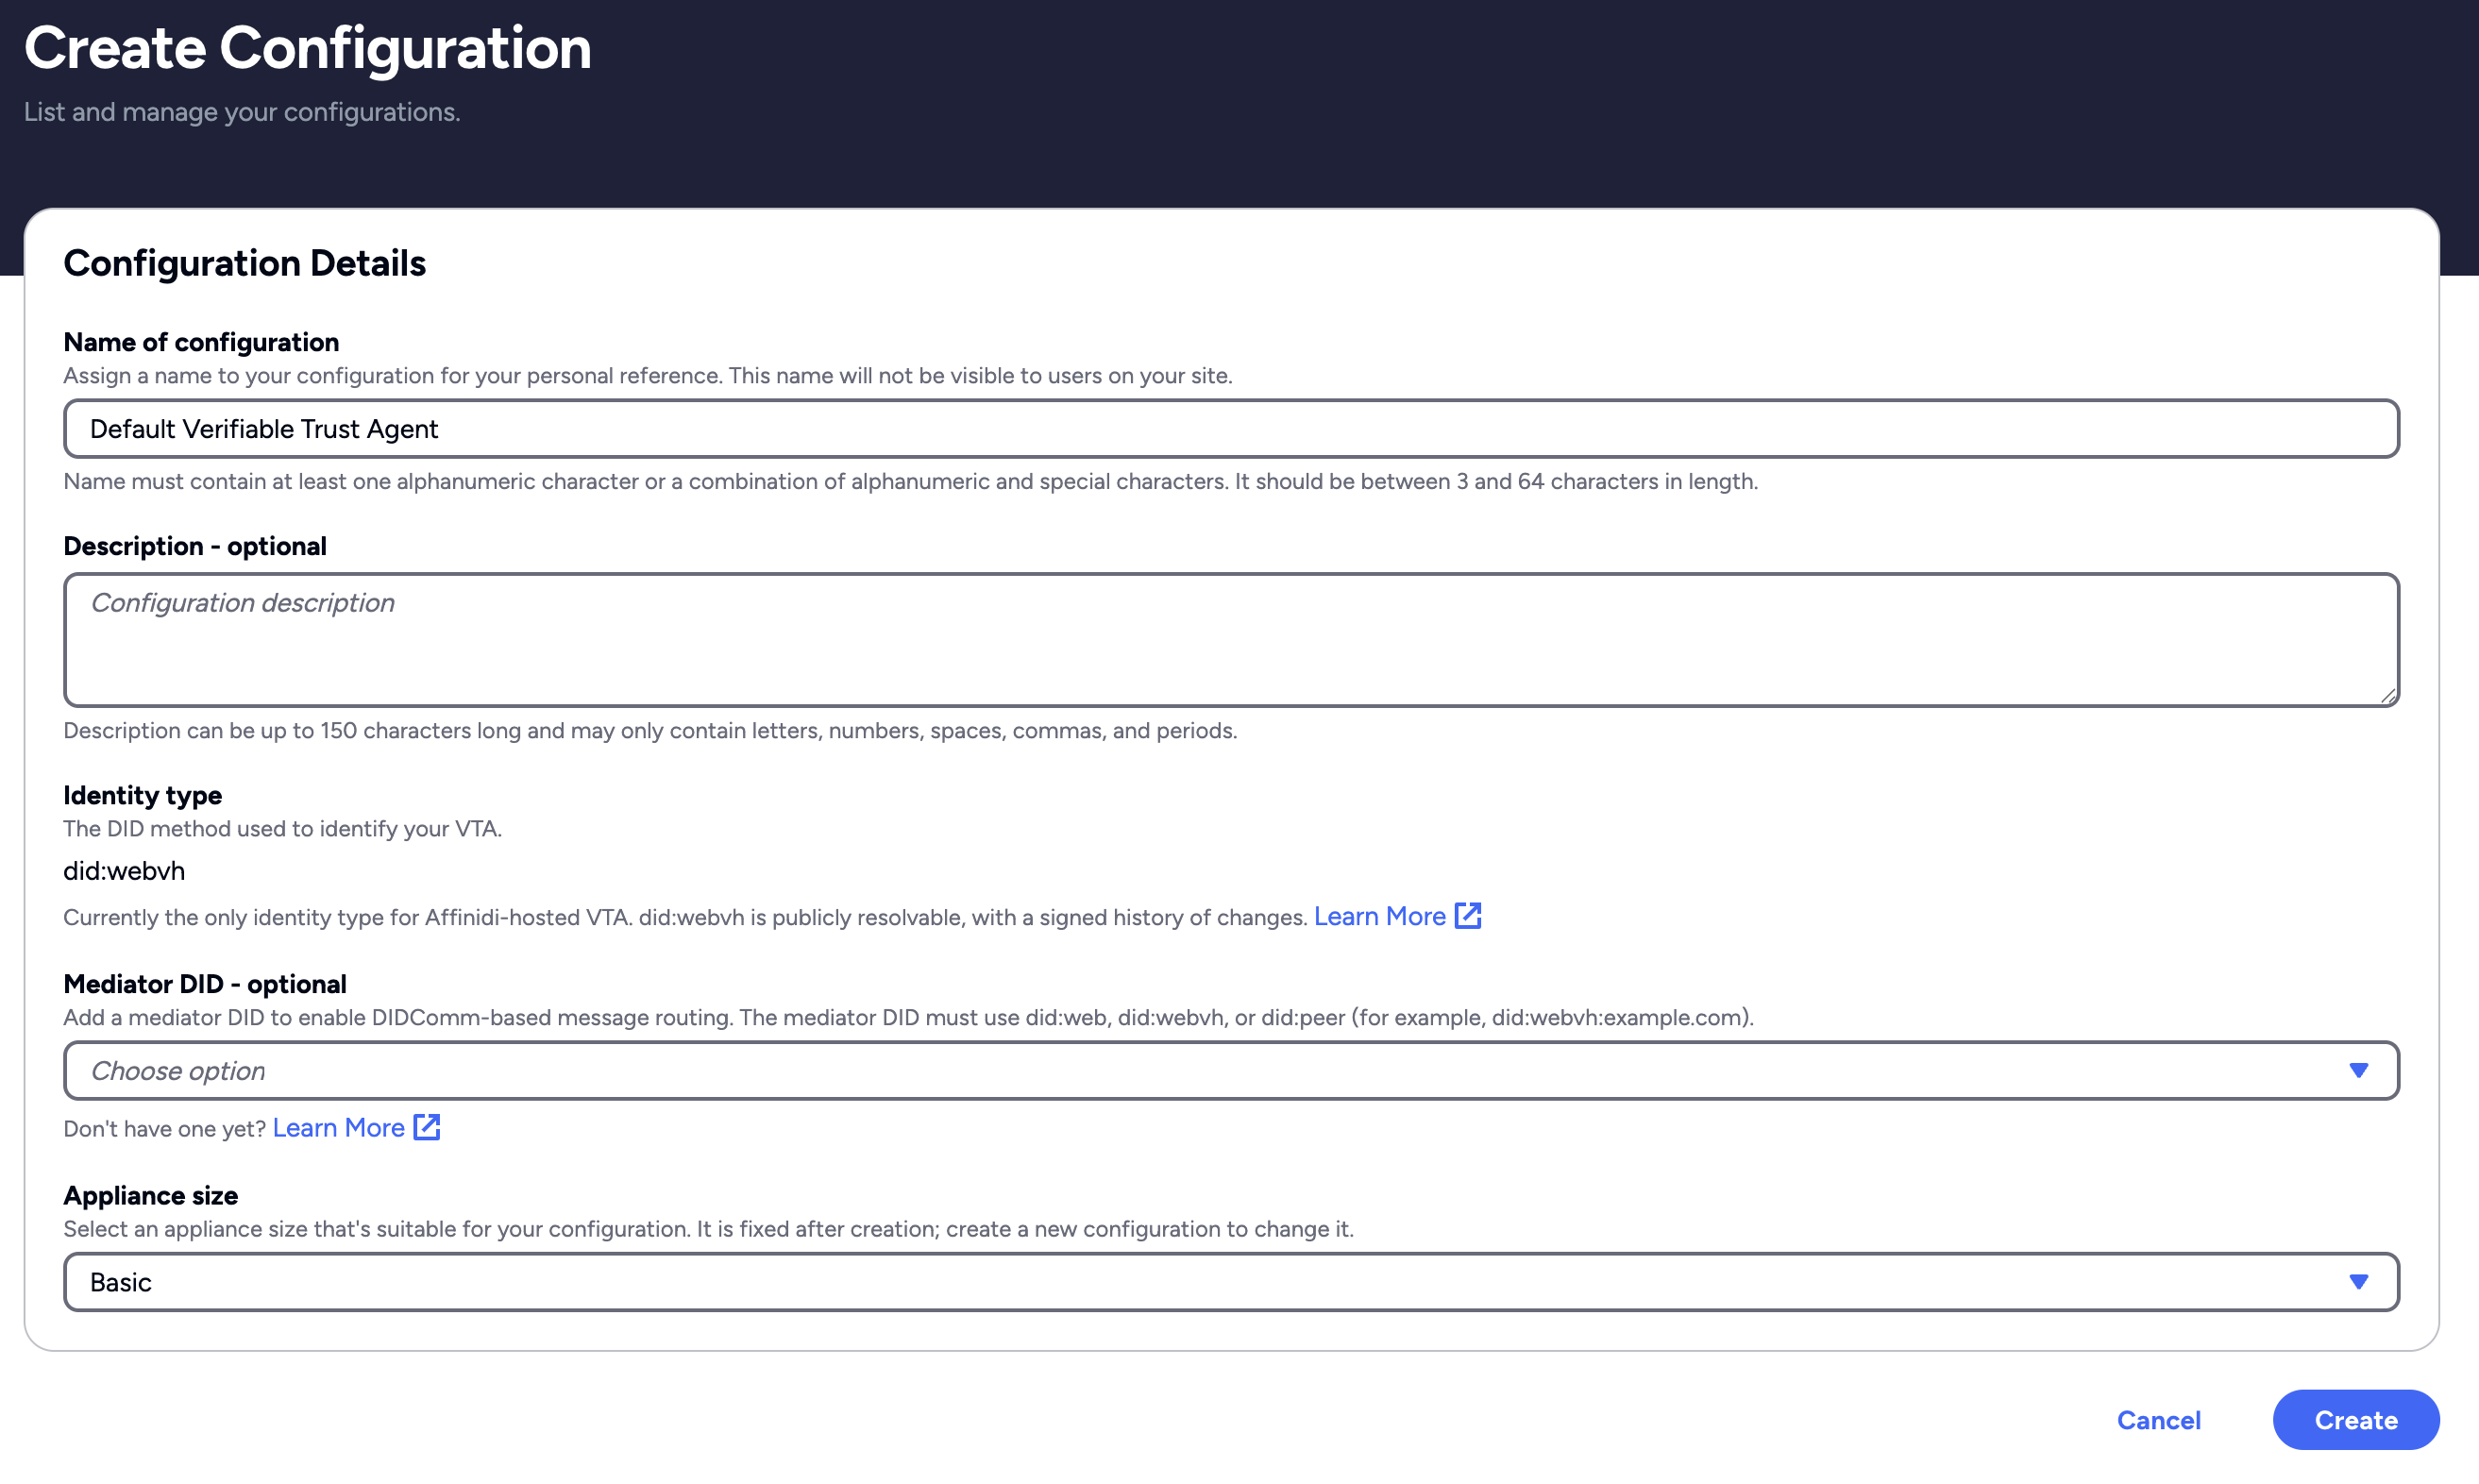
Create VTA configuration in Affinidi Portal
Field Description Name of configuration A display name for this VTA instance in the portal. Description - optional A short note on the purpose of this instance. Identity type Fixed to did:webvhfor an Affinidi-hosted VTA.Mediator DID - optional Add a mediator DID to enable DIDComm-based message routing. Must use did:web,did:webvh, ordid:peer(for example,did:webvh:example.com). To deploy one, see Deploy an Affinidi-hosted mediator.Appliance size Choose Basic, the size a VTA runs on. Depending on your plan, the list also shows Enhanced (Standard plan upward) and Custom (Premium and Affinidi plans), disabled for a VTA. Version Appears only when more than one version set is available to your project. It defaults to the current version. NoteAppliance size cannot be changed after the VTA configuration is created. Create a new configuration to change it.
If you already know your Mediator DID, add it here rather than later. Adding it to an existing REST-only configuration currently requires the mediator to already allow the connection by default; when the mediator has a closed access control list (ACL), the handshake doesn’t go through.
Click Create and wait for the status to show Complete.
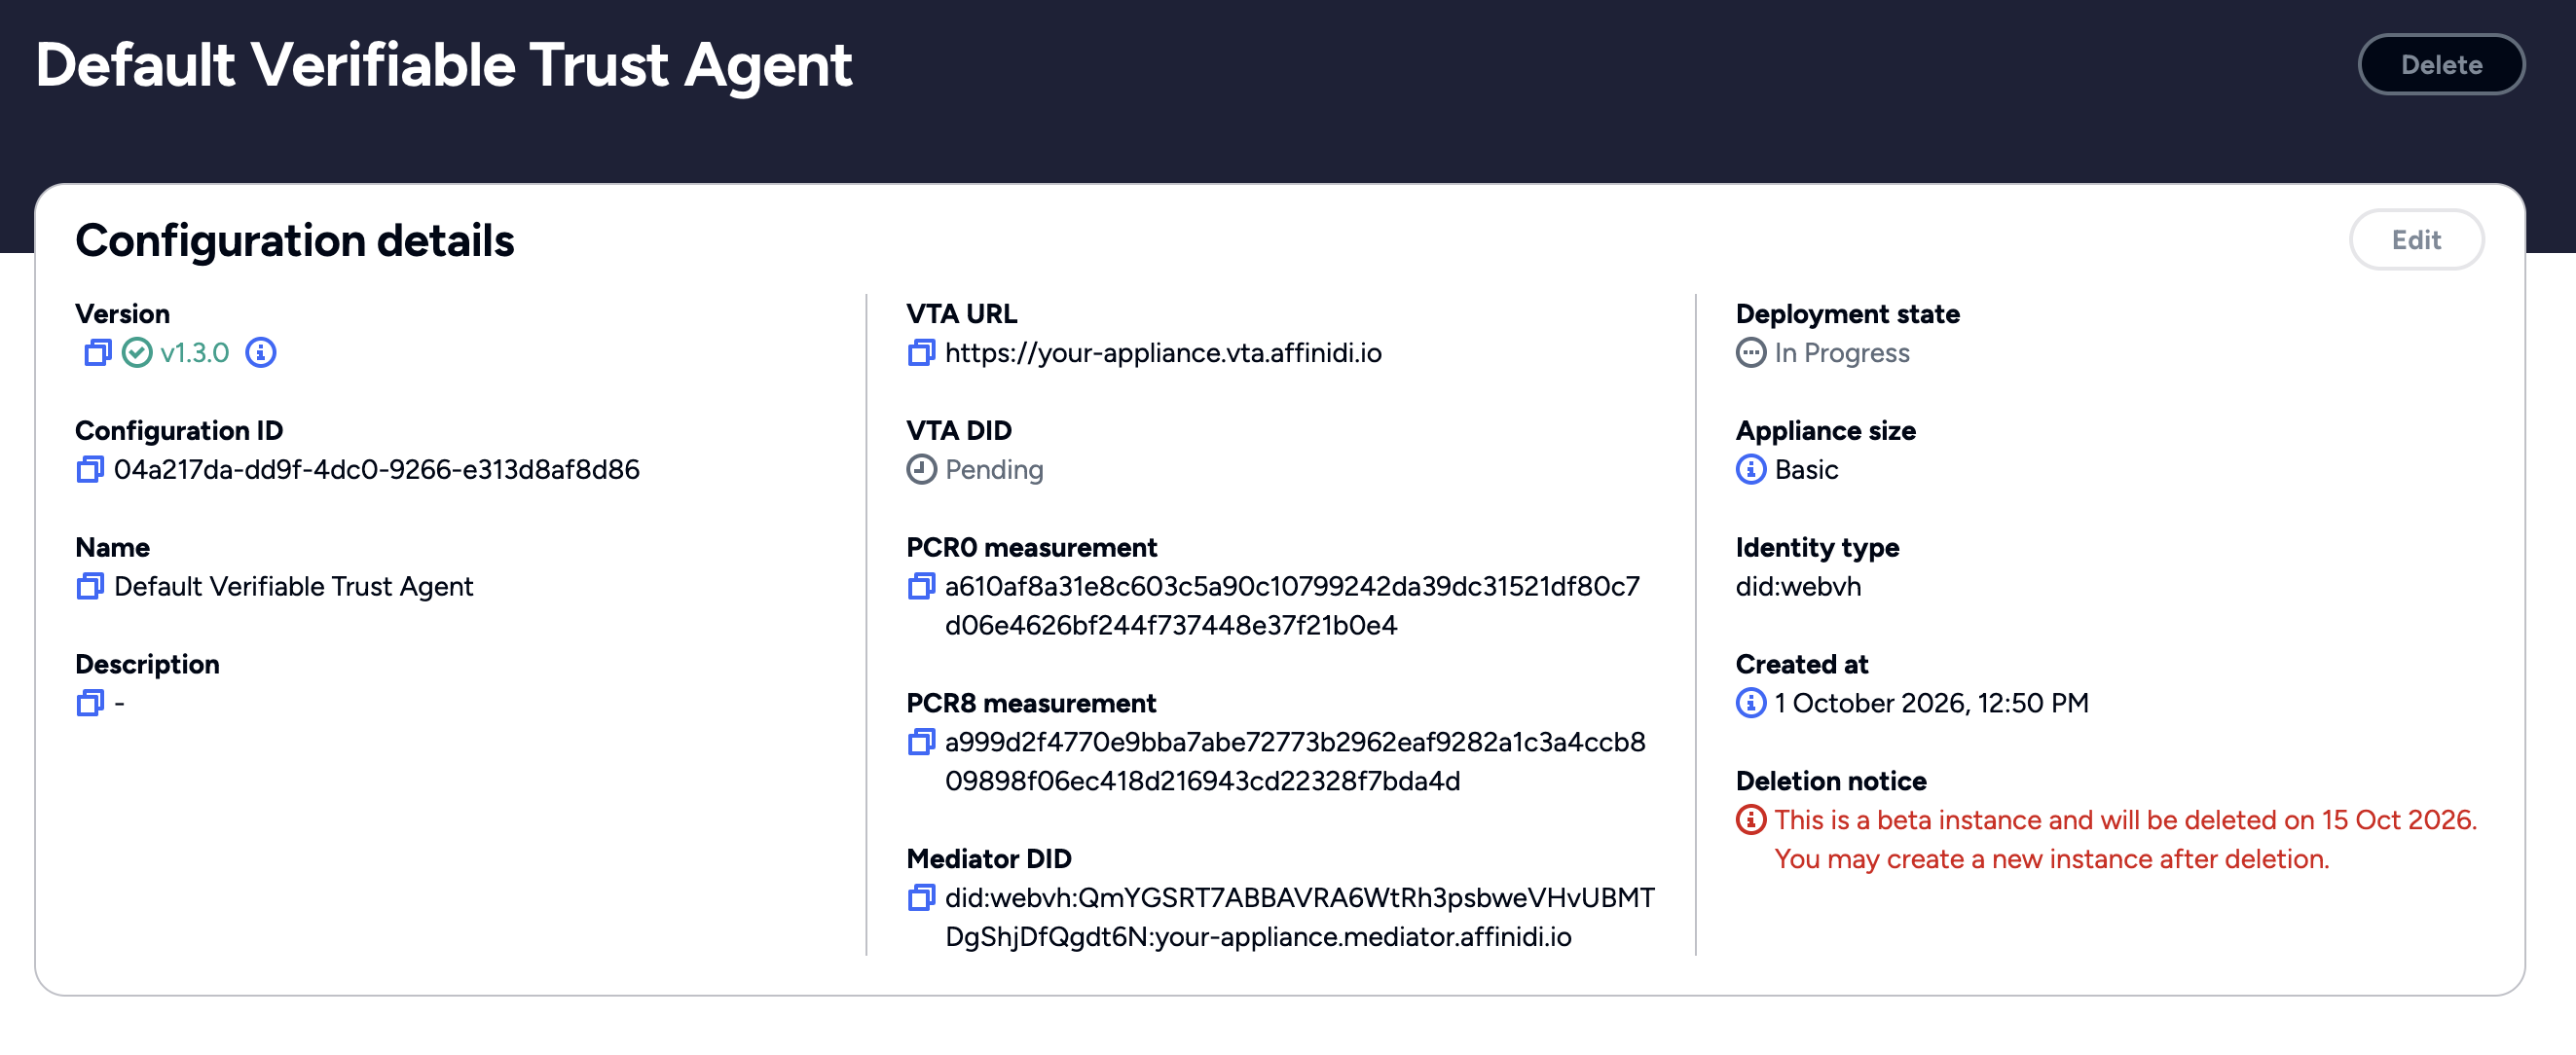
Wait for the deployment to complete.
Once the status is Complete and the page shows the VTA DID and PCR0 measurement, copy the bootstrap command from the Verify the enclave before you bootstrap alert on the configuration page. You run it in Step 3. If you dismissed the alert, click Show bootstrap instructions to bring it back.
The command pins the first three of these values. The VTA URL is the fallback bootstrap target described in Step 3.
Value Starts with Used for VTA DID did:webvh:Issuer identity on all credentials this VTA produces. The command pins it, so PNM connects only to this VTA. PCR0 measurement A hex string The measurement of the software running inside the VTA’s Trusted Execution Environment (TEE). The command pins it, so PNM refuses to connect to anything other than this exact build. PCR8 measurement A hex string The measurement of the certificate that signed that software image. Shown when Portal has recorded it, and the command includes it when Portal has it. VTA URL https://Public REST endpoint for admin calls and integrations. Also the fallback bootstrap target while the VTA DID is still publishing. 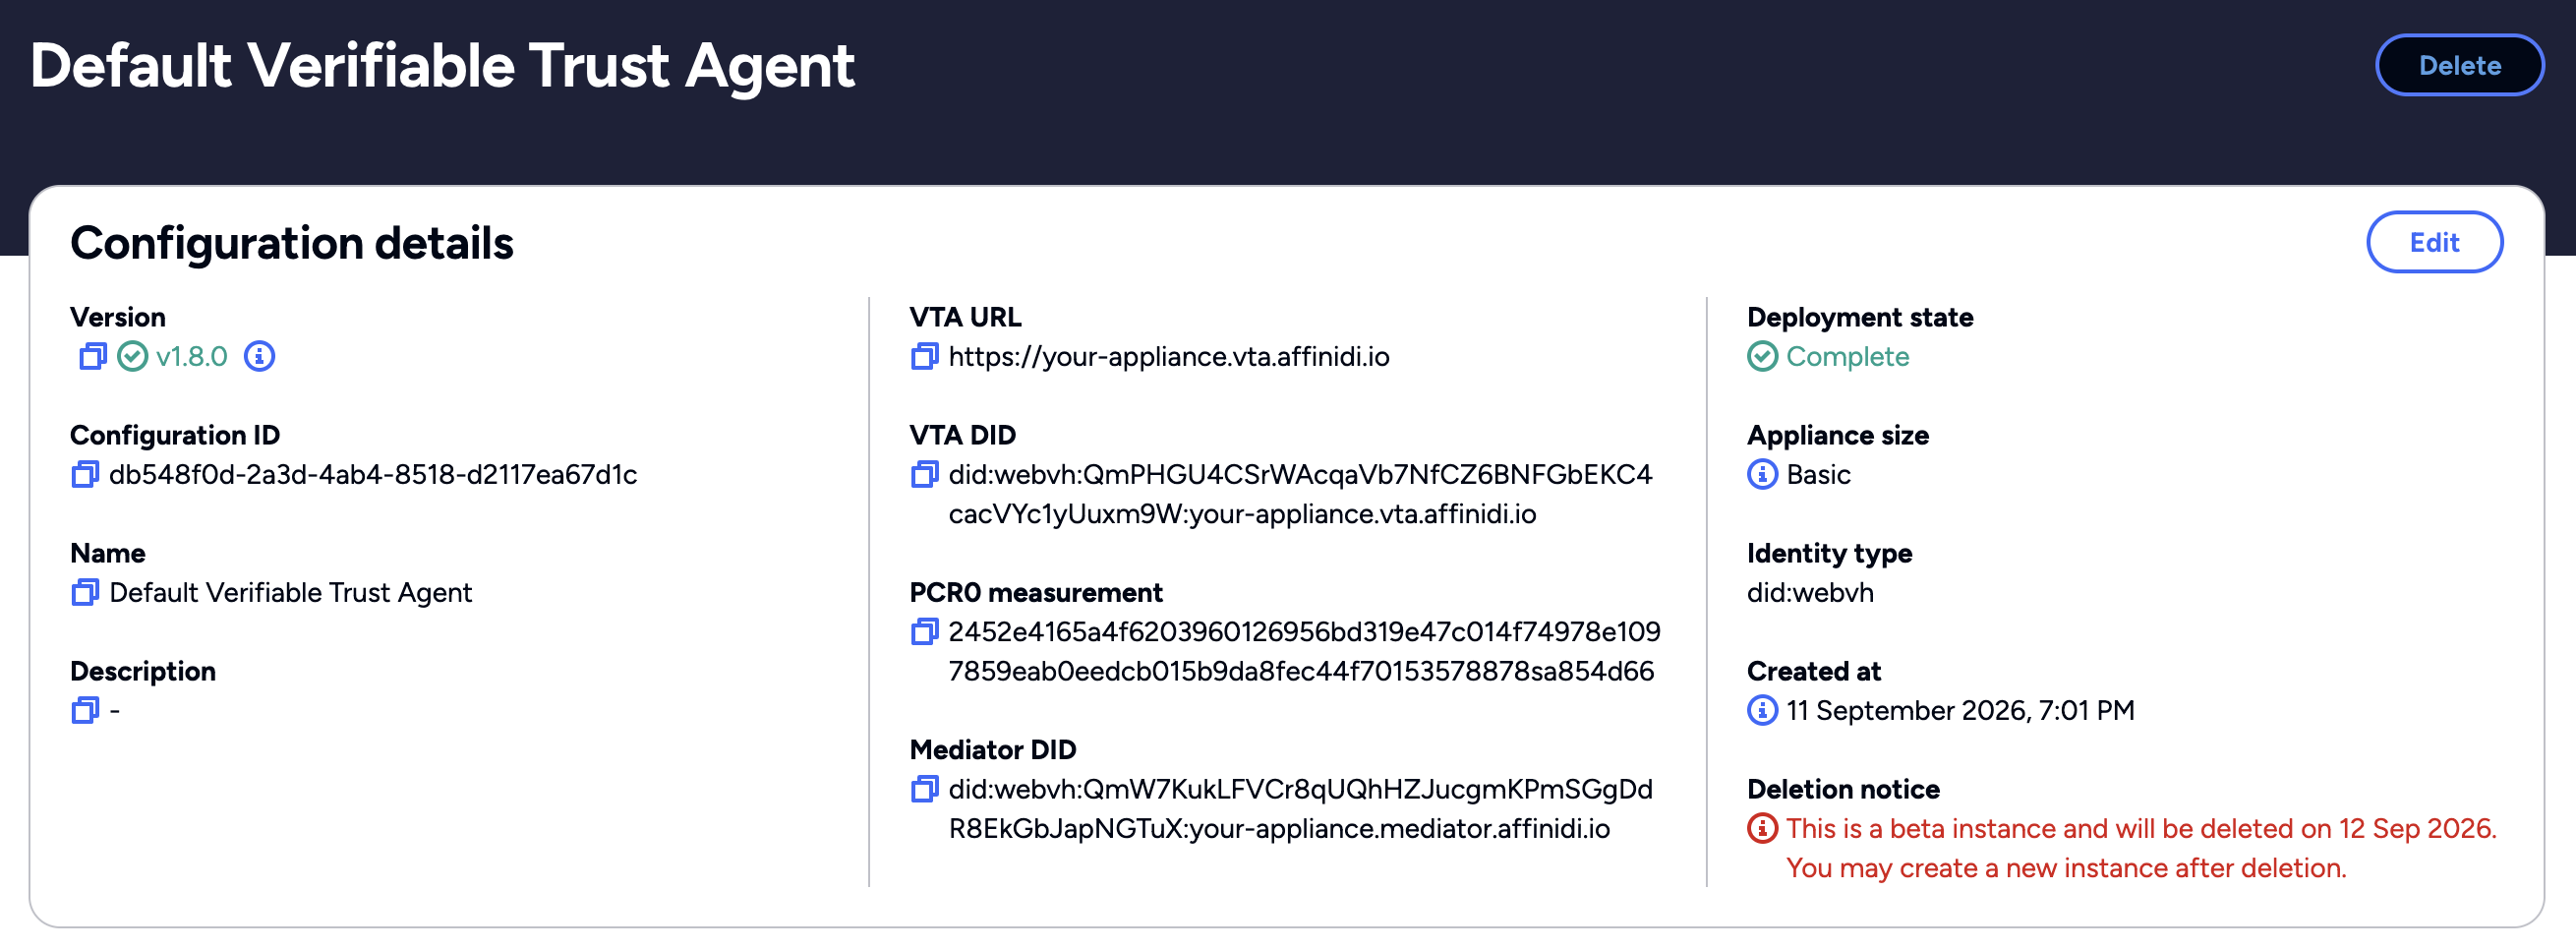
Copy the bootstrap command from the alert below the configuration details.
One configuration per projectEach project holds one VTA configuration during Early Access. To deploy a new VTA, delete the existing configuration first.
Mediator in Explicit Allow modeYour VTA connects to its mediator as its VTA DID. A mediator in Explicit Deny mode, the default, accepts it without further setup. A mediator whose Mediator ACL mode is Explicit Allow accepts connections only from DIDs on its allow list, as described in Supported Access Control Lists (ACLs), so add the VTA DID to that list before you continue.
Portal keeps a saved DID on the list permanently, so check the DID before you save:
- In Affinidi Portal, select DIDComm Mediator in the left sidebar and open your mediator’s configuration.
- Under Access Controls, click Edit.
- Click Add DID, paste the VTA DID into User’s DID, leave Blocked cleared, and click Save.
Step 3. Bootstrap PNM against the VTA
PNM now verifies the enclave’s attestation and installs your admin credential, as described in Deployment overview above.
This is a one-time, single-use step. Once your admin credential is installed, a second pnm bootstrap connect against the same VTA fails. That’s expected: it means bootstrap already succeeded.
Keep the --expect-pcr0 pin in the command every time you bootstrap a new VTA. A mismatch means the running software is not the build you expected, and PNM refuses to install your admin credential. By the time PNM checks the measurement, the VTA has already used its one-time bootstrap, so treat that VTA as untrusted: delete the configuration in Affinidi Portal and deploy a new one.
Paste the bootstrap command you copied in Step 2 into your terminal and run it. It looks like this:
pnm bootstrap connect --vta-did did:webvh:QmVE1TQeCtg3aavpTqasqencJpagRr8JKdGRyoZ5Qx6kRp:your-appliance.vta.affinidi.io --expect-pcr0 8f1d3c5a7b9e...c9a1f3b5 --expect-pcr8 4b2e9d6f0a1c...a7c1e0d2PNM registers each VTA under a short local name, its VTA slug, which you pass as --vta <vta-slug> in later commands. The slug defaults to the hostname at the end of the VTA DID, your-appliance.vta.affinidi.io in this example. To choose a shorter name, add --slug <name> to the command before you run it.
Two independent checks run before your credential installs, and both must pass:
- The DID pins which VTA answers. PNM resolves the
did:webvhlocally, verifying its self-certifying identifier (SCID) and its log, then connects to the REST endpoint that document advertises. A credential minted by a different VTA is refused. - PCR0 pins what is running inside it. The pinned value is checked against the enclave’s attestation quote, so a genuine VTA running a build you did not expect is refused as well. When the command also carries
--expect-pcr8, PNM checks the certificate that signed that build in the same way.
The pinned PCR0 is also the trust anchor that replaces the digest here, which is why no --expect-digest is involved: bootstrap connect mints its bundle during the call, so no out-of-band digest can exist beforehand to compare against.
Bootstrap resolves the DID locally and deliberately ignores any configured resolver URL, so a VTA whose DID log has not published yet cannot be reached this way. Use the VTA URL instead until it publishes:
pnm bootstrap connect --vta-url <vta-url> --expect-pcr0 <pcr0> --expect-pcr8 <pcr8>Keep the PCR values from the copied command, and include --expect-pcr8 only when the copied command has it. --vta-did and --vta-url are mutually exclusive. The URL form still pins the enclave through PCR0, and it does not pin which VTA answers, so prefer the DID form whenever the DID resolves.
Expected output:
TEE attestation verified.
  Enclave module: i-0123456789abcdef0-enc0123456789abcdef
  PCR0:           8f1d3c5a7b9e...c9a1f3b5 (pinned ✓)
  PCR8:           4b2e9d6f0a1c...a7c1e0d2 (pinned ✓)

Bootstrap complete.
  VTA slug:   your-appliance.vta.affinidi.io
  Client DID: did:key:z6MkjLfAT61ZbMfUTytxjp6KnDh7hy9jE5YkQJNuouJEC4cU
  VTA DID:    did:webvh:QmVE1TQeCtg3aavpTqasqencJpagRr8JKdGRyoZ5Qx6kRp:your-appliance.vta.affinidi.io
  Digest:     b1946ac92492d234...7c6235b4d2611184
(pinned ✓) next to PCR0 is the line to check: it confirms the attested measurement matched the value you pinned, so the credential installed against the build you expected. (pinned ✓) appears next to PCR8 too when the command pinned it.
Step 4. Confirm the connection
pnm --vta <vta-slug> healthReplace <vta-slug> with the VTA slug value from Step 3’s output.
Expected output:
  VTA: your-appliance.vta.affinidi.io
  DID: did:webvh:QmVE1TQeCtg3aavpTqasqencJpagRr8JKdGRyoZ5Qx6kRp:your-appliance.vta.affinidi.io

── VTA ───────────────────────────────────────────
  DID           did:webvh:QmVE1TQeCtg3aavpTqasqencJpagRr8JKdGRyoZ5Qx6kRp:your-appliance.vta.affinidi.io
                ✓ resolves (webvh)
  Mode          DIDComm + REST
  URL           https://your-appliance.vta.affinidi.io (from DID)
  Service       ✓ ok

── Authentication ────────────────────────────────
  Client DID    did:key:z6MkjLfAT61ZbMfUTytxjp6KnDh7hy9jE5YkQJNuouJEC4cU
  Token         ✓ valid (expires in 899s)

── Mediator ──────────────────────────────────────
  DID           did:webvh:QmSW59XWpXN4xNX5ZJvkYmaJBpBH7d1WN1fR6ZZG8xtjGE:your-appliance.mediator.affinidi.io
                ✓ resolves (webvh)
                ✓ pong (14ms)

── VTA DIDComm ───────────────────────────────────
  Trust-ping    ✓ pong (25ms)
If any check shows ✗, see Troubleshooting below.
PNM treats the first VTA you register on a machine as its default, and --vta picks a specific VTA for a single command. To make this VTA the default for every later command, run:
pnm vta use <vta-slug>pnm vta list shows every VTA registered on this machine.
Troubleshooting
| Symptom | Likely cause | Fix |
|---|---|---|
pnm bootstrap connect fails with --expect-digest <hex> is required (or pass --no-verify-digest to opt out with a warning) | pnm is older than 0.16.4, where a pinned PCR0 became a trust anchor in its own right. This error appears with the --vta-url form. | Upgrade with the cargo install command in Install PNM, then re-run the command from Step 3. |
pnm bootstrap connect fails with unexpected argument '--vta-did' | Same cause: --vta-did was added in 0.16.4. | Upgrade pnm, or use the --vta-url form until you do. |
Could not resolve bootstrap endpoint for VTA DID ... | The VTA’s DID log has not published yet, or this machine cannot reach it. Bootstrap always resolves locally, so a reachable resolver sidecar does not satisfy it: PNM_RESOLVER_URL and [resolver_url] are deliberately ignored for this call. | Retry once the DID log is published and reachable from this machine, or bootstrap with --vta-url instead, accepting that it does not pin the VTA’s identity. |
pnm bootstrap connect fails with PCR0 mismatch: enclave reported …, operator expected … | The pinned PCR0 does not match the enclave’s live attestation, so the running software is not the build you expected. | Treat this VTA as untrusted. Its one-time bootstrap is already used, so delete the configuration in Affinidi Portal, deploy a new one, and confirm the PCR0 on its configuration page before you bootstrap it. |
pnm bootstrap connect fails with bootstrap request failed (410 Gone): {"error":"gone: TEE first-boot carve-out has already been used"} | The VTA already has an admin credential installed; the attested bootstrap endpoint is single-use | Expected once bootstrap has already succeeded. Run pnm --vta <vta-slug> health to confirm the existing connection instead. |
pnm health shows ✗ trust-ping failed or ✗ trust-ping timed out on Trust-ping | VTA DIDComm layer has stalled | Restart the VTA with pnm vta restart, then wait for the confirmation VTA is back. Re-run pnm health to confirm Trust-ping shows ✓ pong. |
Next steps
Glad to hear it! Please tell us how we can improve more.
Sorry to hear that. Please tell us how we can improve.
Thank you for sharing your feedback so we can improve your experience.