Affinidi Login with KeyCloak
The Affinidi Login can be integrated with any application that supports OIDC flow.
This lab uses NextJS and NextAuth.js as the framework to implement Affinidi Login.
Before you begin
- Set up Affinidi Vault account. Follow the guide below if you haven’t set it up yet.
Set up Affinidi Vault
Click on Get started if you are creating a new account, or click on Restore from Backup if you have an existing backup of your Affinidi Vault. Provide the passphrase to secure your Affinidi Vault.
You have the option to enable Biometrics to unlock your Affinidi Vault easily instead of using passphrase.
- Enter your email address to register with the Affinidi Vault. An OTP will be sent to this email for verification.
- Enter the OTP sent to the email you have provided for verification to complete the setup.
After successfully providing the OTP, you are redirected to the Affinidi Vault dashboard.
Remember to keep your passphrase in a secure location. Use the Passphrase Reset feature in Affinidi Vault settings to generate the PDF files and keep them safe, which you can use to recover access to your Affinidi Vault if you forget your passphrase.
Install Docker and Docker Compose software into your machine.
Optionally, install the Affinidi CLI. Follow the guide below if you haven’t installed yet.
Download Application
You can download this sample application using Next.js framework and start exploring how to integrate Affinidi Login with KeyCloak as the authorisation server and Affinidi Vault as the Identity Provider to provide a passwordless login experience.
Important Note
The downloadable sample application is provided only as a guide to quickly explore and learn how to integrate the components of Affinidi Trust Network into your application. This is NOT a Production-ready implementation. Do not deploy this to a production environment.Running the Application
- Suppose this is your first time downloading the sample application. Run the following command to install the dependencies.
npm install- Create the
.envfile in the sample application by running the following command.
cp .env.example .envIf you open the sample application in a Code Editor, duplicate the
.env.exampleand rename it.env.
- After installing the dependencies, run the application by running the command.
npm run devRunning the application for the first time without configuring the
.envfile will throw an exception error. We will configure the required environment variables in the following steps of this guide.
You may refer to the included README.md file for more details.
Initiate KeyCloak App via Docker
In this lab, we use KeyCloak docker image to kick-start the application locally.
Open your command line and go to the sample application directory.
Run the following command to initiate the KeyCloak app through Docker.
docker compose up -d- Verify that the container was successfully created by running:
docker ps
workshop-reference-app-keycloak-1should be in a running status and accessible in the browser through http://localhost:8080.
- Login to the Administration Console using the following credentials:
Username / Password: admin / admin
Configure KeyCloak Client
Create an OpenID Connect client to integrate with the sample application. Use the generated credentials to enable KeyCloak authentication flow.
- Go to Client and create a new client.

- In the General Settings, configure the following details and then click on Next:
- Client type:
OpenID Connect - Client ID:
affinidi-keycloak - Name:
affinidi-keycloak
In the Capability Config, enable both
Client authenticationandAuthorization. Keep the default Authentication flow.In the login settings, configure the following URLs:
- Root URL:
http://localhost:3000 - Home URL:
http://localhost:3000 - Valid redirect URIs:
http://localhost:3000/api/auth/callback/keycloak - Web origins:
http://localhost:3000
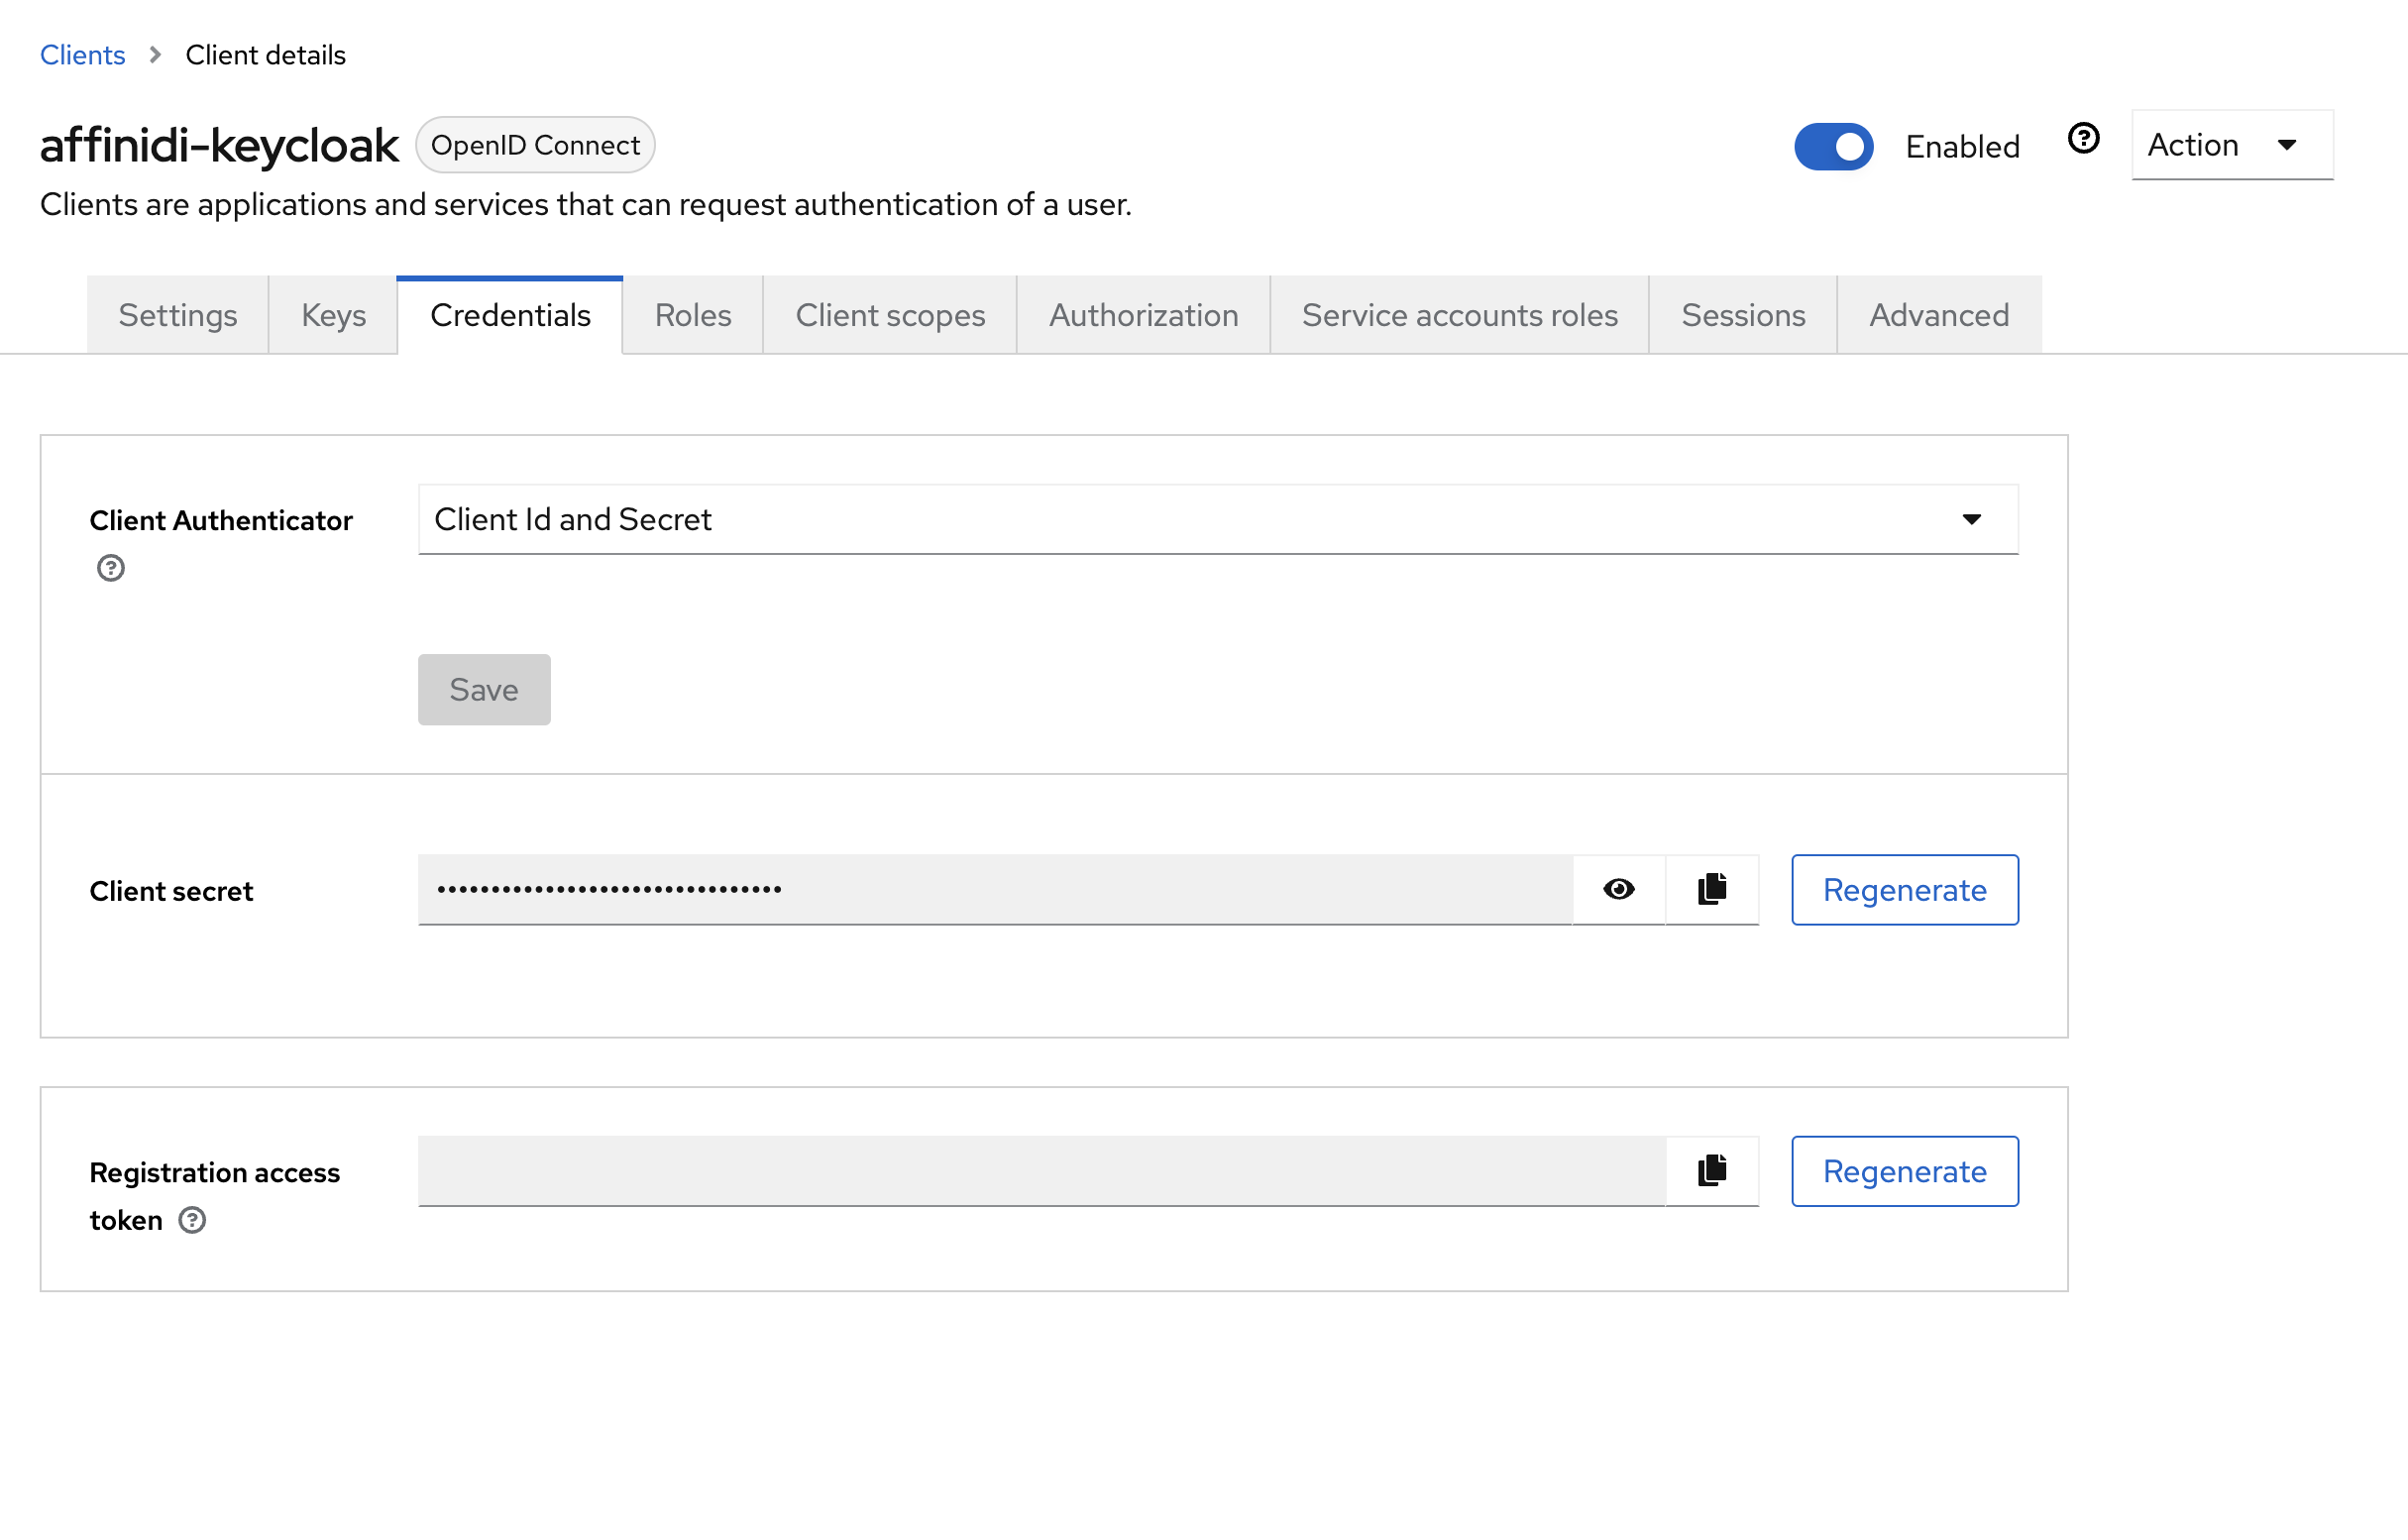
- Once you have successfully created a KeyCloak client, a Client secret is generated under the Credentials tab. We’ll use this on the later steps.
Create Login Configuration
Having set up KeyCloak, started the KeyCloak client, and created a new client, you need to create the Affinidi Login Configuration. The authentication credentials produced by the Login Configuration serve to integrate Affinidi Login into the KeyCloak OpenID provider.
To create a Login Configuration, you can either use Affinidi CLI or Affinidi Portal .
Expand the section below for your preferred method:
Name: My KeyCloak config
Redirect URIs: http://localhost:8080/realms/master/broker/affinidi/endpoint
Using Affinidi Portal
Go to Affinidi Login under the Services section.
Click on the Create Login Configuration and provide the required details.
Nameis the string that describes your login configuration.Redirect URIsis the URL on your application where the user gets redirected after the successful authentication.
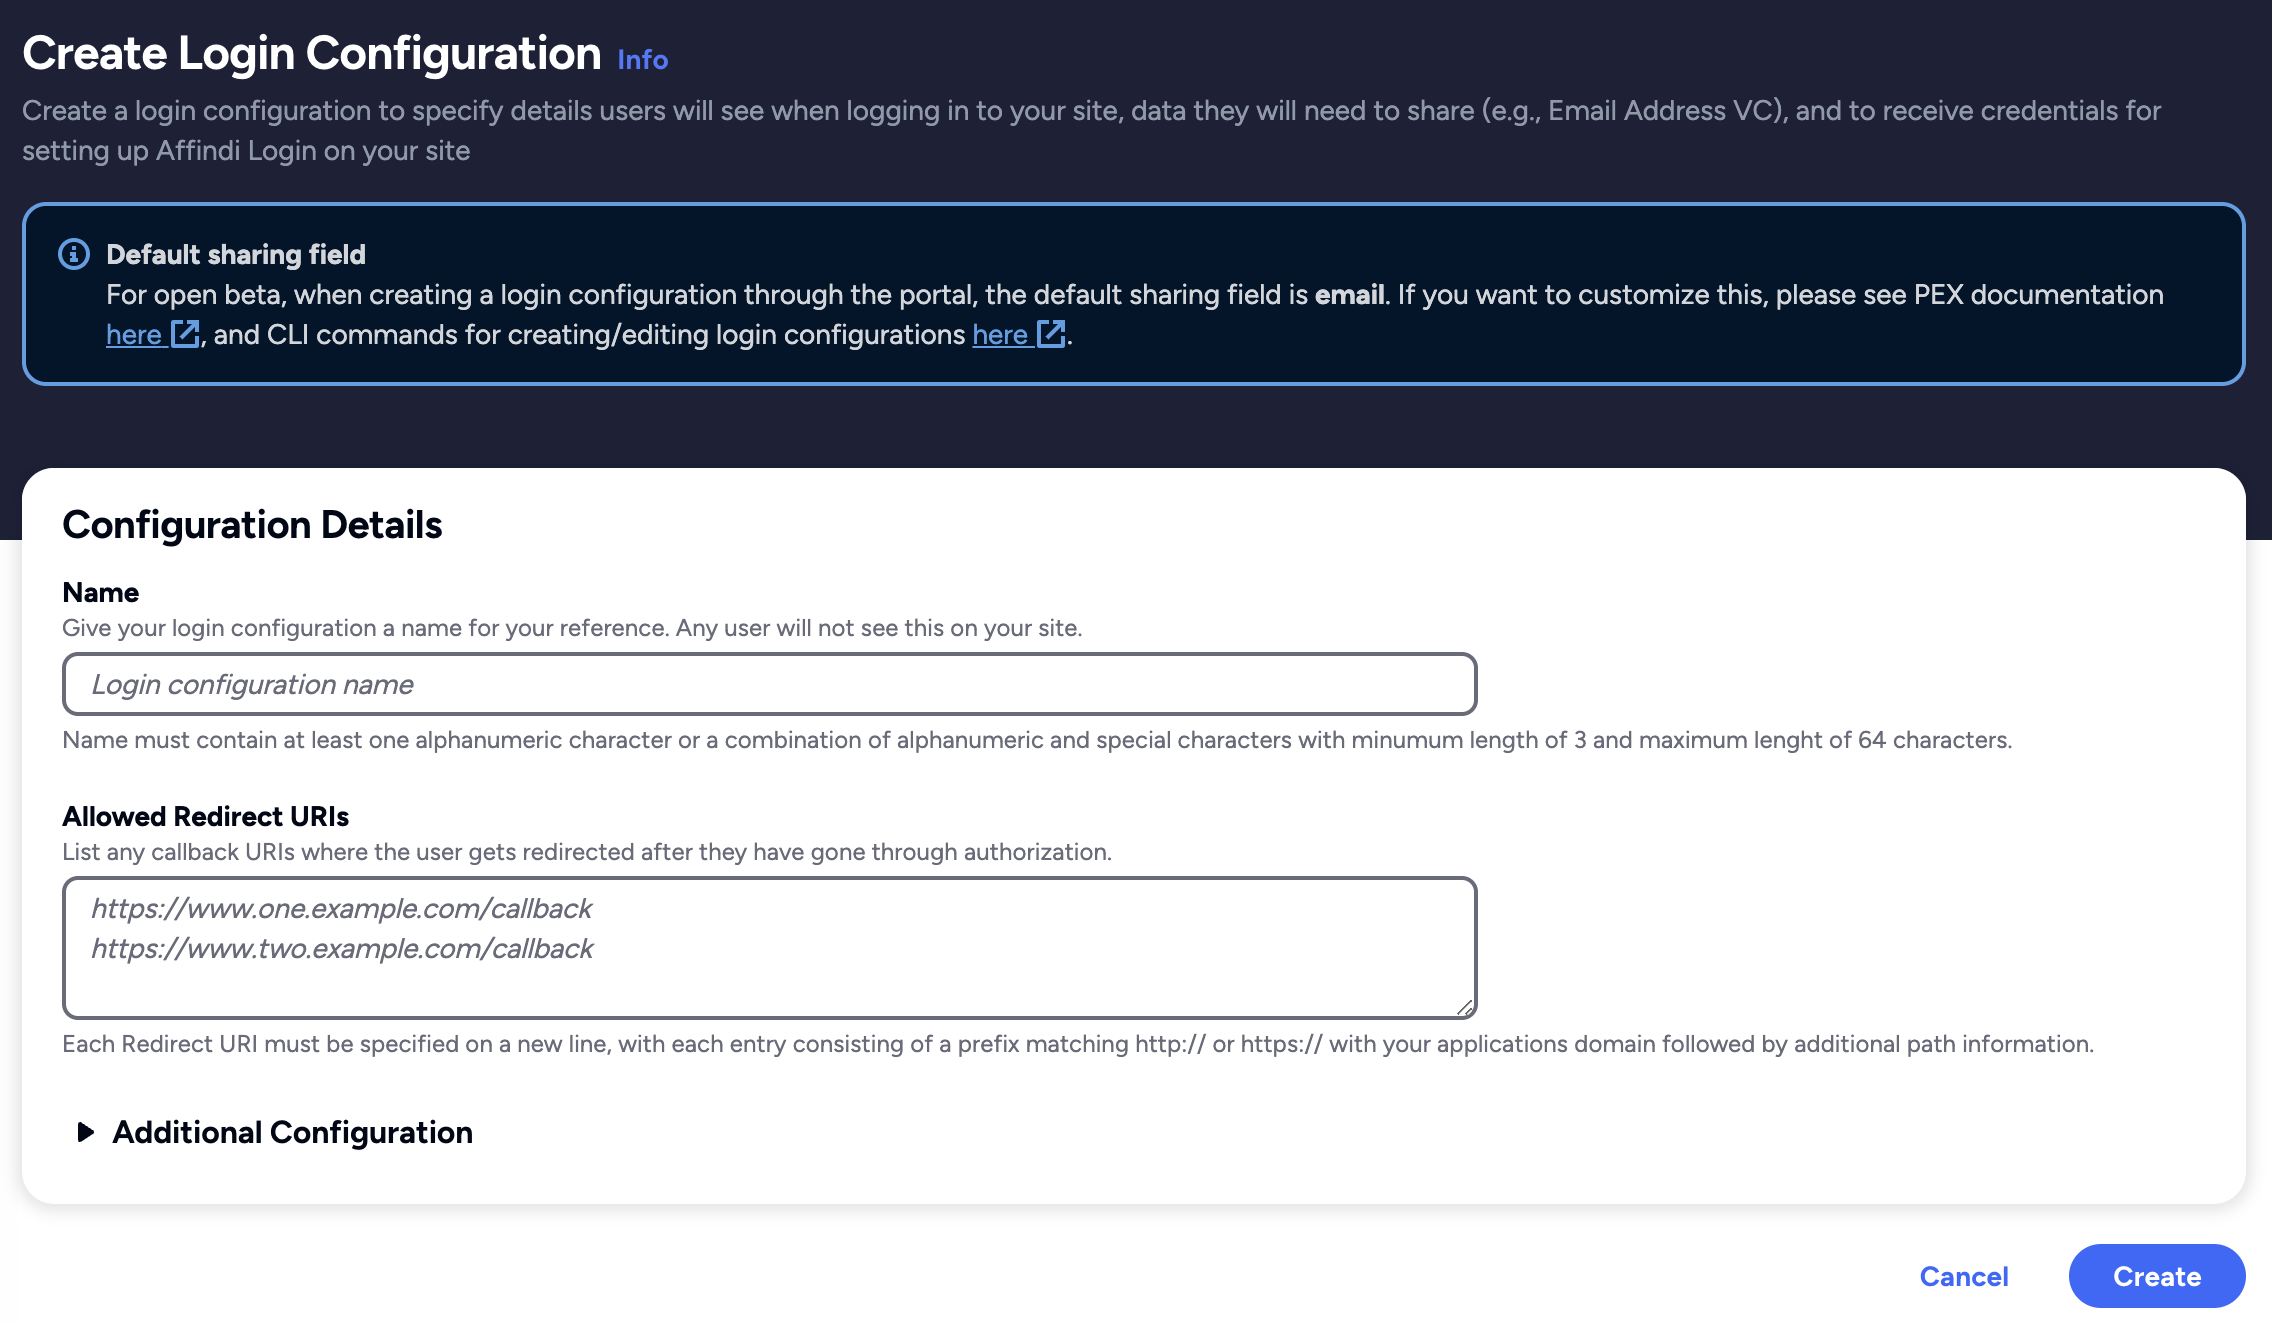
Click on create and confirm if all the details are correct.
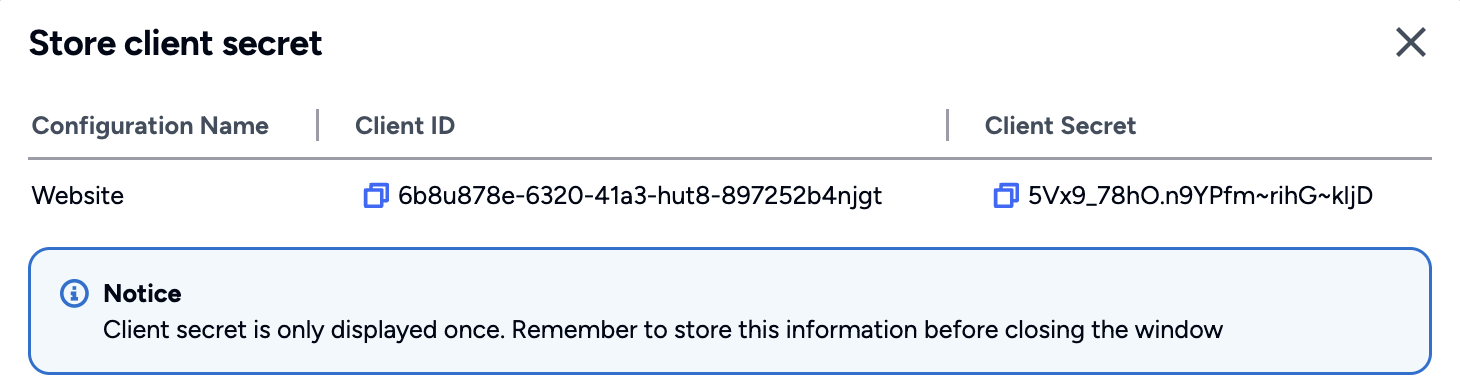
After confirming the details, another popup shows the Client ID and Client Secret for your Login Configuration. Copy the generated Client Credentials and use them to integrate with Affinidi Login.
- After copying the Client ID and Client Secret and closing the popup, you are redirected back to the Affinidi Login page.
Login Configuration uses the default Presentation Definition (presentationDefinition) and ID Token Mapping (idTokenMapping) that is used to request the user’s email address during the authentication flow.
Important
Safeguard the Client ID and Client Secret diligently; you'll need them for setting up your IdP or OIDC-compliant applications. Remember, the Client Secret will be provided only once.
Configure KeyCloak with Affinidi Login
In these steps, you configure KeyCloak to integrate with Affinidi Login as the identity provider when authenticating users during the login flow. Use the auth credentials that Login Configuration generated.
Go back to the KeyCloak Admin Console and go to Identity providers.
Click on KeyCloak OpenID Connect and configure the following details:
- Alias:
affinidi - Display name:
affinidi
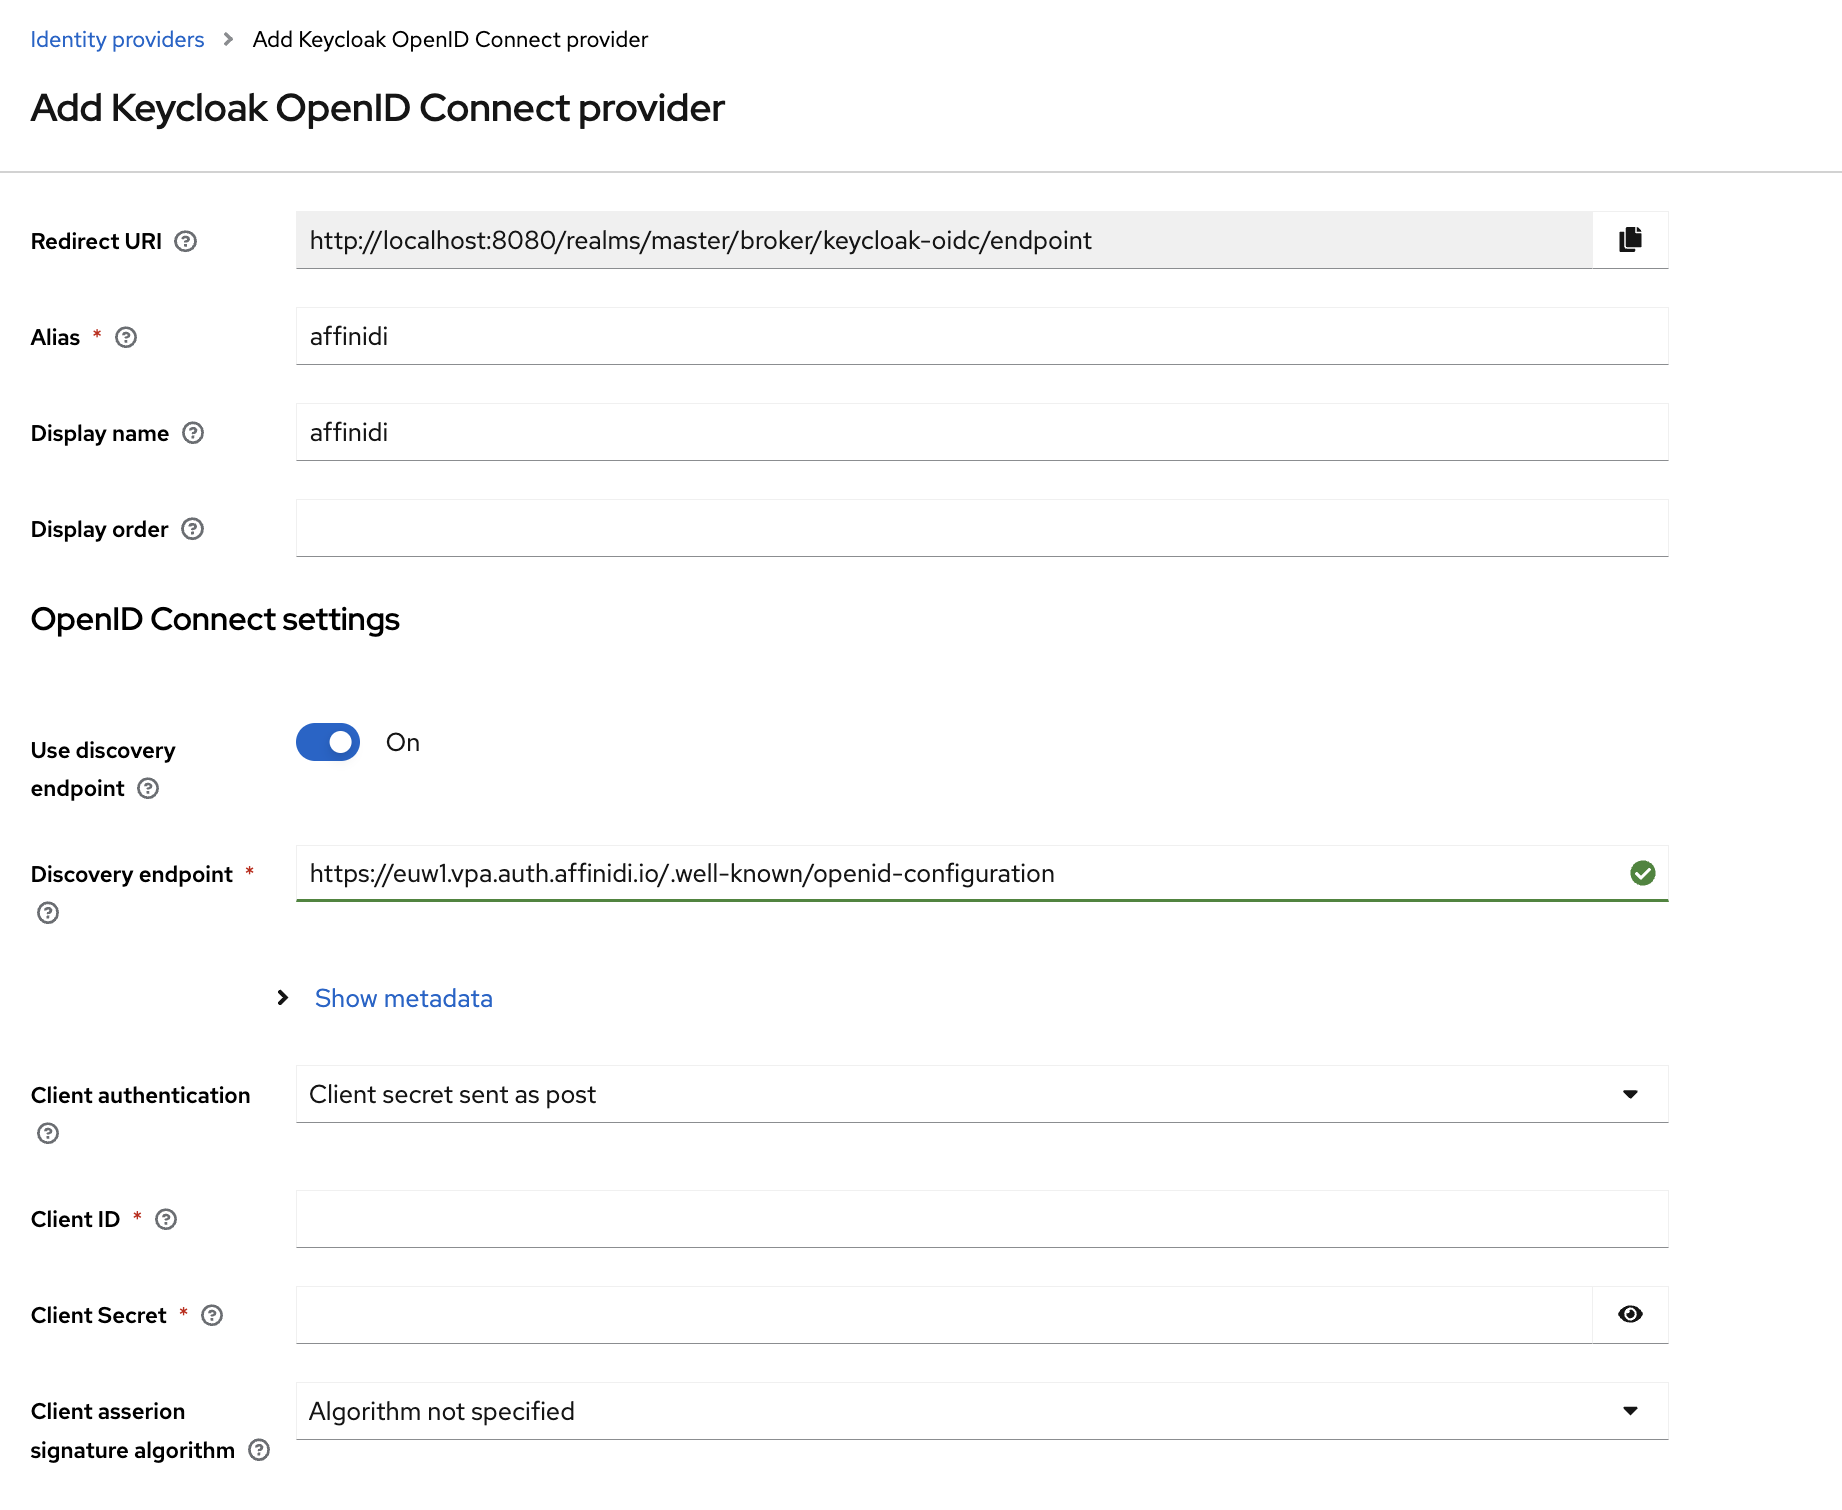
- In the OpenID Connect settings, configure credentials that the Login Configuration generated from the previous step:
- Discovery endpoint:
auth.issuer/.well-known/openid-configuration - Client ID: set the value from the
auth.clientIdof the Login Configuration - Client Secret: set the value from the
auth.clientIdof the Login Configuration
auth.issueris the value from Login Configuration.
- Once you add the OpenID Connect provider details. Scroll down to Advanced section and set the following details:
- Scopes:
openid offline_access - Prompt:
Login
- Enable both Store tokens and Trust email option in the Advanced settings section.
Configure KeyCloak idToken Mapping
In these steps, add the field mappings that allow KeyCloak to map user claims from the idToken provided by Affinidi Login into KeyCloak’s own idToken, which is subsequently sent to the application integrated with KeyCloak.
In the mapping example provided, the
custom[1].emailfield from Affinidi Login’s idToken custom claim is mapped to the username field of KeyCloak’s idToken.
- To add this, navigate to the ‘Mappers’ tab and select the ‘Add Mapper’ button.
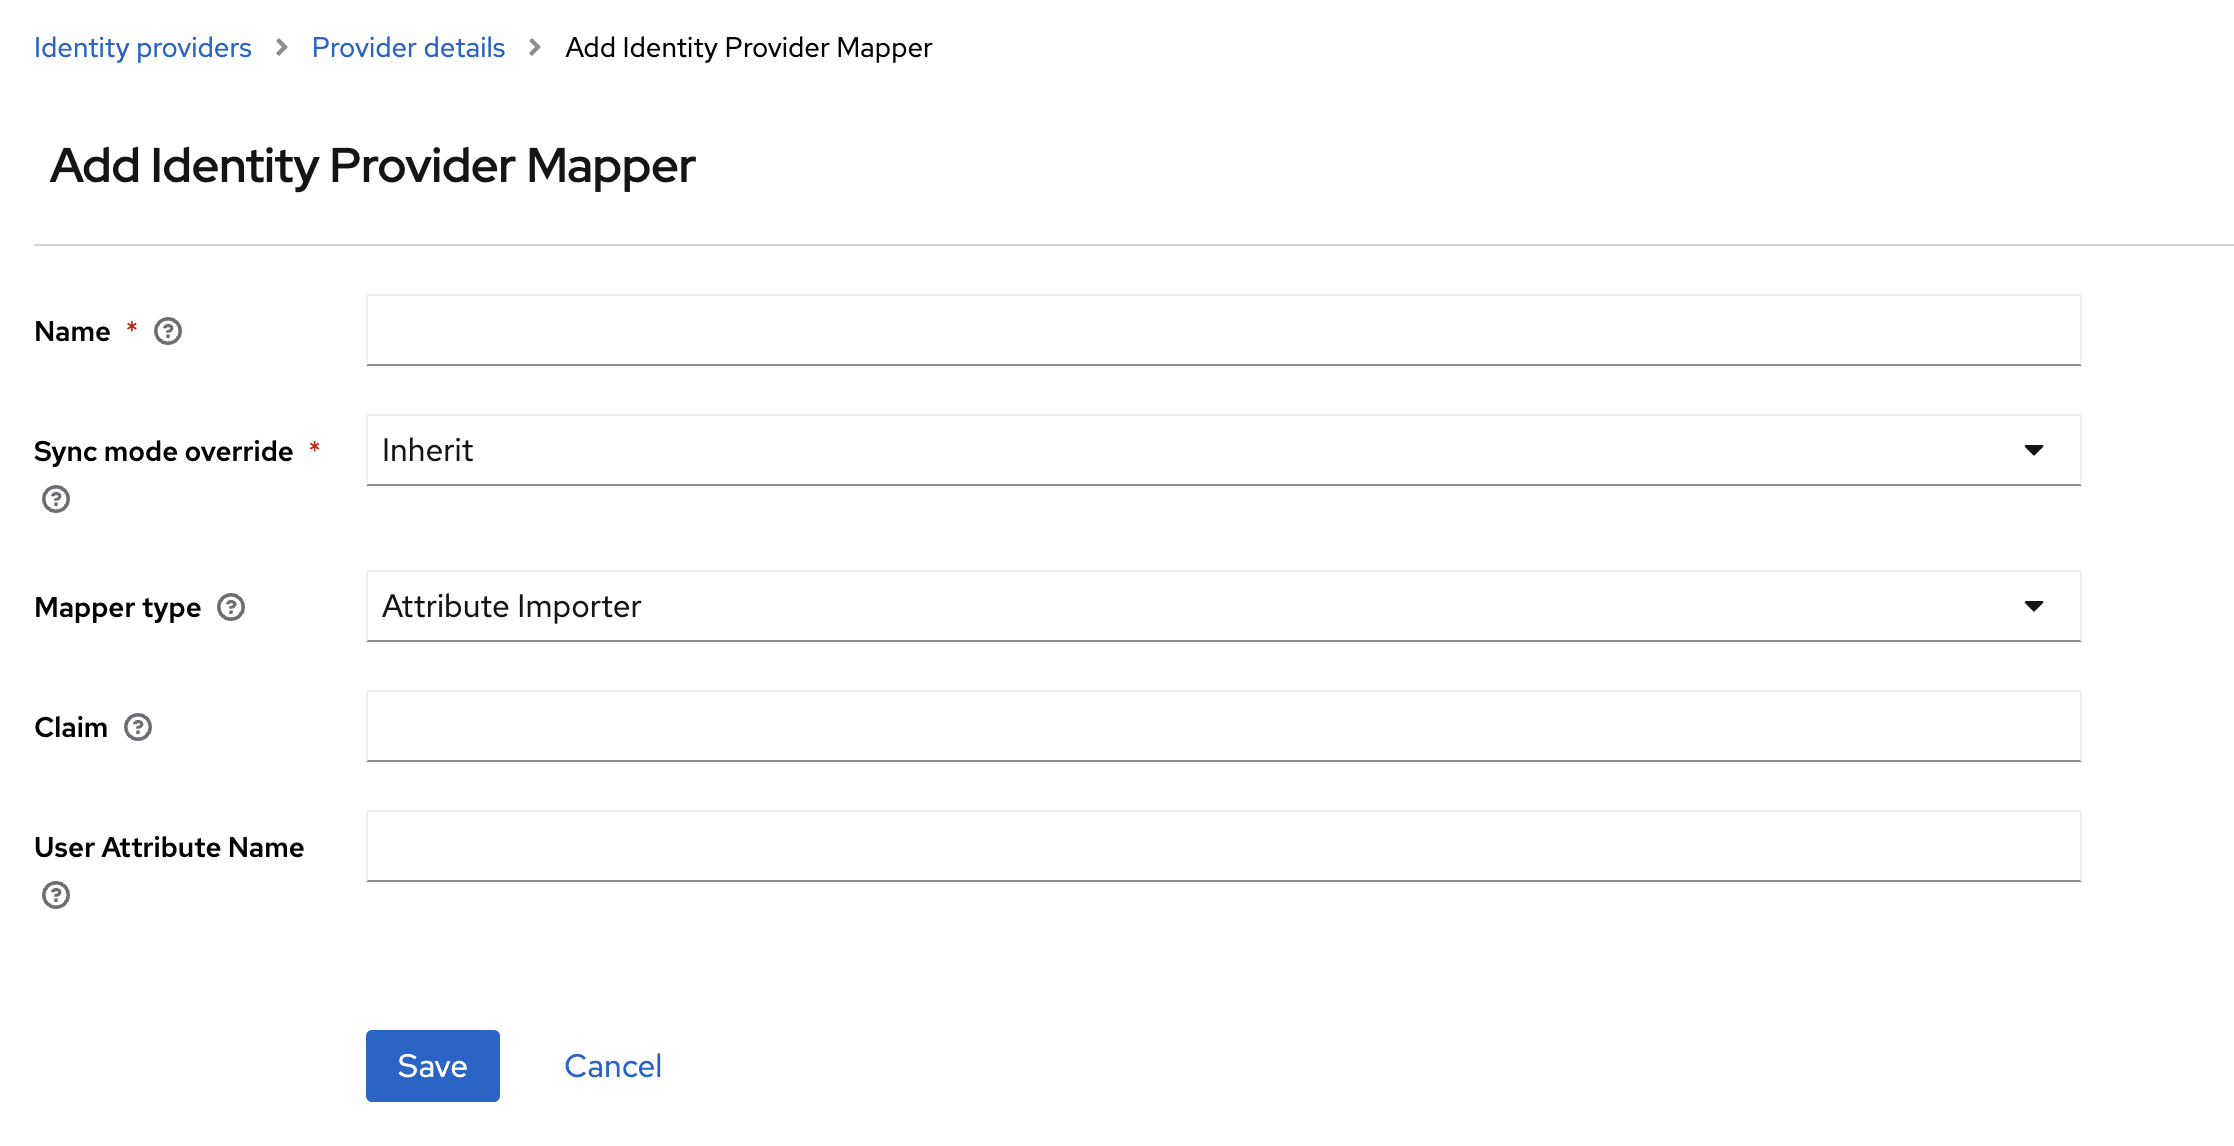
Proceed with the following field mappings:
| Name | Mapper Type | Claims | User Attribute Name |
|---|---|---|---|
| username mapper | Attribute Importer | custom[1].email | username |
| email mapper | Attribute Importer | custom[1].email | |
| firstname mapper | Attribute Importer | sub | firstName |
| lastname mapper | Attribute Importer | sub | lastName |
Set up the Sample Application
In these steps, setup parts of the sample application to integrate KeyCloak into the sample application. The KeyCloak you integrated is configured to connect to the Affinidi Login as the identity provider.
In this guide, learn how to integrate Affinidi Login using NextJS and NextAuth.js with KeyCloak as authorisation server into your application.
KeyCloak is configured to connect to Affinidi Login as the Identity provider to authenticate user.
Configure .env file
Set the environment variables based on the credentials generated from KeyCloak client called affinidi-keycloak you have created earlier:
        PROVIDER_CLIENT_ID="affinidi-keycloak"
PROVIDER_CLIENT_SECRET="<KEYCLOAK_CLIENT_SECRET>"
PROVIDER_ISSUER="http://localhost:8080/realms/master"
Configure NextAuth for Affinidi Login
File path: pages/api/auth/[…nextauth].ts
Using the NextAuth.js library, configure the nextauth file to enable Affinidi Login as a login provider and set up the JWT and Session from the idToken sent by the Affinidi Login after the user successfully authenticates.
Add KeyCloak Login as a Login Provider
In the code below, we are adding KeycloakProvider as one of the Login Provider for NextAuth.js.
Import the KeyCloak from the NextAuth.js library
import KeycloakProvider from "next-auth/providers/keycloak"Add KeyCloak as a Login Provider
KeycloakProvider({
    clientId: providerClientId,
    clientSecret: providerClientSecret,
    issuer: providerIssuer,
}),
Generate JWT and Session from the idToken
In the code below, you generate a JWT and a session from the idToken that we have received from KeyCloak after successful user authentication.
async jwt({ token, account, profile }) {
    const email = (profile as any)?.email;
    const did = (profile as any)?.given_name;

    return {
    ...token,
    ...(email && { email }),
    ...(did && { did }),
    ...(account?.access_token && { accessToken: account?.access_token }),
    ...(account?.id_token && { idToken: account?.id_token }),
    ...(profile?.sub && { userId: profile?.sub }),
    };
},

async session({ session, token }) {
    return {
    ...session,
    ...session.user,
    ...(token.did && { did: token.did }),
    ...(token.email && { email: token.email }),
    ...(token.userId && { userId: token.userId }),
    ...(token.accessToken && { accessToken: token.accessToken }),
    ...(token.idToken && { idToken: token.idToken }),
    };
},
Enable Affinidi Login
File path: pages/sign-in/index.tsx
In the code below, we are enabling Affinidi Login into the Login page of the sample app and referencing the NextAuth provider that we configured earlier.
        async function logIn() {
  // enable Affinidi Login button
  await signIn('keycloak', { callbackUrl: hostUrl })
}
Summary
sequenceDiagram
    actor User
    participant Website
    participant KeyCloak
    participant Affinidi Login
    participant Affinidi Vault
    participant Affinidi Verifier

    User->>Website: My Login
    Website->>KeyCloak: trigger OIDC flow
    Note over Website, KeyCloak: KeyCloak OIDC credentials
    KeyCloak->>Affinidi Login: Authenticate user
    Note over KeyCloak, Affinidi Login:  login_challenge
    Affinidi Login->>Affinidi Vault: Verify user identity
    Note over Affinidi Login, Affinidi Vault:  presentationDefinition
    Affinidi Vault->>User: Request user confirmation to share Email VC
    User->>Affinidi Vault: User confirmed consent to share Email VC
    Affinidi Vault->>Affinidi Vault: Generate VP Token from VC
    Affinidi Vault->>Affinidi Login: Send Email VP Token
    Affinidi Login->>Affinidi Verifier: Validate VP Token
    Note over Affinidi Login, Affinidi Verifier:  vp_token, presentation_submission, presentation_definition
    Affinidi Login->>Affinidi Login: Generate idToken
    Affinidi Login->>KeyCloak: Send generated idToken from VP
    KeyCloak->>Website: Send Mapped idToken
    Website->>User: Provide access to the user
In the sample application, we integrated KeyCloak as the OIDC provider and set it up to work with Affinidi Login as the identity provider. Affinidi Login interacts with the Affinidi Vault to verify the user’s identity and then supplies the VP Token, which KeyCloak uses as part of the idToken.
Glad to hear it! Please tell us how we can improve more.
Sorry to hear that. Please tell us how we can improve.
Thank you for sharing your feedback so we can improve your experience.