Affinidi Login - Passwordless Authentication for Wix
Affinidi Login can be integrated easily with any application that supports OIDC flow.
This integration guide provides step-by-step instructions to enable users to have a Passwordless Login experience into your Wix website using Affinidi Login.
Assumptions
You already have a development site created where you would configure Affinidi Login. If you need to create one, then follow the instructions here.
Information presented here is recommended as a learning guide for non-production environments. We recommend to reach out to Affinidi team through Discord to assess and adjust the production readiness together for your specific store.
Before you begin
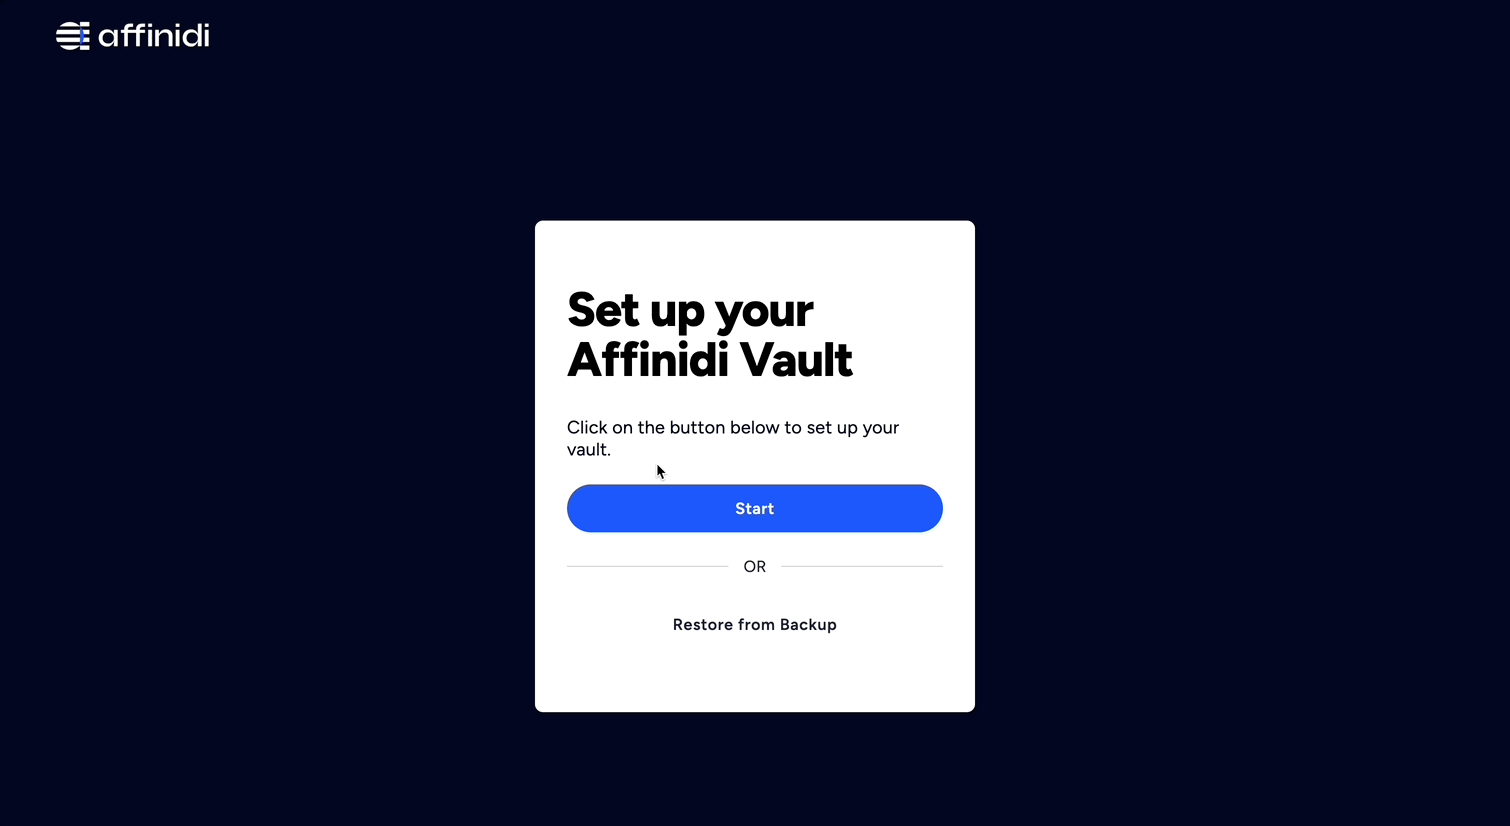
- Set up Affinidi Vault account. Follow the guide below if you haven’t set it up yet.
Set up Affinidi Vault
Click on Get started if you are creating a new account, or click on Restore from Backup if you have an existing backup of your Affinidi Vault. Provide the passphrase to secure your Affinidi Vault.
You have the option to enable Biometrics to unlock your Affinidi Vault easily instead of using passphrase.
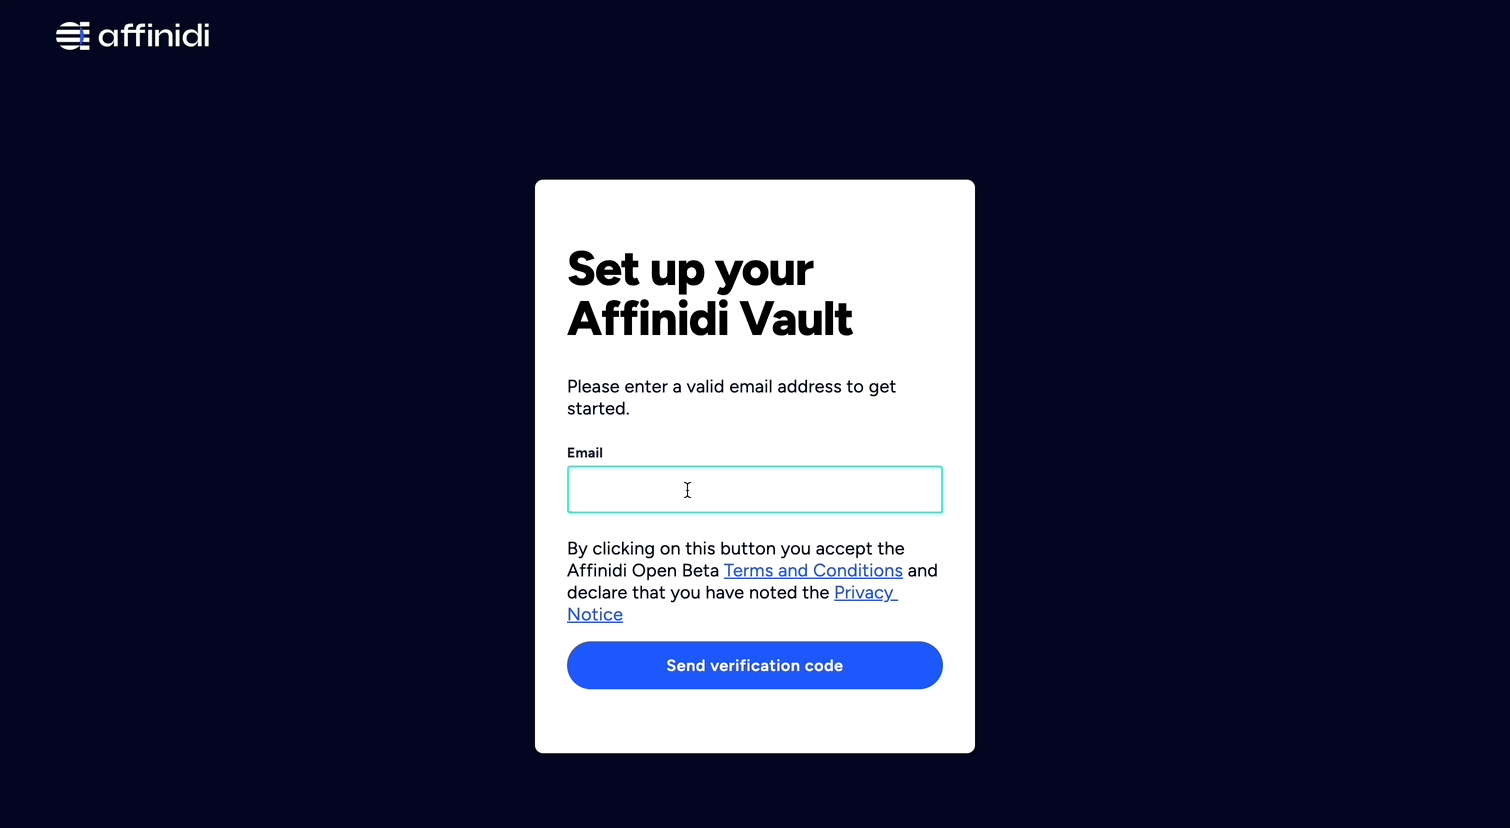
- Enter your email address to register with the Affinidi Vault. An OTP will be sent to this email for verification.
- Enter the OTP sent to the email you have provided for verification to complete the setup.
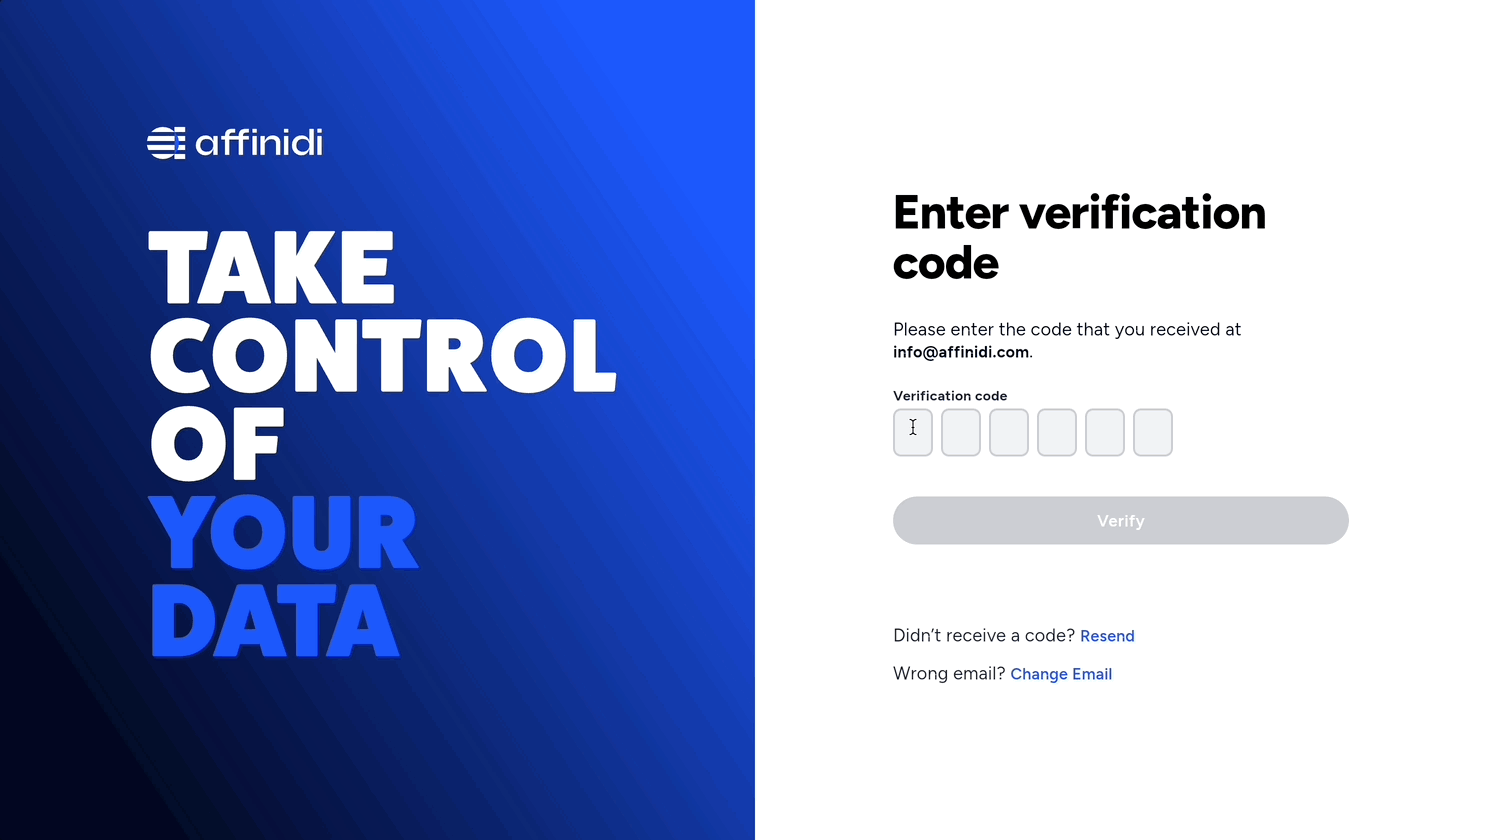
After successfully providing the OTP, you are redirected to the Affinidi Vault dashboard.
Remember to keep your passphrase in a secure location. Use the Passphrase Reset feature in Affinidi Vault settings to generate the PDF files and keep them safe, which you can use to recover access to your Affinidi Vault if you forget your passphrase.
- Optionally, install the Affinidi CLI. Follow the guide below if it hasn’t been installed.
- Enable the Dev Mode on your Wix site.
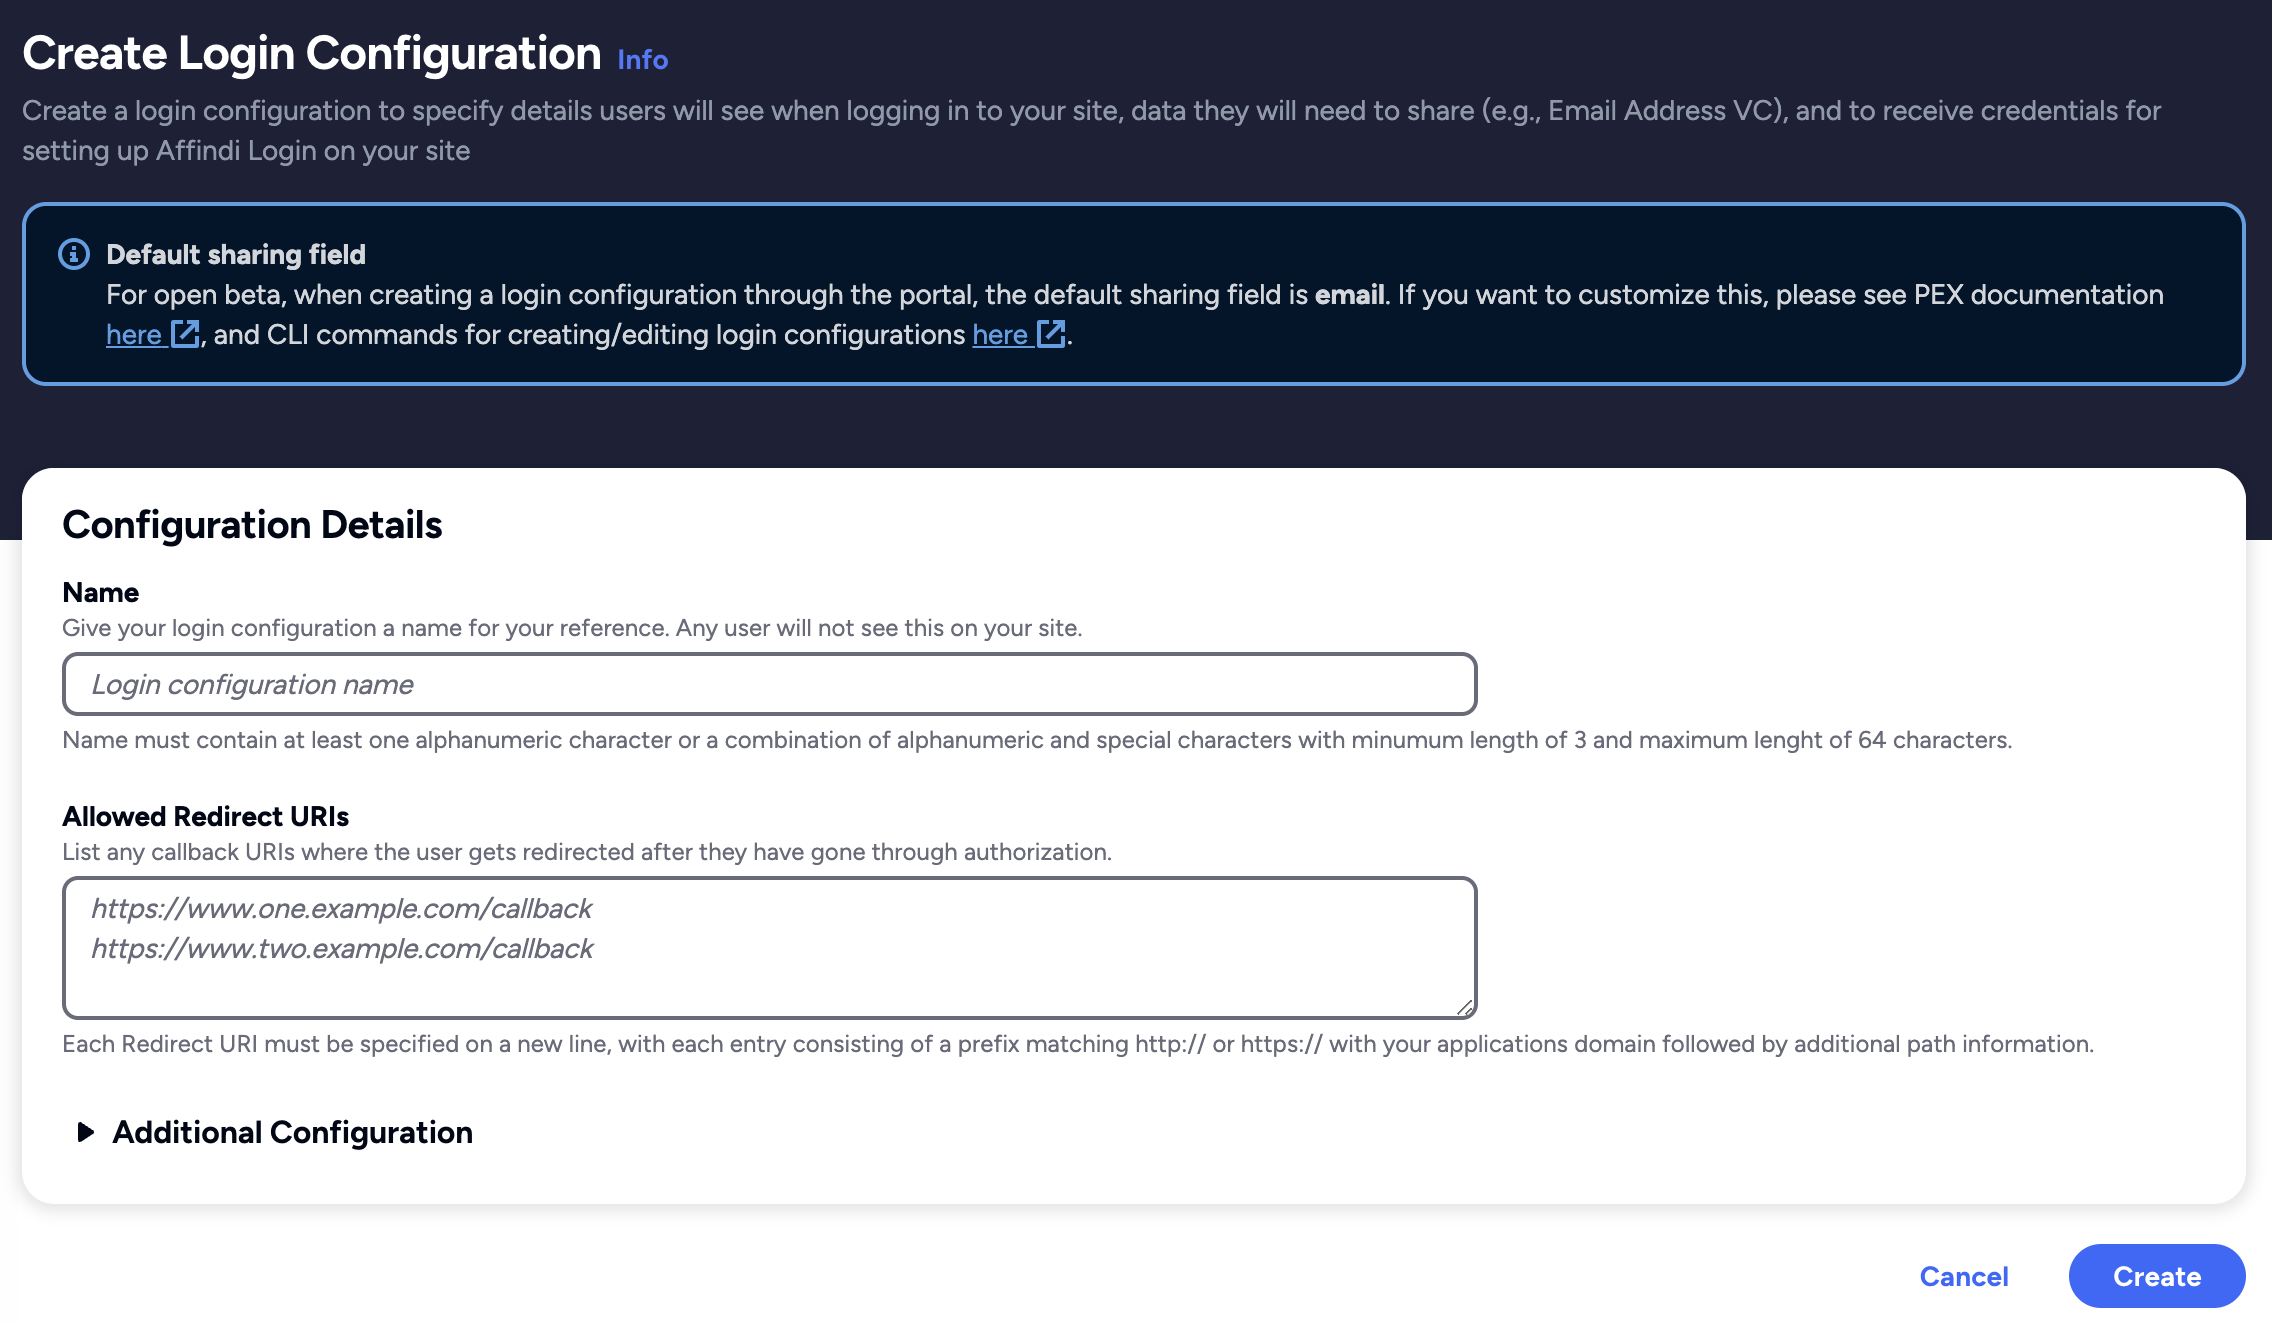
Create Login Configuration
To create a Login Configuration, you can either use Affinidi CLI or Affinidi Portal .
Expand the section below for your preferred method:
Name: Wix Site
Redirect URIs: Set the Redirect URI based on your Wix site.
e.g. https://<WIX_SITE_HOST>/_functions/getAuthCallback
Auth Method: none
Using Affinidi Portal
Go to Affinidi Login under the Services section.
Click on the Create Login Configuration and provide the required details.
Nameis the string that describes your login configuration.Redirect URIsis the URL on your application where the user gets redirected after the successful authentication.
Click on create and confirm if all the details are correct.
After confirming the details, another popup shows the Client ID and Client Secret for your Login Configuration. Copy the generated Client Credentials and use them to integrate with Affinidi Login.
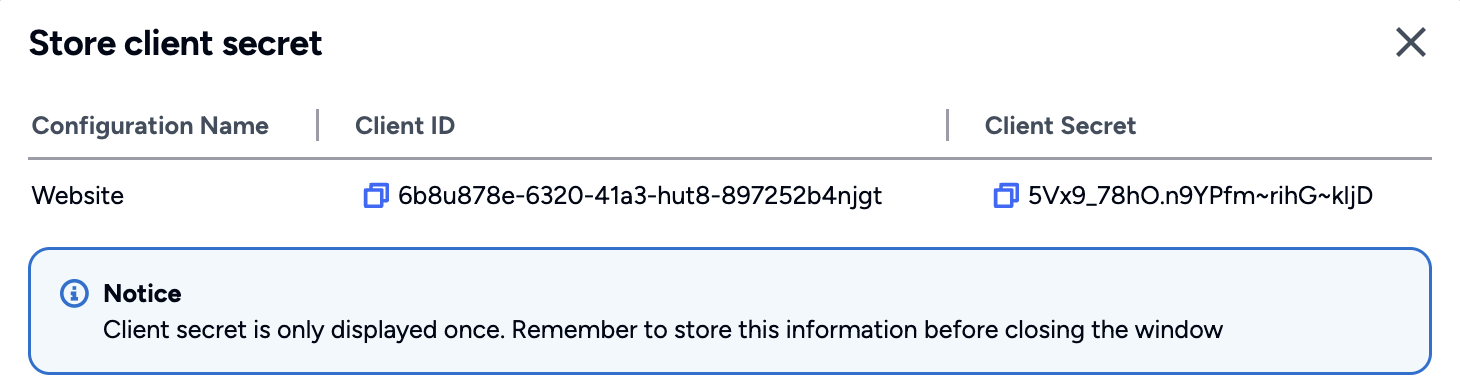
- After copying the Client ID and Client Secret and closing the popup, you are redirected back to the Affinidi Login page.
Login Configuration uses the default Presentation Definition (presentationDefinition) and ID Token Mapping (idTokenMapping) that is used to request the user’s email address during the authentication flow.
Important
Safeguard the Client ID and Client Secret diligently; you'll need them for setting up your IdP or OIDC-compliant applications. Remember, the Client Secret will be provided only once.
ID Token Mapping Template
When creating or after creating the Login Configuration, we have to modify the ID Token Mapping to move the email field from the custom claim to the top-level claim following the OIDC standard.
To modify the ID Token Mapping of the Login Configuration, expand the Additional Configuration section and look for the custom Presentation Definition. Click the Create New button when creating a new Login Configuration or click on Edit button when editing an existing Login Configuration.
Use the ID Token Mapping below:
        [
  {
    "sourceField": "$.credentialSubject.email",
    "idTokenClaim": "$.email",
    "inputDescriptorId": "email_vc"
  },
  {
    "sourceField": "$.type",
    "idTokenClaim": "$.custom[0].type",
    "inputDescriptorId": "email_vc"
  },
  {
    "sourceField": "$.issuer",
    "idTokenClaim": "$.custom[1].issuer",
    "inputDescriptorId": "email_vc"
  }
]
The ID Token Mapping format the ID Token claim to have the email at the top-level claim to align with the standards.
Setup Client Credentials
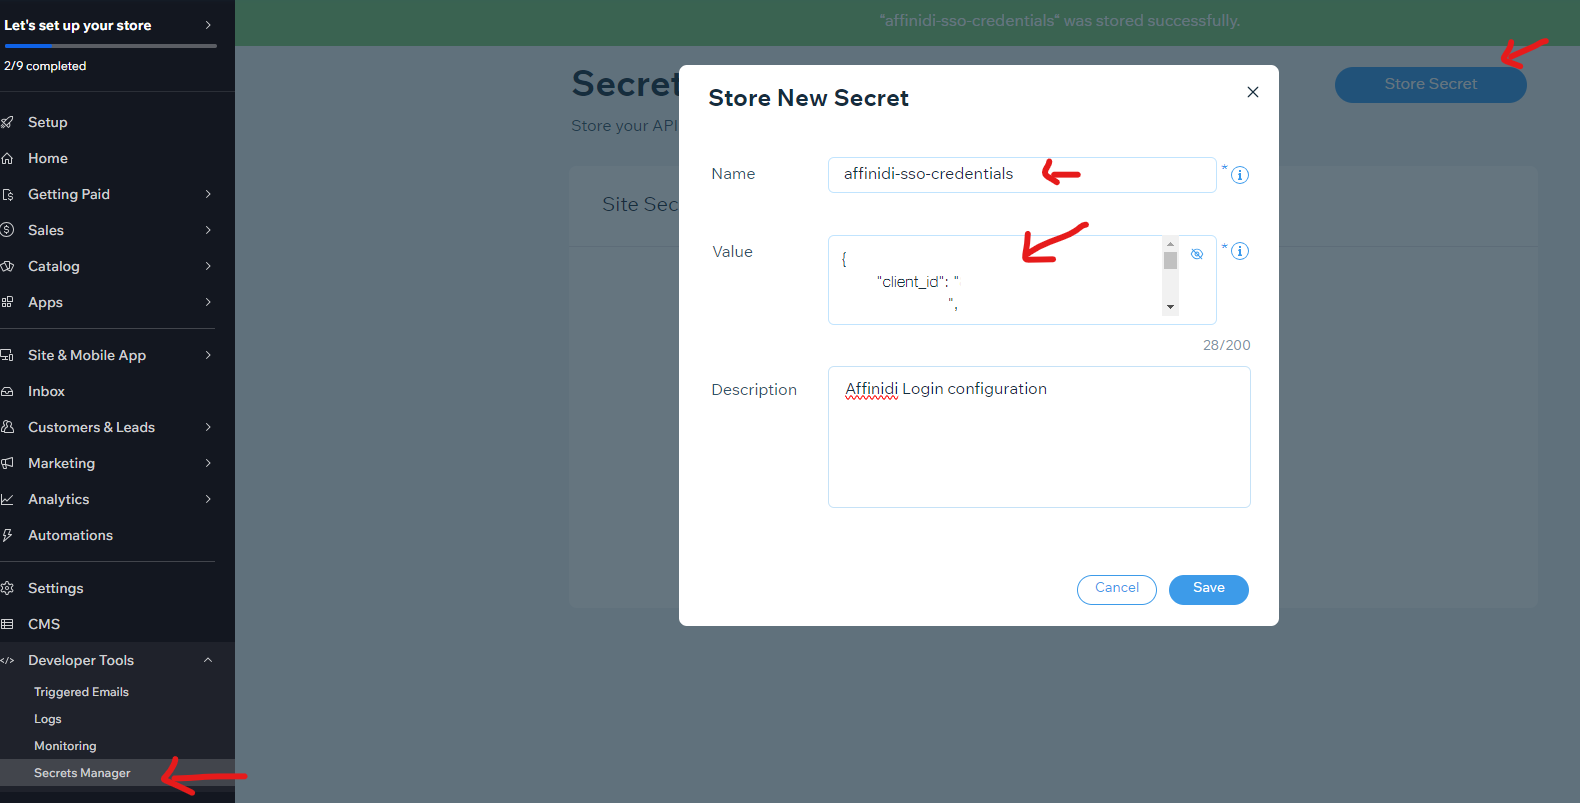
After configuring the Login Configuration, securely store the provided Client Credentials and a static Code Verifier using Wix Secret Manager.
- Go to the Secrets Manager page.
- Click on Store Secret and set the Name to affinidi-sso-credentials.
- Copy the JSON string below, paste it on the Value field and save.
        {
  "client_id": "<LoginConfig_CLIENT_ID>",
  "issuer": "<LoginConfig_ISSUER_URL>",
  "code_verifier": "<RANDOM_43_CHARACTER_LENGH_SECRET_STRING>"
}
To simplify this guide to integrate Affinidi Login on the Wix site, we have used a static Code Verifier to enable PKCE flow. To enhance the security of the authorisation flow, we recommended that a function to randomly generate the Code Verifier on each authentication request and temporarily store the value using Wix APIs like Wix Data is implemented.
Set up the Wix Site
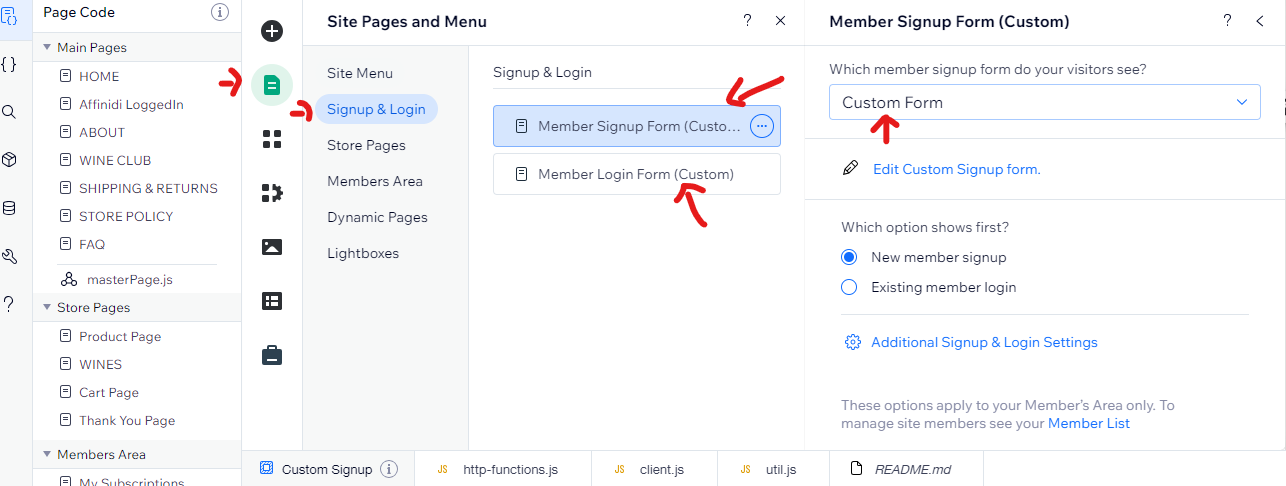
By default, Wix does not allow changes to the Signup and Login pages, to customise these pages:
- Go to the Pages & Menu page.
- Click on the Signup & Login menu.
- Click on the Member Signup Form and Member Login Form to change from Default to Custom Form.
Create a new blank page after changing the default forms to a custom form.
This page acts as a loading page and parses the ID Token to create and auto-login the user into the Wix site.
- Set the name of the page Affinidi LoggedIn.
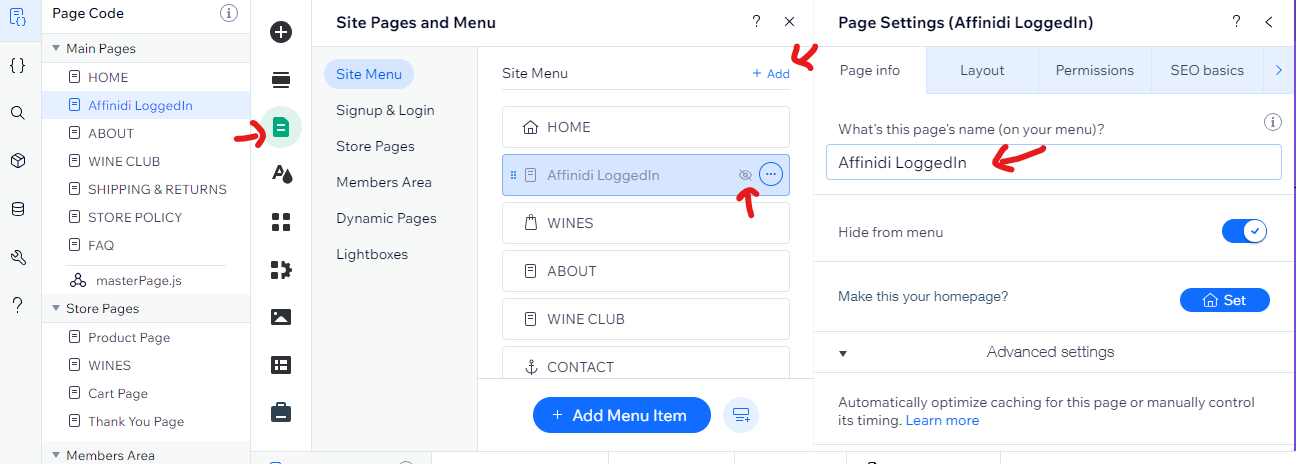
- Add the text to the page:
Please wait, we are logging you in...Hide this new page from the menu item since it is only used as a loading page during authentication.
Add the below code to process the Token once it is received after successful authentication.
        import { applyToken } from 'public/affinidi/client.js'
import wixUsers from 'wix-users';
import wixLocationFrontend from 'wix-location-frontend';

$w.onReady(function () {
	console.log('Affinidi Logged-in page initiated');
	applyToken().then(() => {
        // Gets user email
        wixUsers.currentUser.getEmail().then((email) => {
            console.log('user logged in', email);
        });
		    wixLocationFrontend.to('/account/my-account');
    }).catch(error => {
		  console.error('error ', error);
		  wixLocationFrontend.to('/');
	  });

});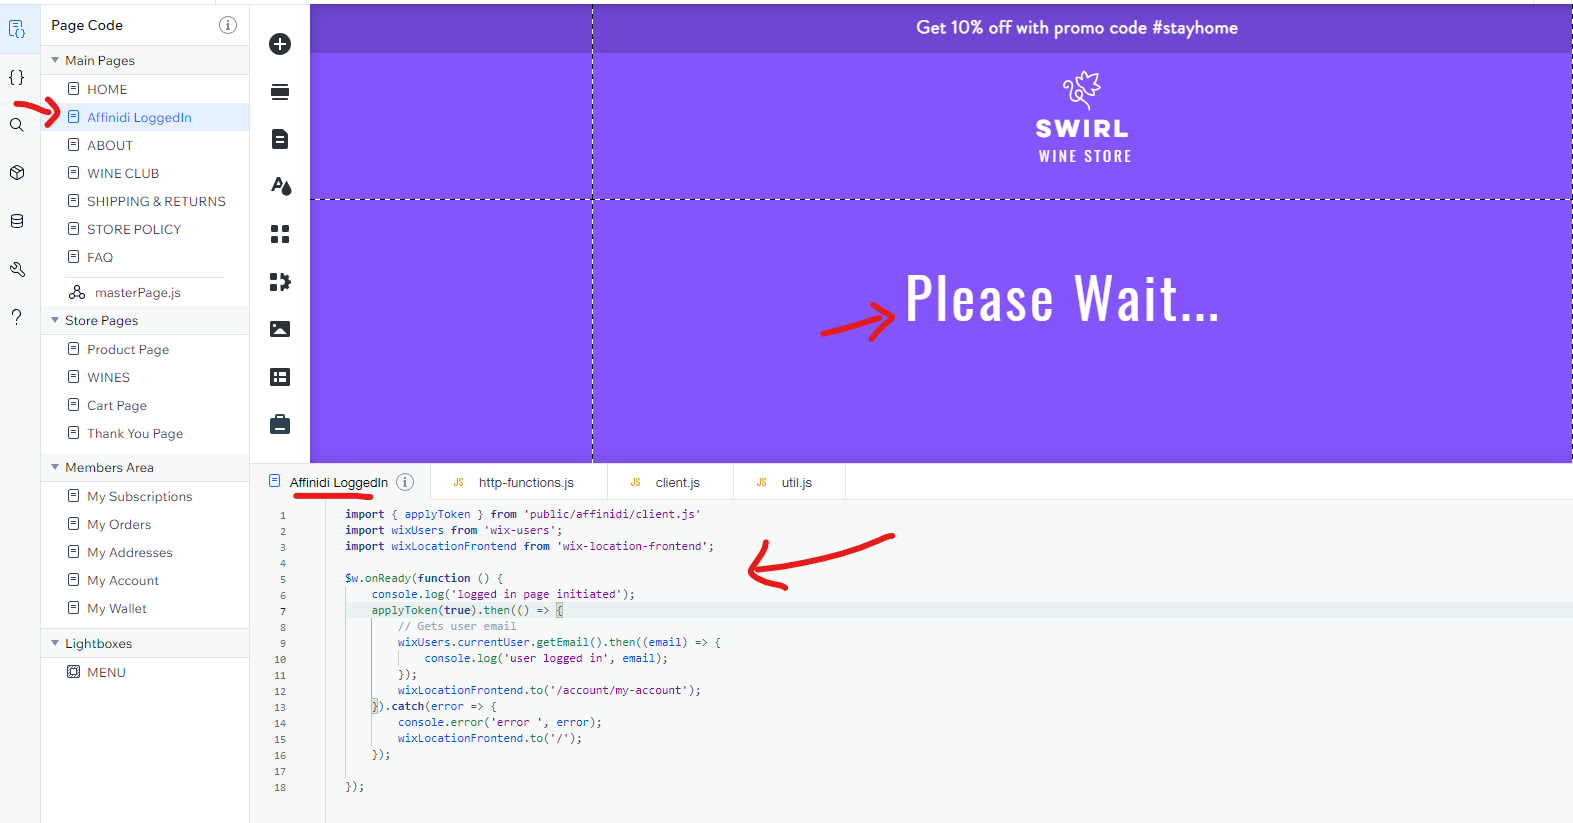
After creating the new page, ensure that the URL generated for the page is /affinidi-loggedin.
Implement Integration Code
After creating the custom page, we will create several files to integrate Affinidi Login.
- Go to the Packages & Apps and install the npm package openid-client.
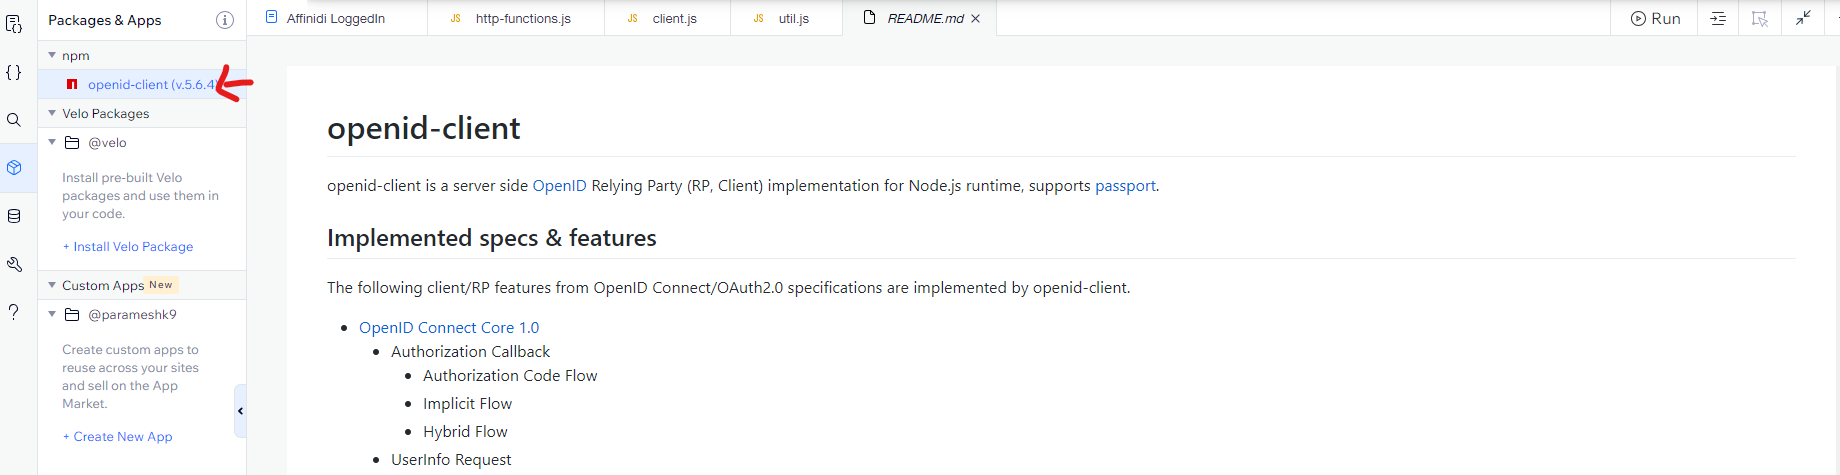
- Go to the Public & Backend menu to upload the integration codes.
- Copy the code from here and follow the folder and file structure below:
-- Public
-- affinidi /* Add folder */
- client.js /* Add new js file */
- util.js /* Add new js file */
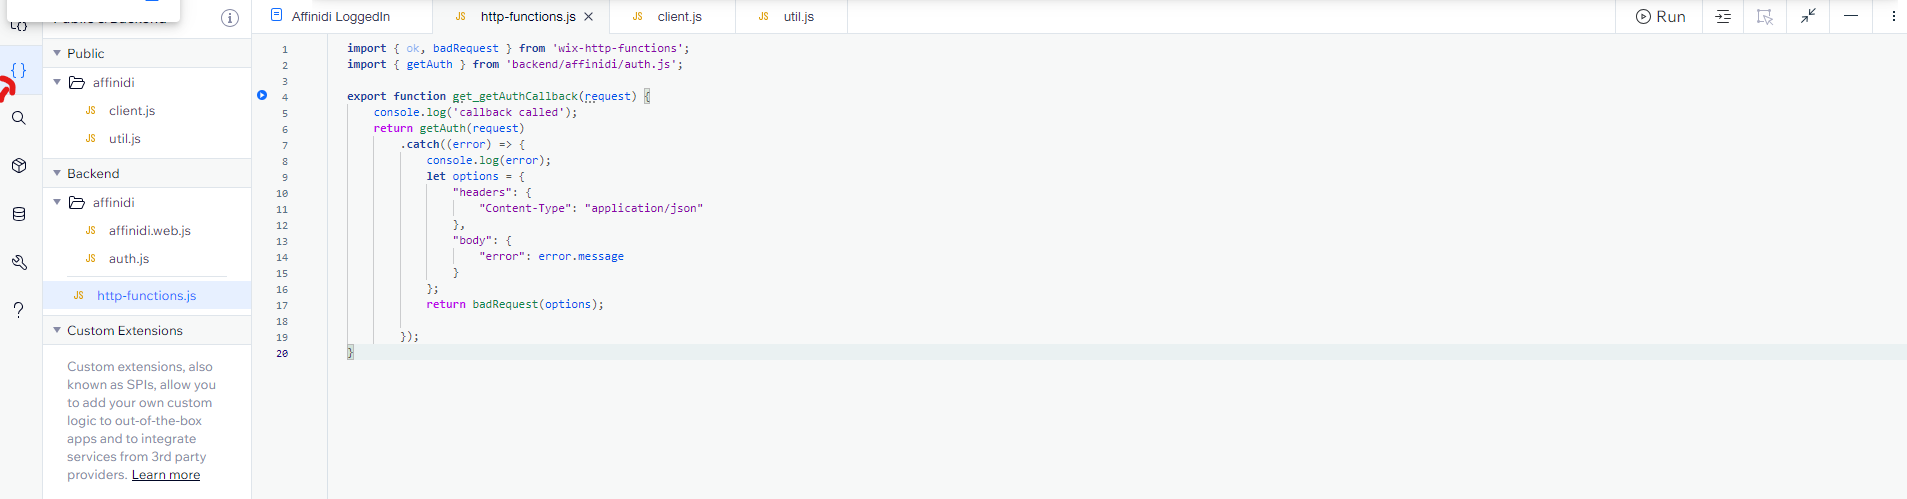
-- Backend
-- affinidi /* Add folder */
- affinidi.web.js /* Add new web module file */
- auth.js /* Add new js file */
- http-functions.js /* Add js file, ignore it if already exists */ Customise Signup & Login Forms
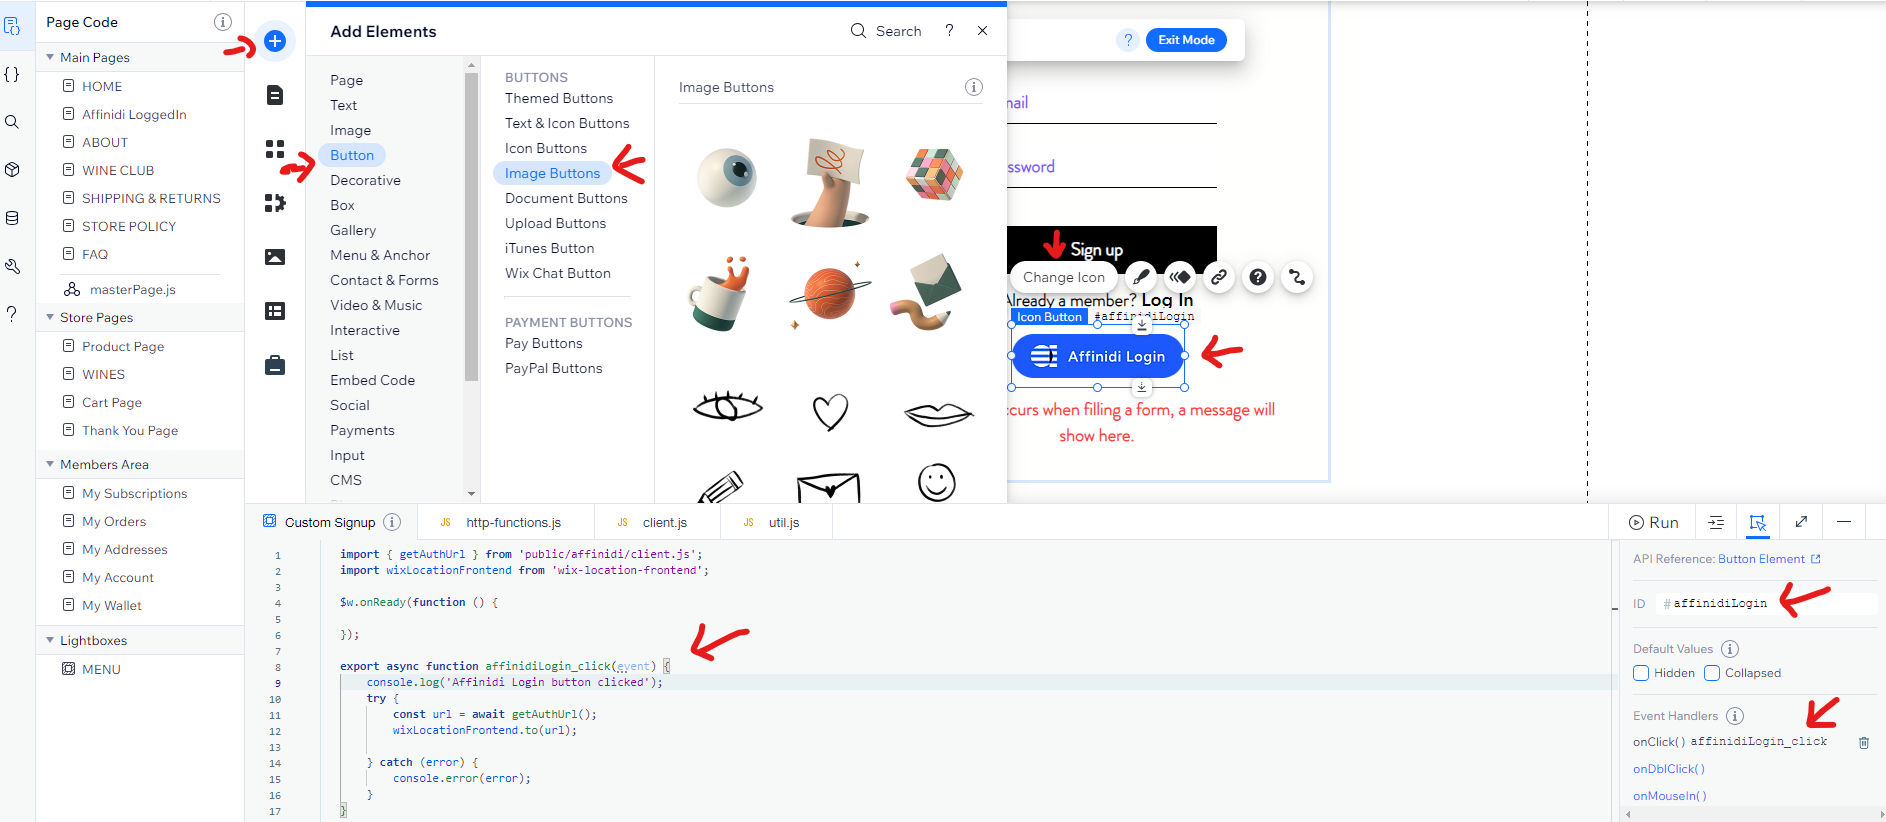
Once the code is implemented, we will modify the frontend to display the Affinidi Login button for Custom Signup and Custom Signin forms.
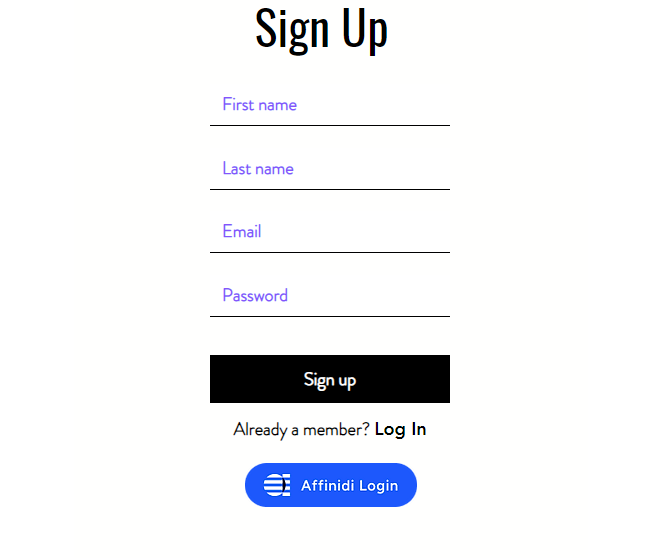
Customise Signup Form:
- Open the Custom Signup.
- Add a new element using the type Icon Button.
- Download and use the following images to render the buttons in different states:

Regular Image

Hover Image

Clicked Image
Set the tooltip as
Affinidi Loginand ID toaffinidiLogin.Add an onClick event handler for the buttons using the below code:
        import { getAuthUrl } from 'public/affinidi/client.js';
import wixLocationFrontend from 'wix-location-frontend';

export async function affinidiLogin_click(event) {
  $w('#affinidiLogin').disable();
	console.log('Signup Page, Affinidi Login button clicked');
  try {
      const url = await getAuthUrl();
      wixLocationFrontend.to(url);

  } catch (error) {
      console.error(error);
  }
	$w('#affinidiLogin').enable();
}
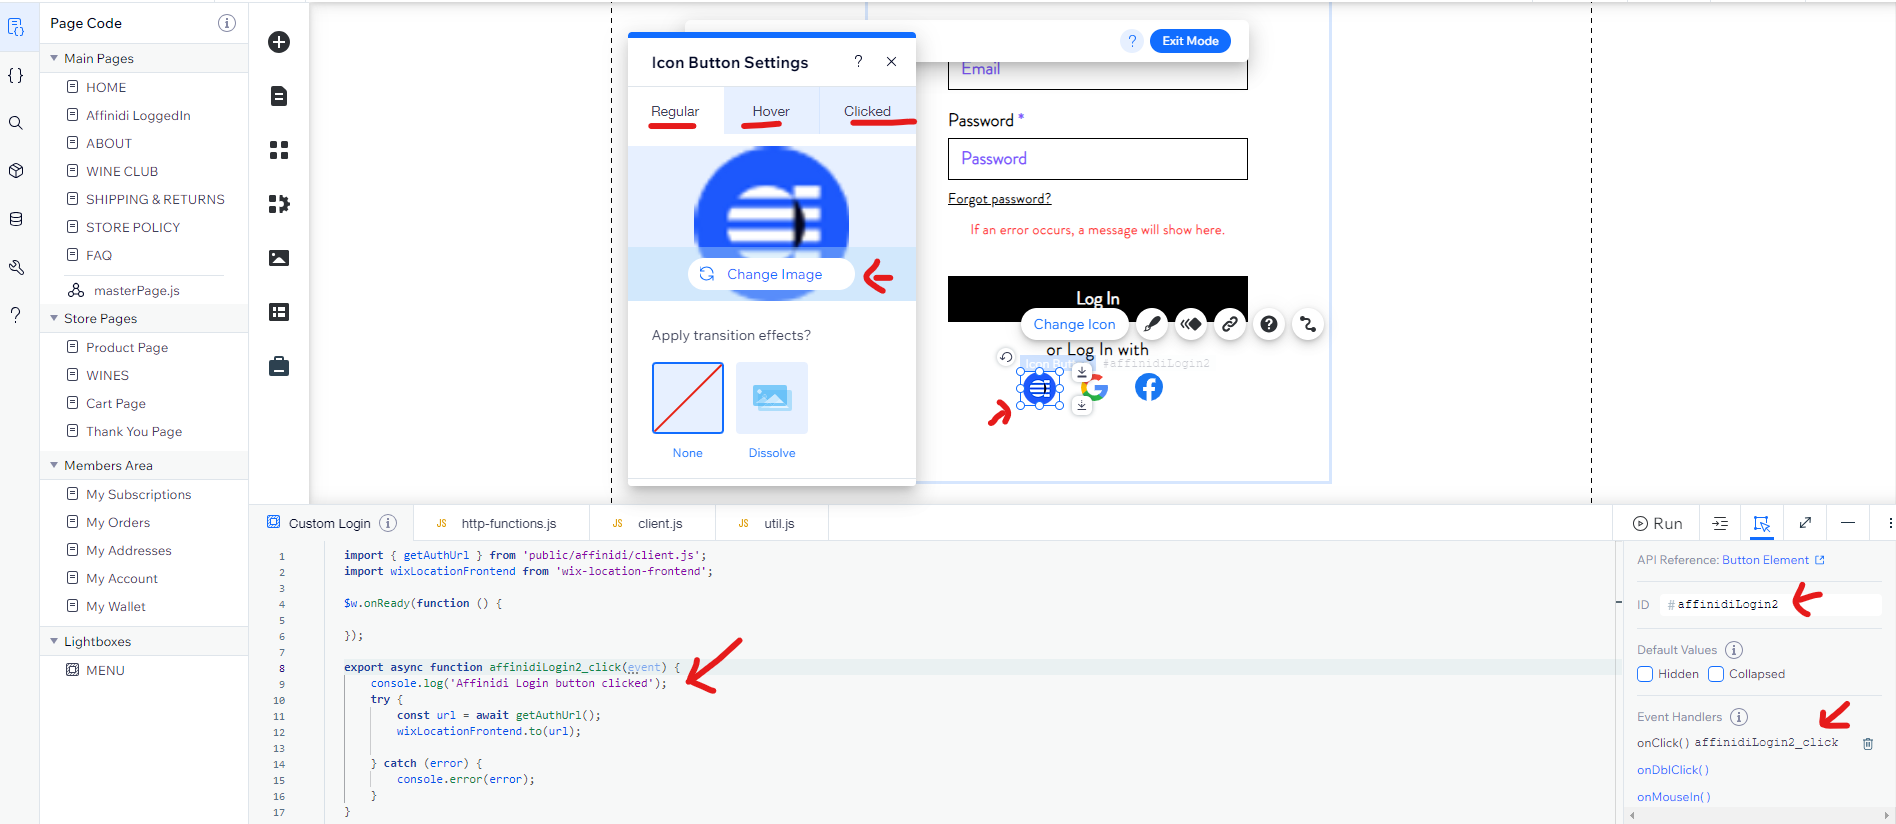
Customise Login Form:
- Open the Custom Login.
- Add a new element using the type Icon Button.
- Download and use the following images to render the buttons in different states:

Regular Image

Hover Image

Clicked Image
Set the tooltip as
Affinidi Loginand ID toaffinidiLogin2.Add an onClick event handler for the buttons using the below code:
        import { getAuthUrl } from 'public/affinidi/client.js';
import wixLocationFrontend from 'wix-location-frontend';

export async function affinidiLogin2_click(event) {
  $w('#affinidiLogin2').disable();
	console.log('Login Page, Affinidi Login button clicked');
  try {
      const url = await getAuthUrl();
      wixLocationFrontend.to(url);

  } catch (error) {
      console.error(error);
  }
	$w('#affinidiLogin2').enable();
}
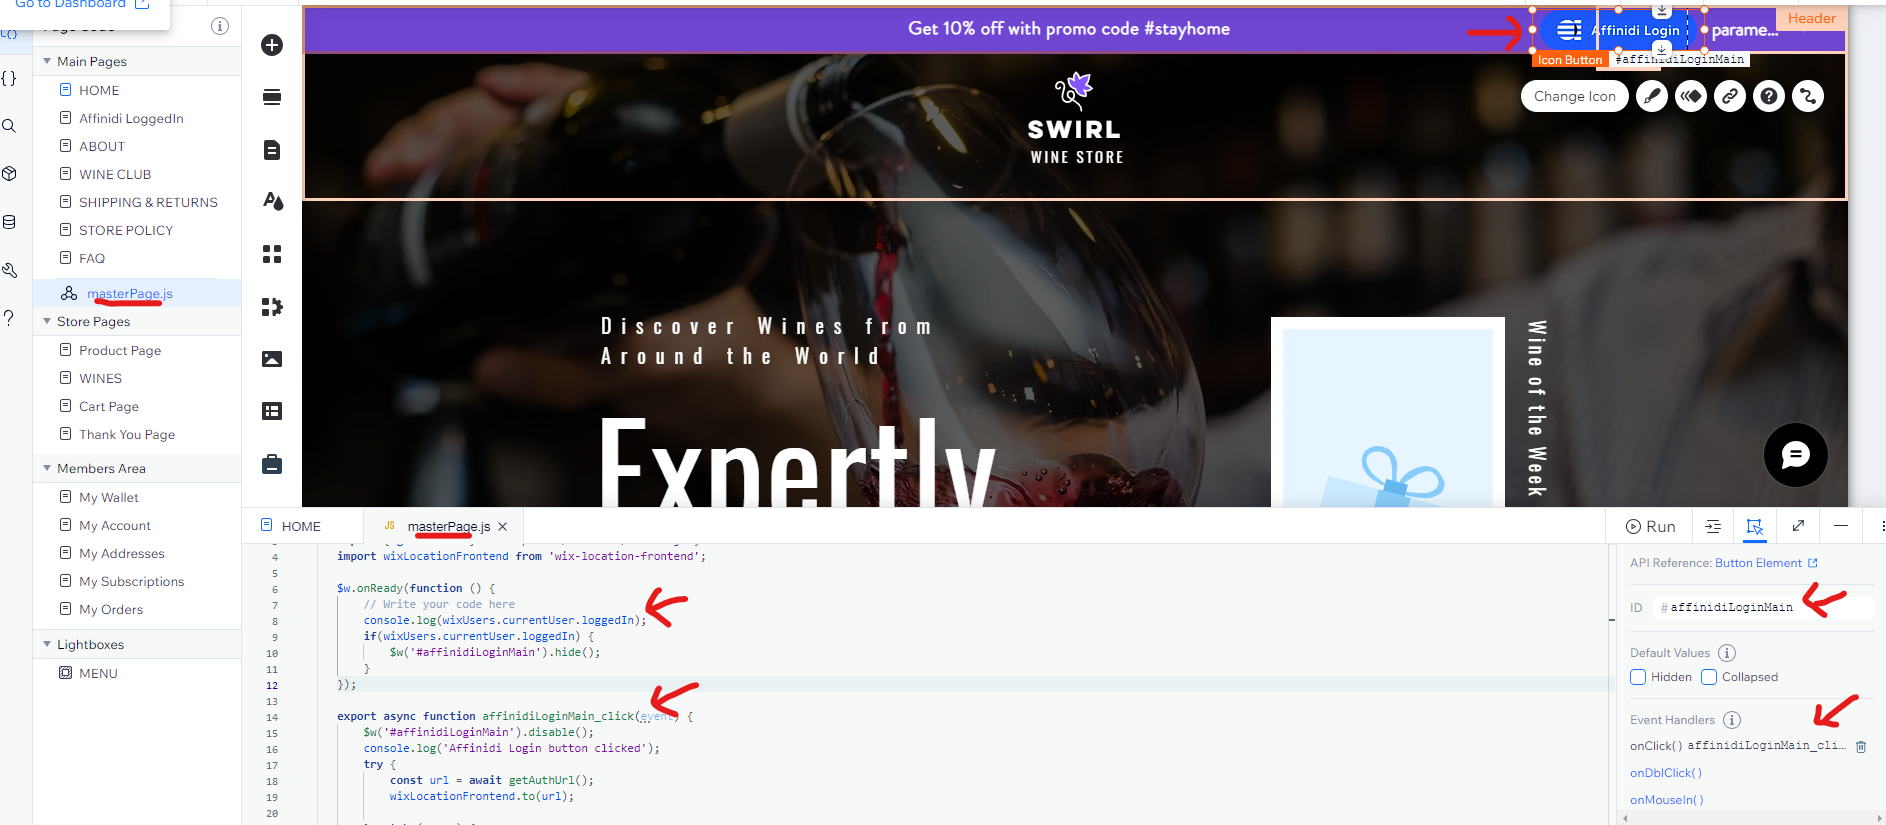
Optional Header Menu Change
Optionally, add the Affinidi Login button to the Header Menu, which will display the button on all pages.
- Go to Home page.
- Add a new element with type Icon Button.
- Download and use the same images downloaded for Custom Signup Form to render the buttons in different states:
Regular Image
Hover Image
Clicked Image
Set the tooltip as Affinidi Login and ID to affinidiLoginMain.
- Open the
MasterPage.jsand add an onClick event handler for the buttons and hides it when the user is logged-in using the below code:
        import { getAuthUrl } from 'public/affinidi/client.js';
import wixLocationFrontend from 'wix-location-frontend';
import wixUsers from 'wix-users';

$w.onReady(function () {
	if(wixUsers.currentUser.loggedIn) {
		$w('#affinidiLoginMain').hide();
	}
});

export async function affinidiLoginMain_click(event) {
  $w('#affinidiLoginMain').disable();
	console.log('Header, Affinidi Login button clicked');
  try {
      const url = await getAuthUrl();
      wixLocationFrontend.to(url);

  } catch (error) {
      console.error(error);
  }
	$w('#affinidiLoginMain').enable();
}
Publish and Try it
Once all the changes are saved, publish the site.
Open your Wix site and click the Affinidi Login button on the Signup or Login form. It will trigger the authentication flow and request your consent to share your Email Address from your Affinidi Vault.

Glad to hear it! Please tell us how we can improve more.
Sorry to hear that. Please tell us how we can improve.
Thank you for sharing your feedback so we can improve your experience.