Affinidi Login - Passwordless Authentication for Shopify
Affinidi Login can be integrated easily with any application that supports OIDC flow.
This integration guide provides step-by-step instructions to enable users to have a Passwordless Login experience into your Shopify Store using Affinidi Login as the Identity Provider.
This feature will auto-create users and update user attributes like first name, last name, address, etc. from Affinidi Login to your Shopify customer profile.
Assumptions
You already have a development store created where you would configure Affinidi Login. If you need to create one then follow instructions here.
Information presented here is recommended as a learning guide for non-production environments. We recommend to reach out to Affinidi team through Discord to assess and adjust the production readiness together for your specific store.
Before you begin
- Set up Affinidi Vault account. Follow the guide below if you haven’t set it up yet.
Set up Affinidi Vault
Click on Get started if you are creating a new account, or click on Restore from Backup if you have an existing backup of your Affinidi Vault. Provide the passphrase to secure your Affinidi Vault.
You have the option to enable Biometrics to unlock your Affinidi Vault easily instead of using passphrase.
- Enter your email address to register with the Affinidi Vault. An OTP will be sent to this email for verification.
- Enter the OTP sent to the email you have provided for verification to complete the setup.
After successfully providing the OTP, you are redirected to the Affinidi Vault dashboard.
Remember to keep your passphrase in a secure location. Use the Passphrase Reset feature in Affinidi Vault settings to generate the PDF files and keep them safe, which you can use to recover access to your Affinidi Vault if you forget your passphrase.
- Install the Affinidi CLI. Follow the guide below if it hasn’t been installed.
Choose a Social Login App that supports Custom Identity Provider (IdP) configuration.
You can use third-party apps available on the Shopify App Store to enable OpenID Connect (OIDC) based Authentication flow on your Shopify store. This mechanism will allow customers to sign in or create accounts on your store using their verified credentials in Affinidi Vault. Visit the Shopify App Store and search for a social login app. Read reviews, check features, and choose an app that suits your needs.
Setup Instructions
Configure the Social Login App in your Shopify store
This guide provides step-by-step instructions with a popular option - miniOrange Single Sign OnSSO. The broad setup steps should be similar to any other apps you choose.
Many apps may provide a free trial period that you may consider as you make this choice.
You are solely responsible for paying all fees and taxes (in each case, if any) for any App you obtain from the Shopify App Store. So please select the option carefully and feel free to engage with the Affinidi team on Discord if you have any questions.
The following steps assume you have experience with the miniOrange Single Sign on-SSO App.
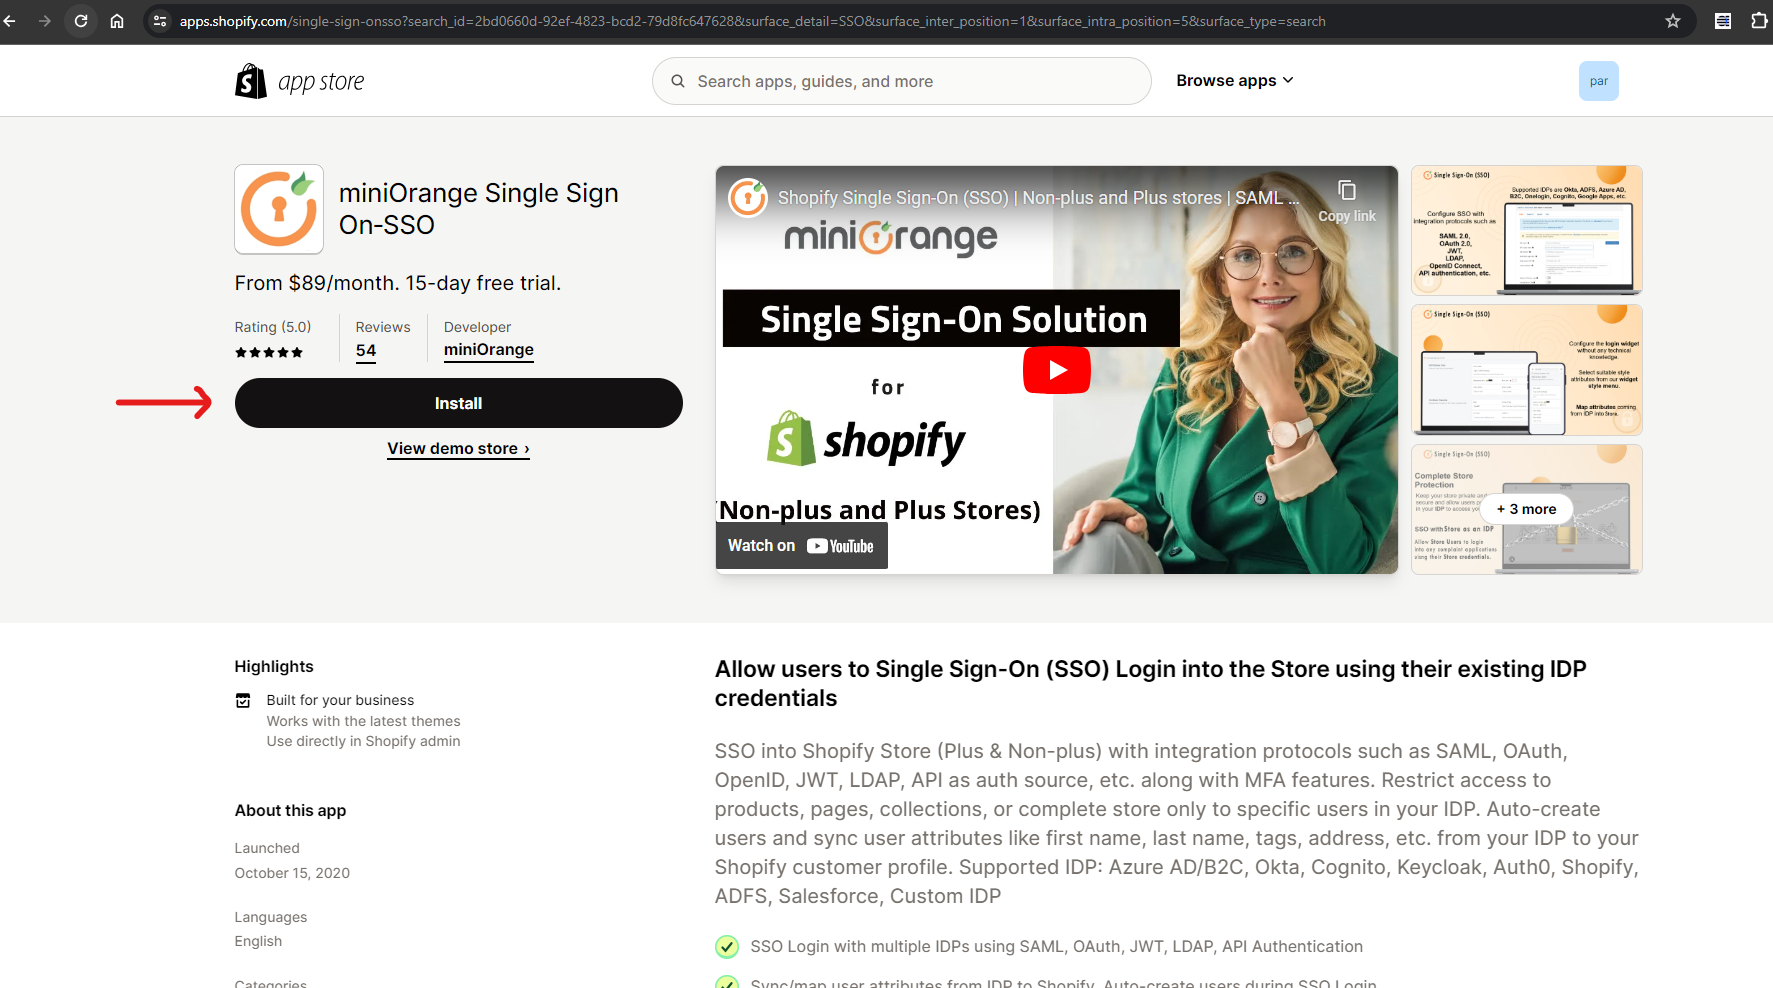
Click on miniOrange Single Sign OnSSO app, then click the “Install” button.
Following are more detailed step-by-step instructions:
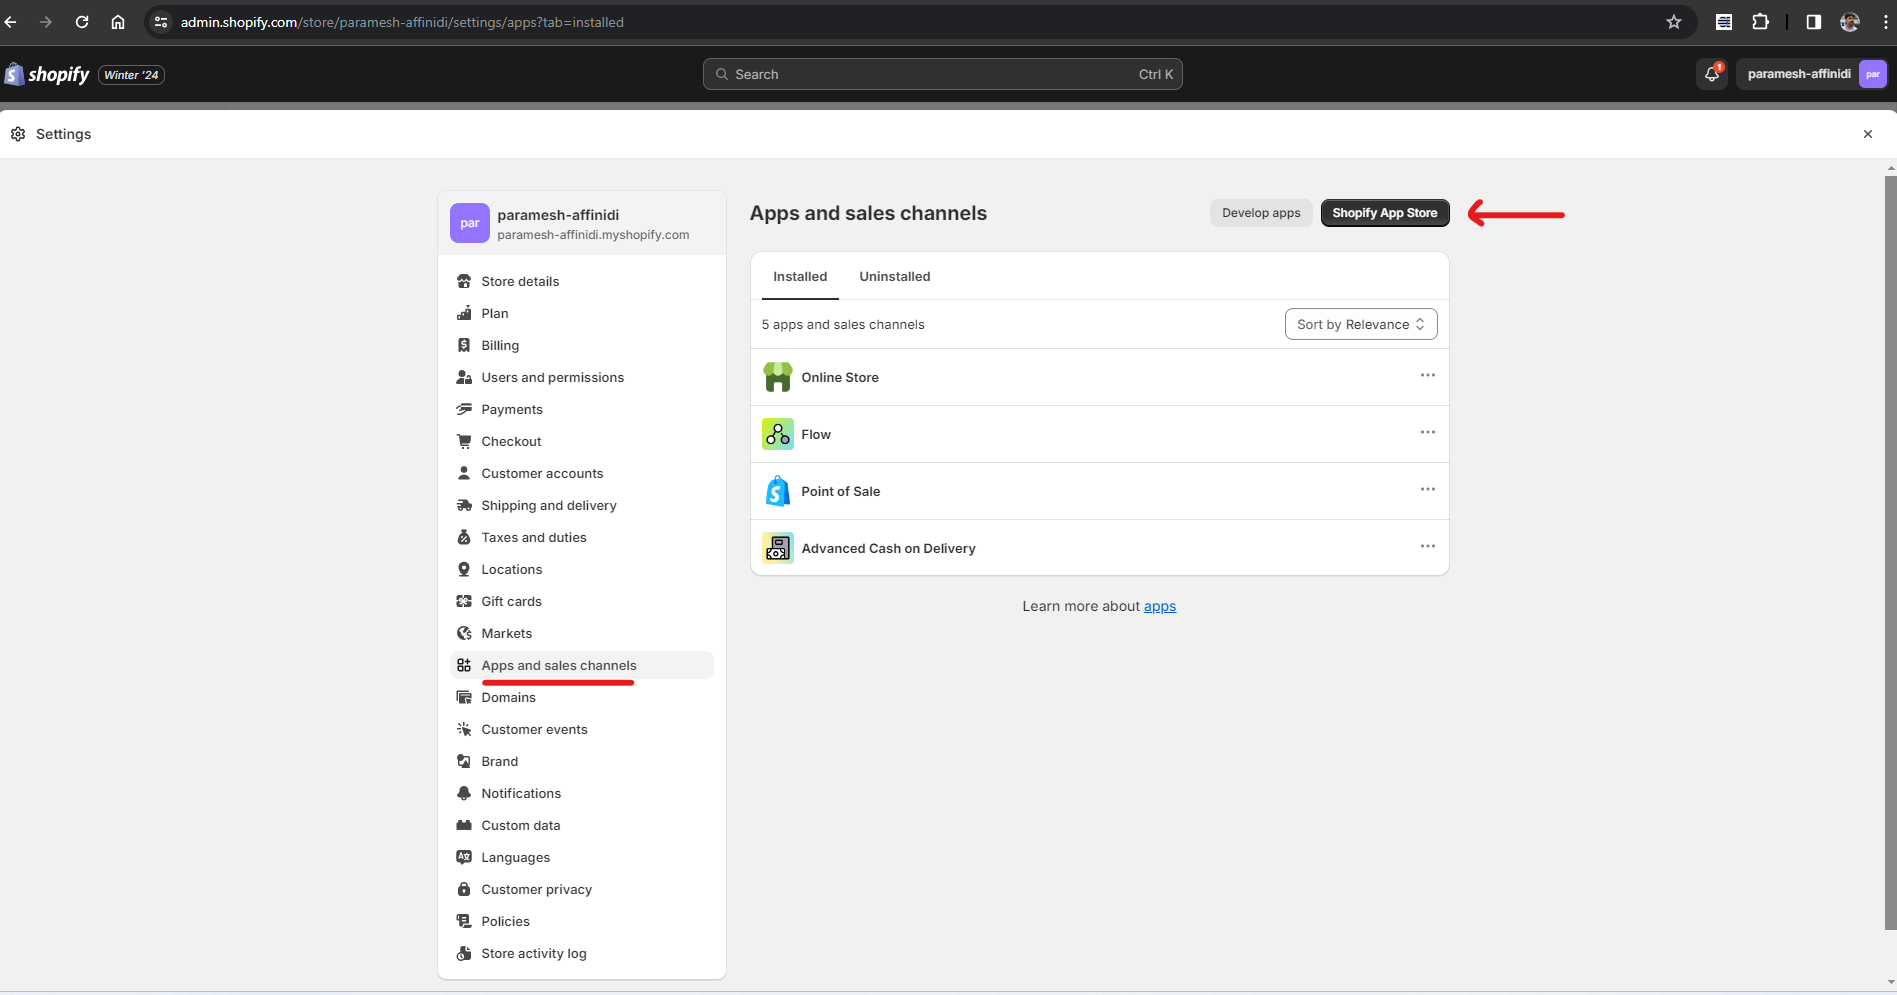
Go to your Shopify Admin portal and select your store.
Click on
Settingsmenu under bottom left side menu bar.
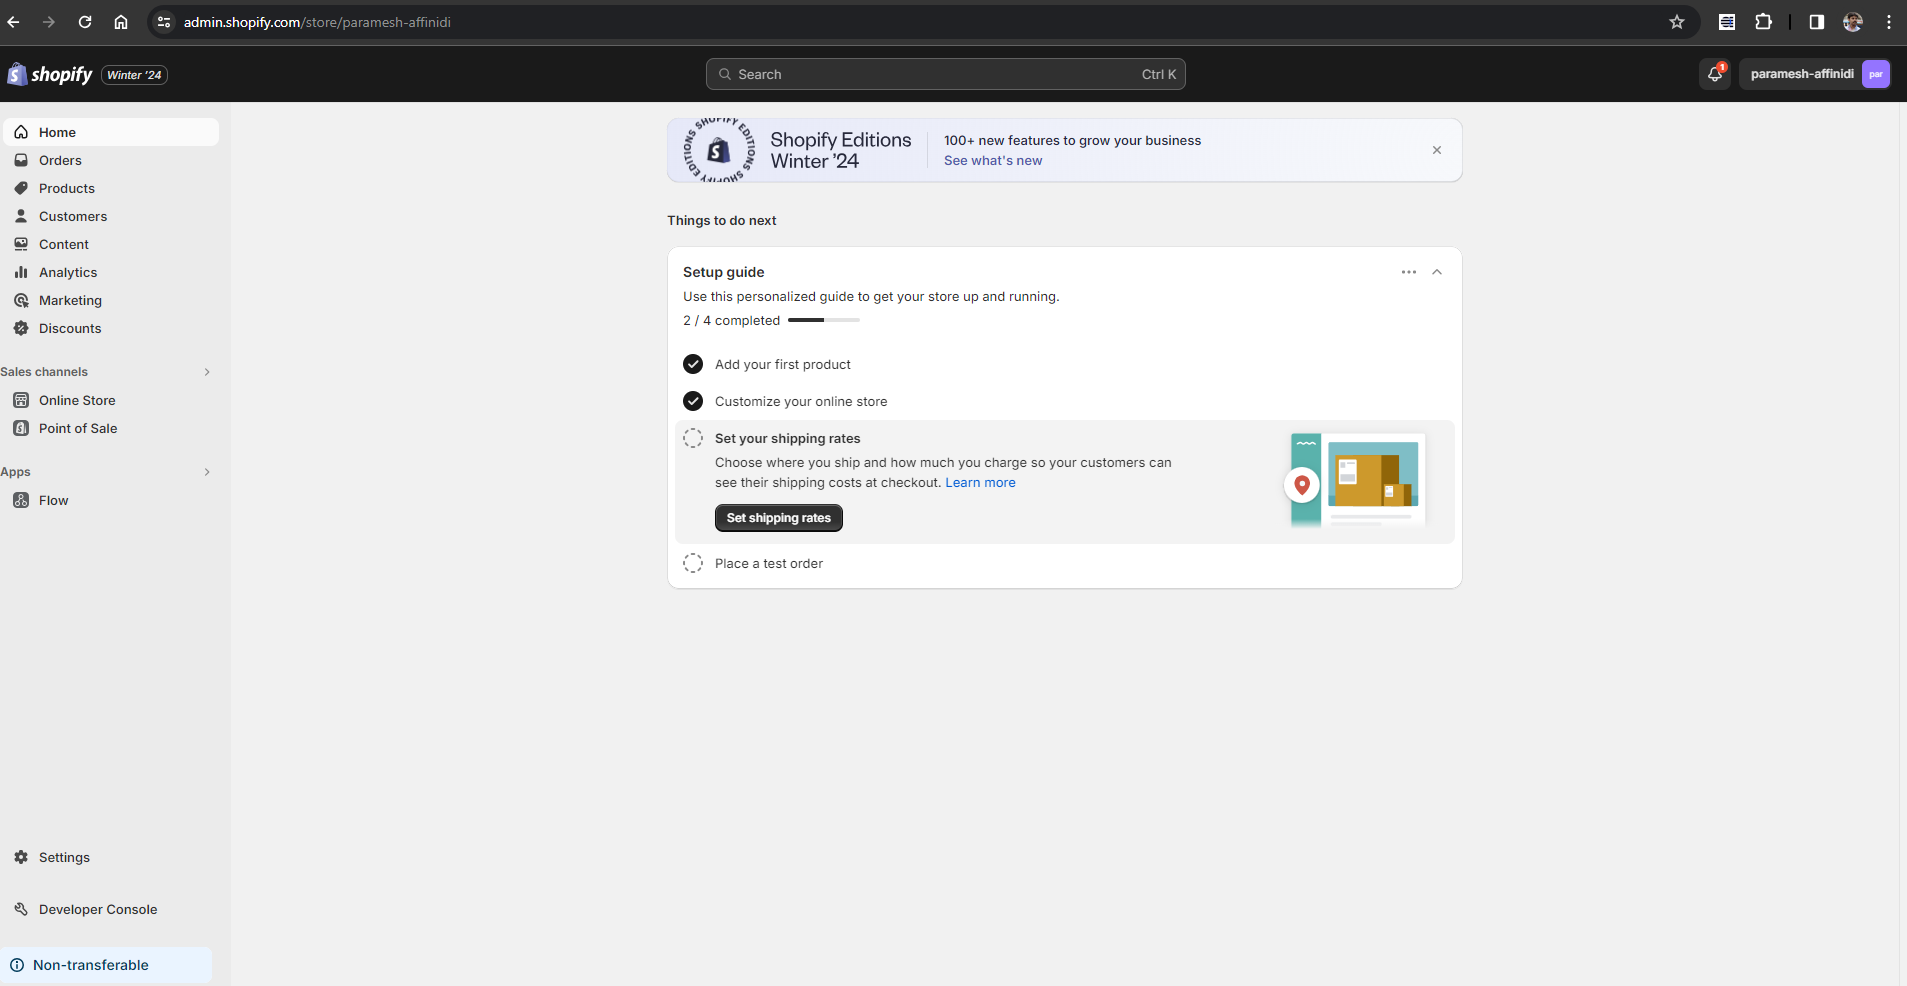
- Select
Apps and sales channelsoption and click onShopify App Store.
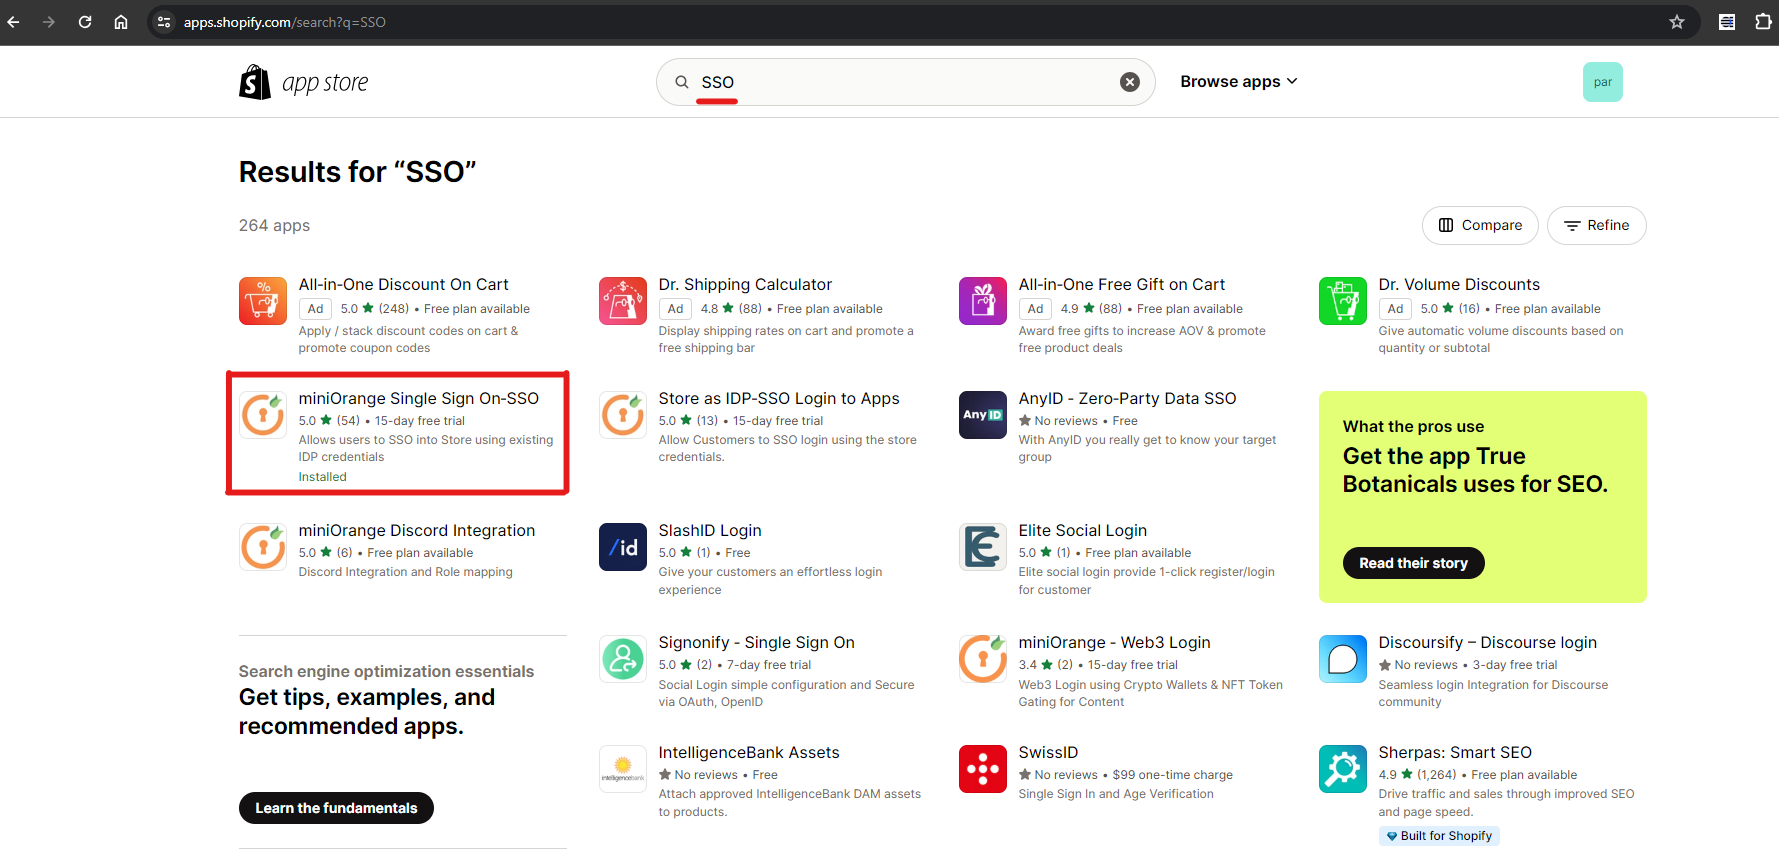
- On Shopify App Store page, search for
SSOand selectminiOrange Single Sign On‑SSOApp.
- Click on
Installbutton, which will redirect to your store.
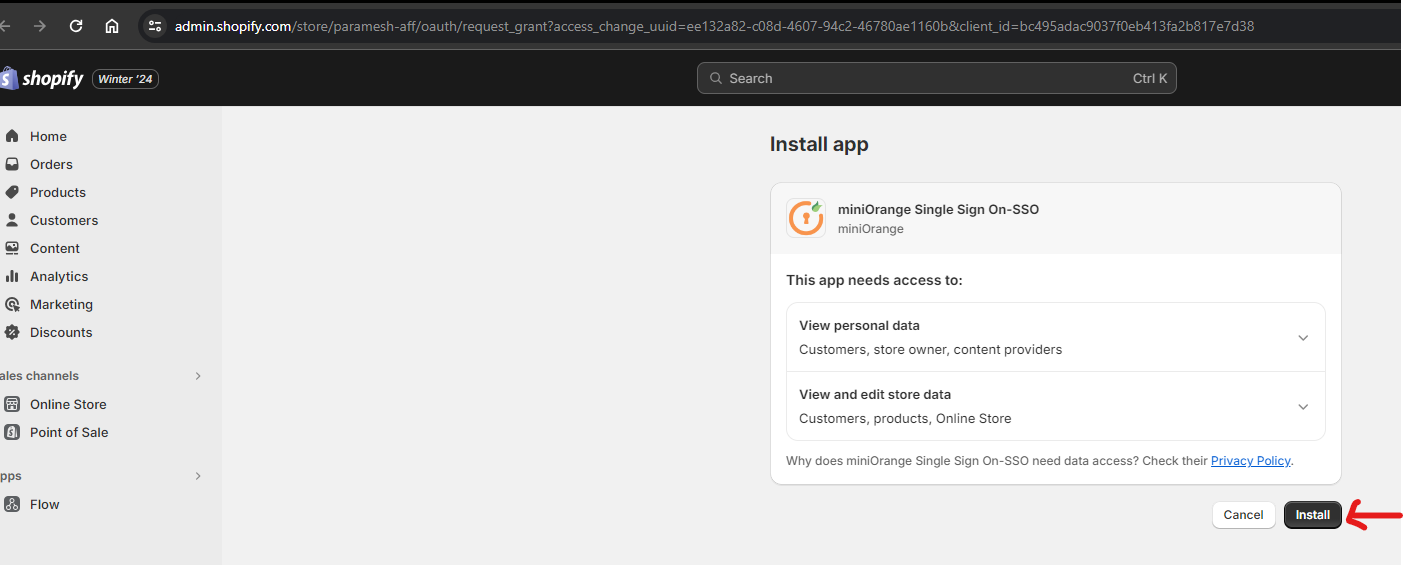
- Click on
Installbutton to install the App in your store. This app requires access to create/read customers record.
- Open the installed app by clicking on
Appsmenu on left side panel and selectminiOrange.
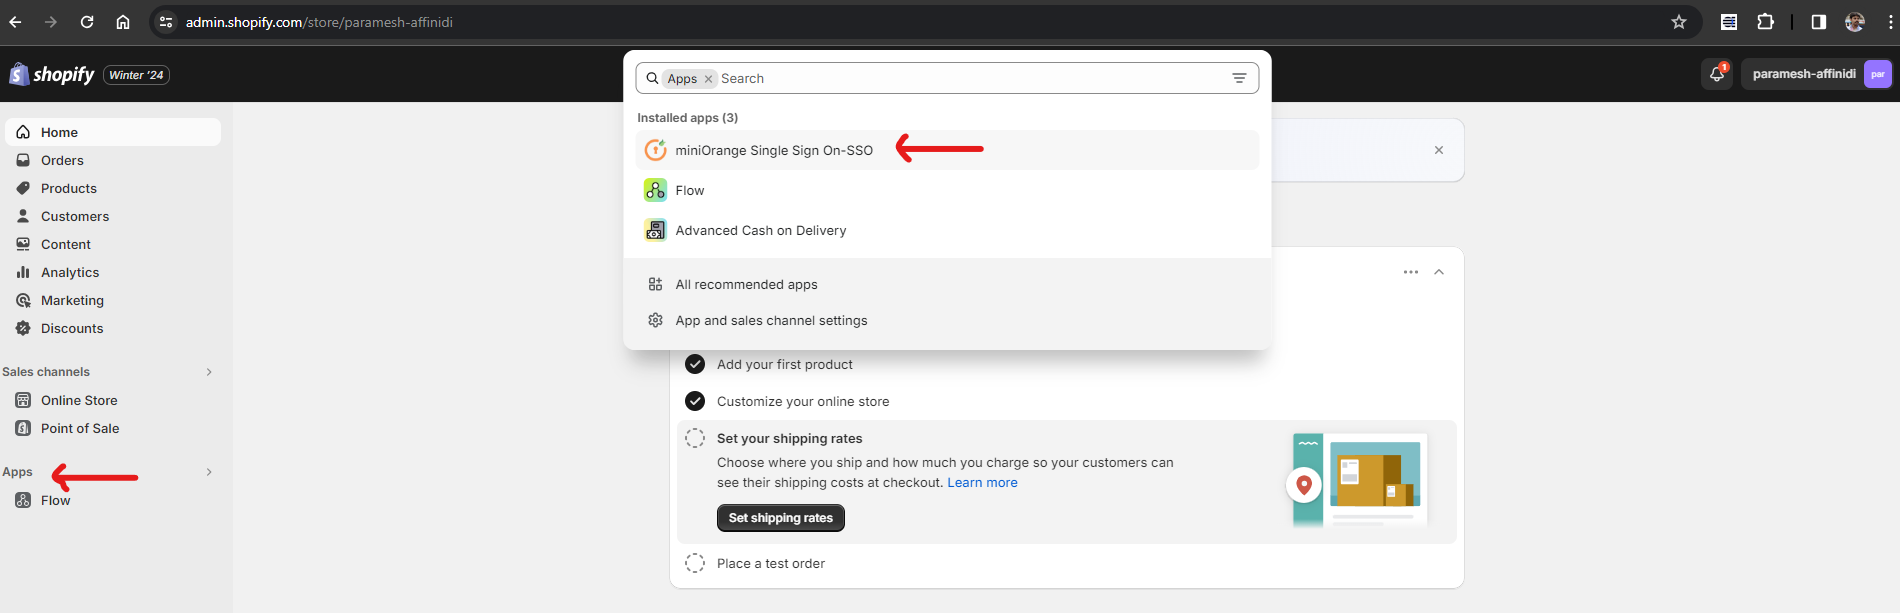
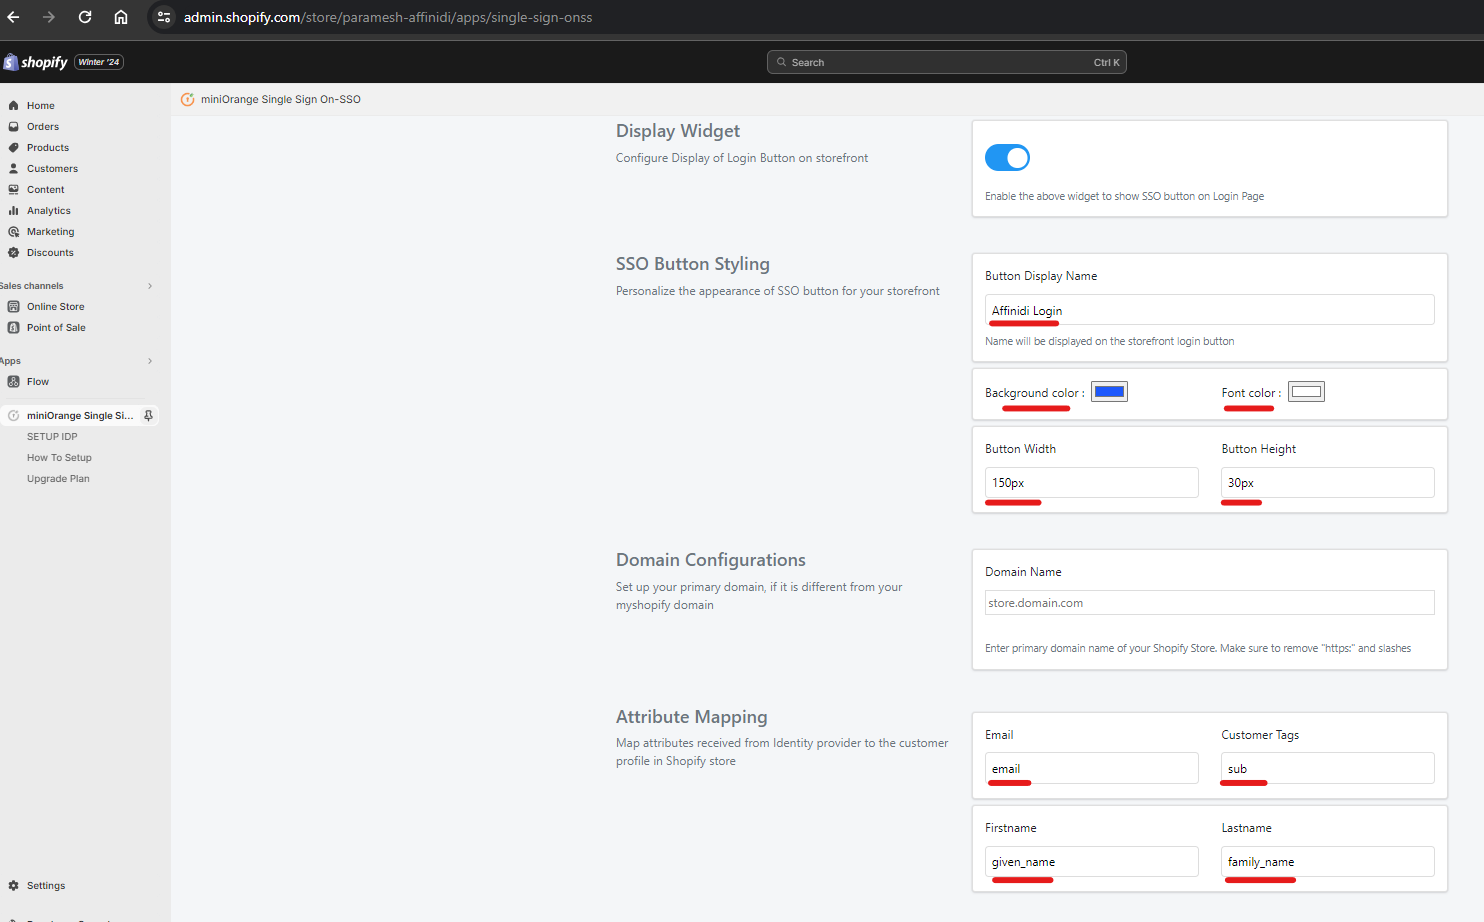
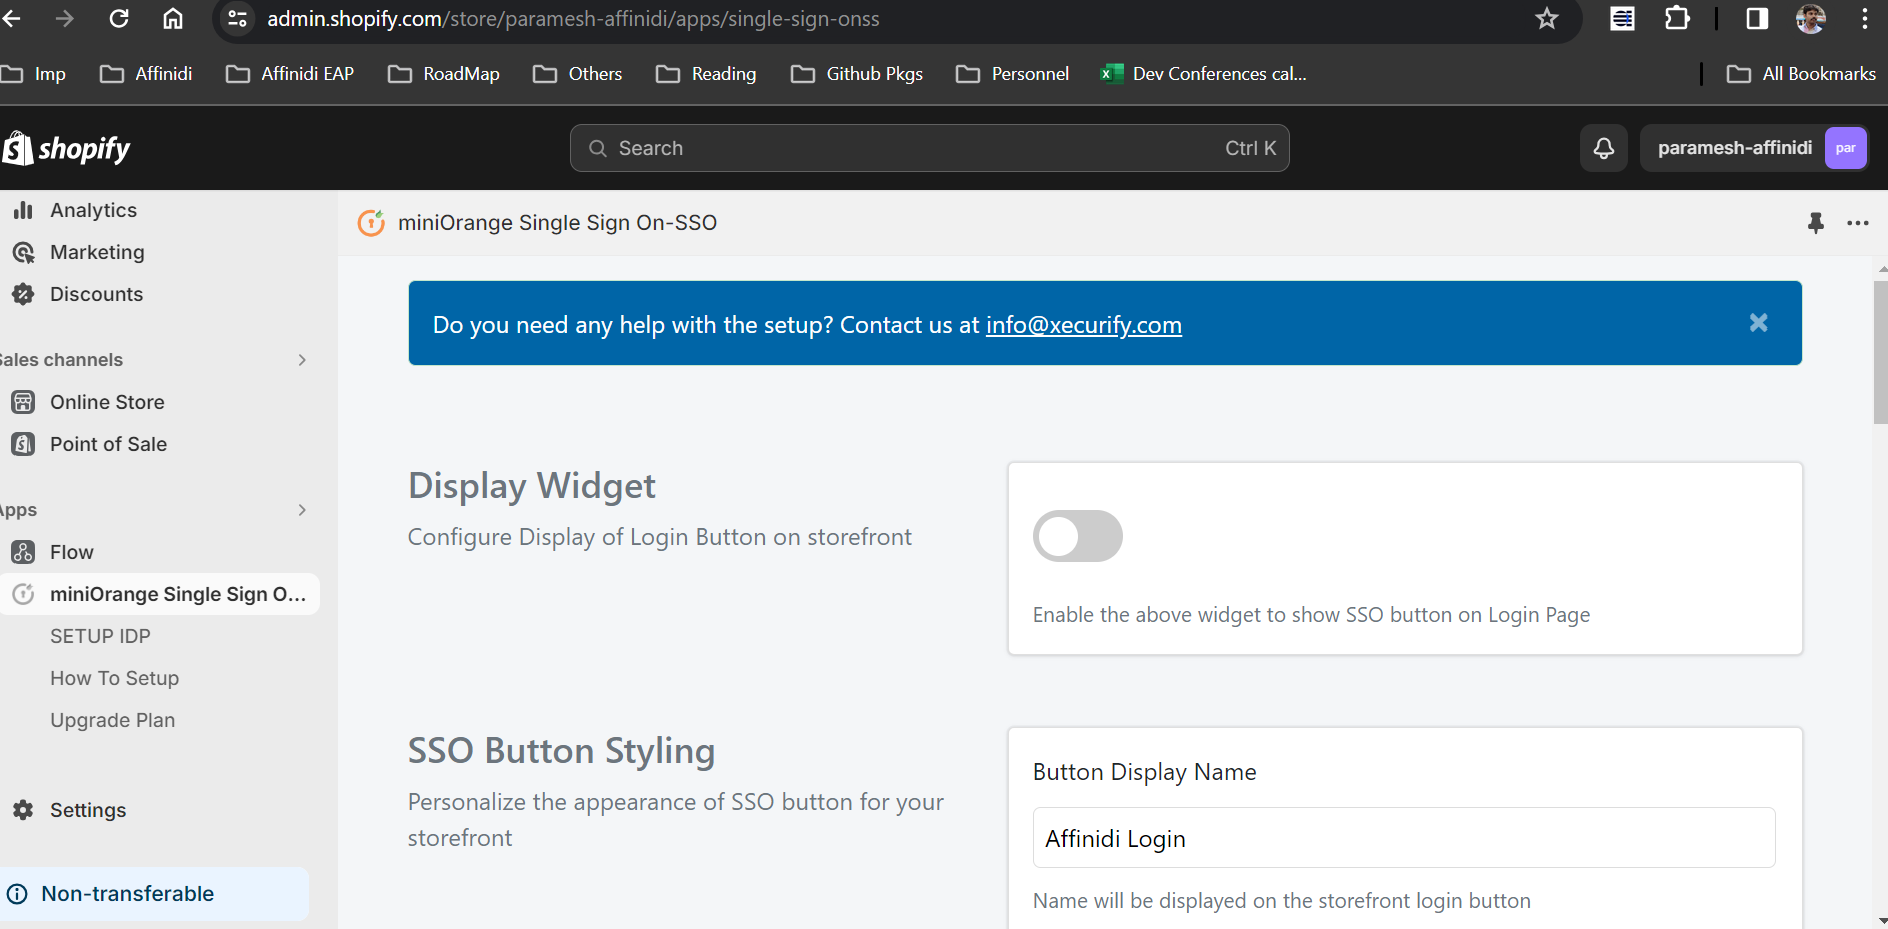
- Enable
Loginbutton, SSO Button Text & Styling:
Name:
Affinidi LoginWidth: 188px
Height: 48px
Background Color: R 29, G 88, B 252)
Attribute Mapping to your Shopify website as given below
- Email:
email - Customer Tags:
sub - Firstname:
given_name - Lastname:
family_name
- Email:
- We need
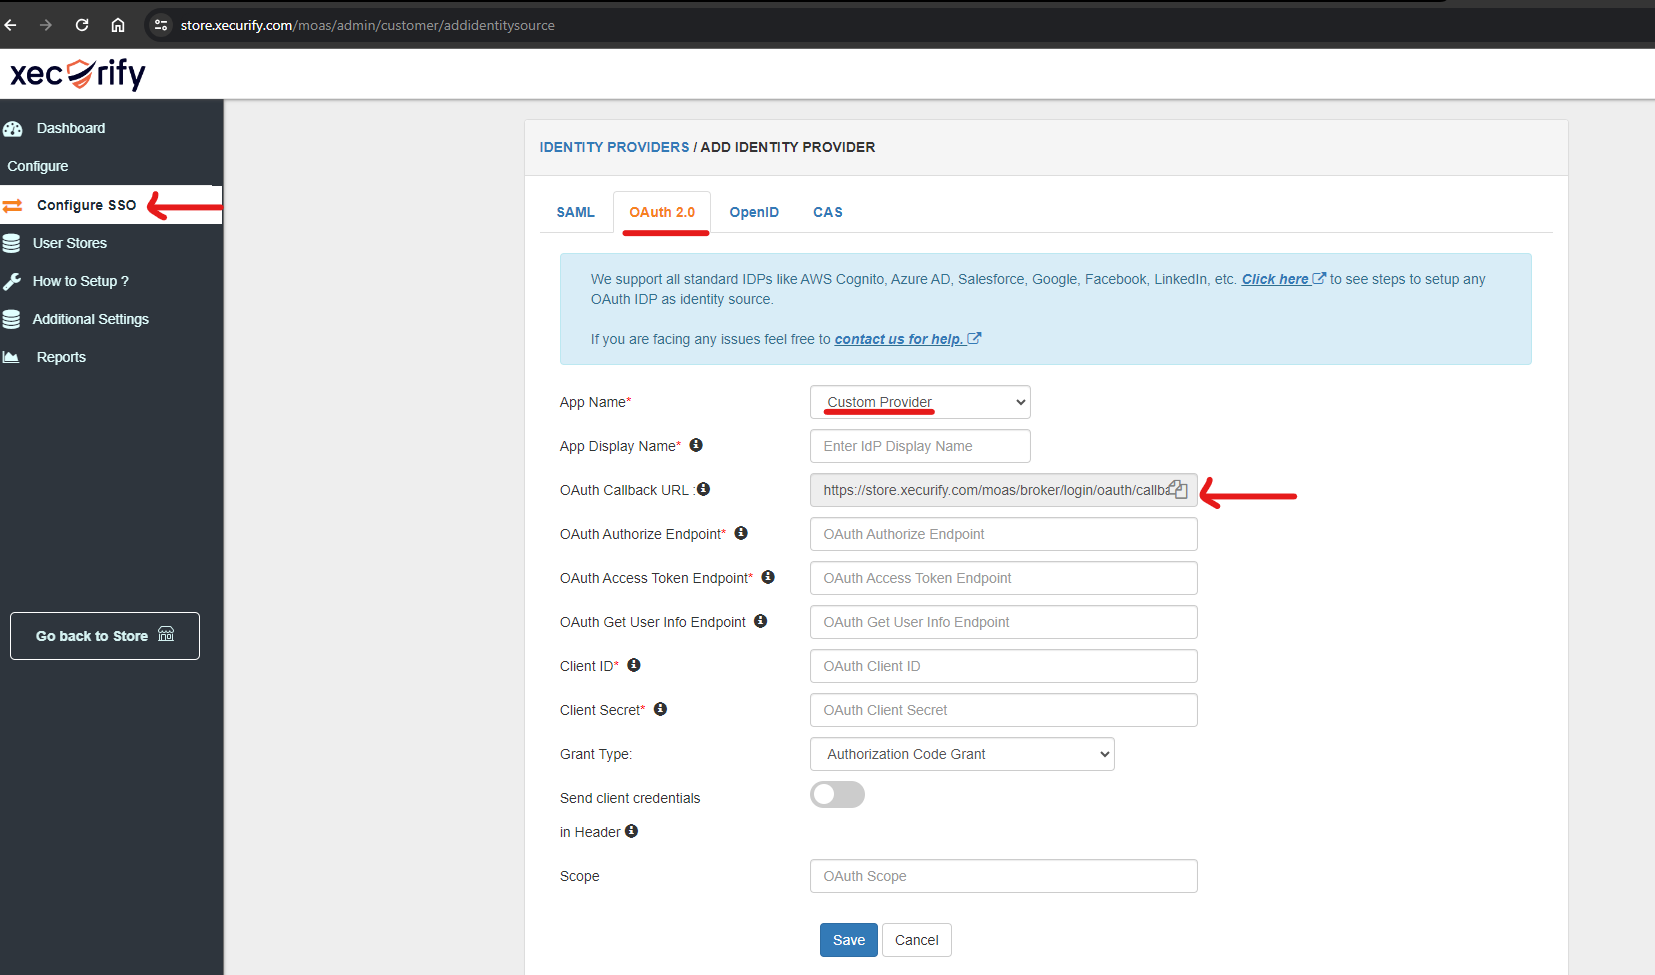
OAuth Callback URLwhere Affinidi Login enabled Authorization Server redirects the user to complete the authentication flow.
Click on
SETUP IDPoption underminiOrangeApp, which will take you to miniOrange App hosted environment.Click on
Add Identity Providerbutton, then click onOAuth 2.0tab item and copy theCallback URL.
Create Login Configuration for Social Login App
Go to Affinidi Login under the Services section.
Click on the Create Login Configuration and provide the required details.
Nameas theShopify AppRedirect URIsas theOAuth Callback URLcopied from the previous step (e.g.https://store.xecurify.com/moas/broker/login/oauth/callback/23456)Auth methodasNoneto enable PKCE flow as a best practice
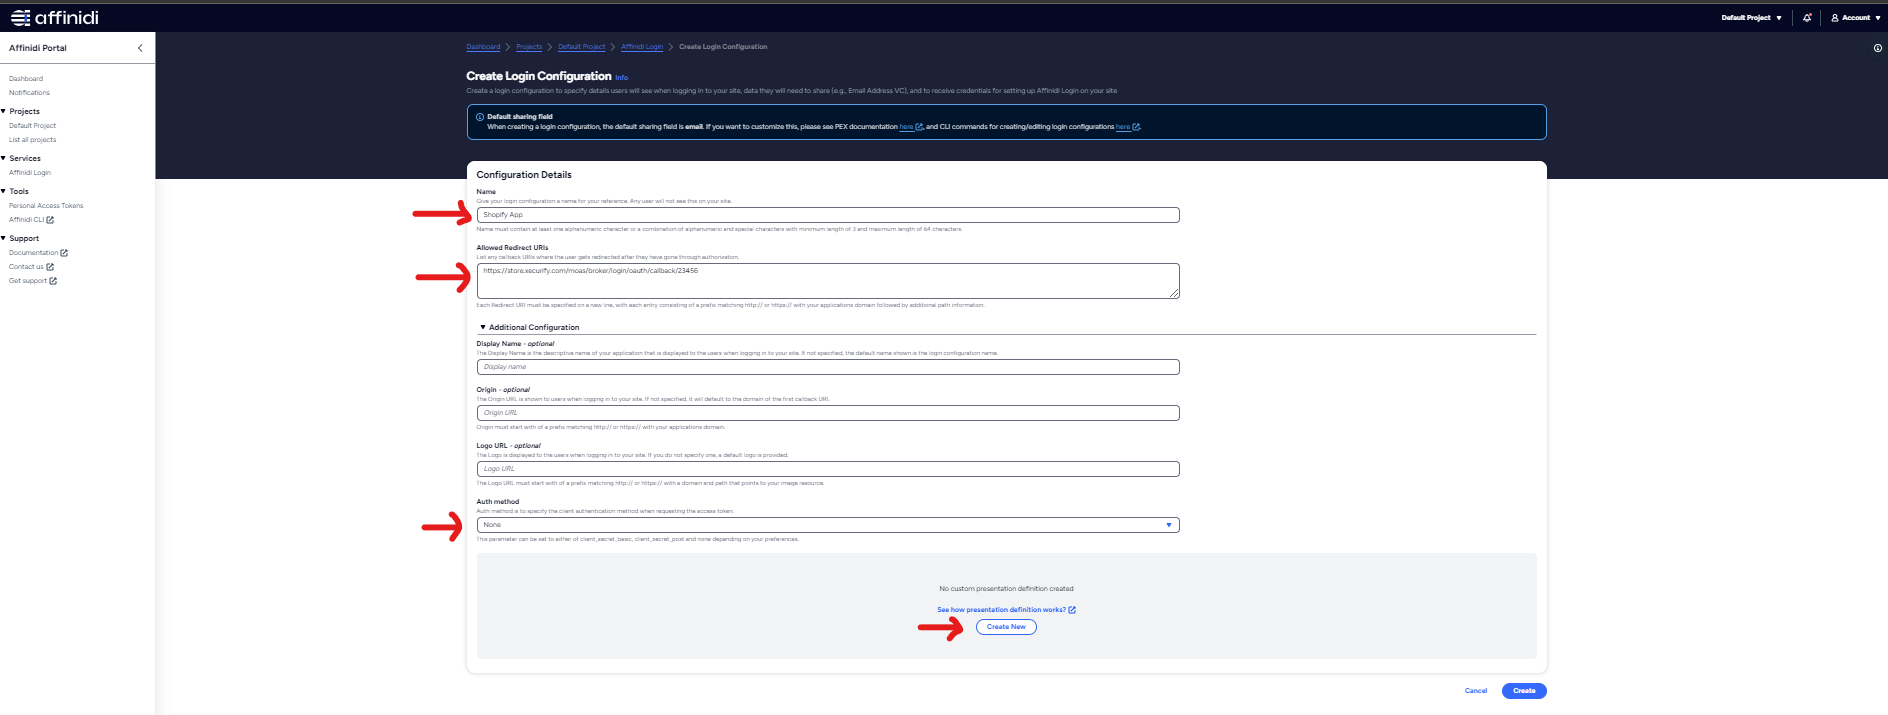
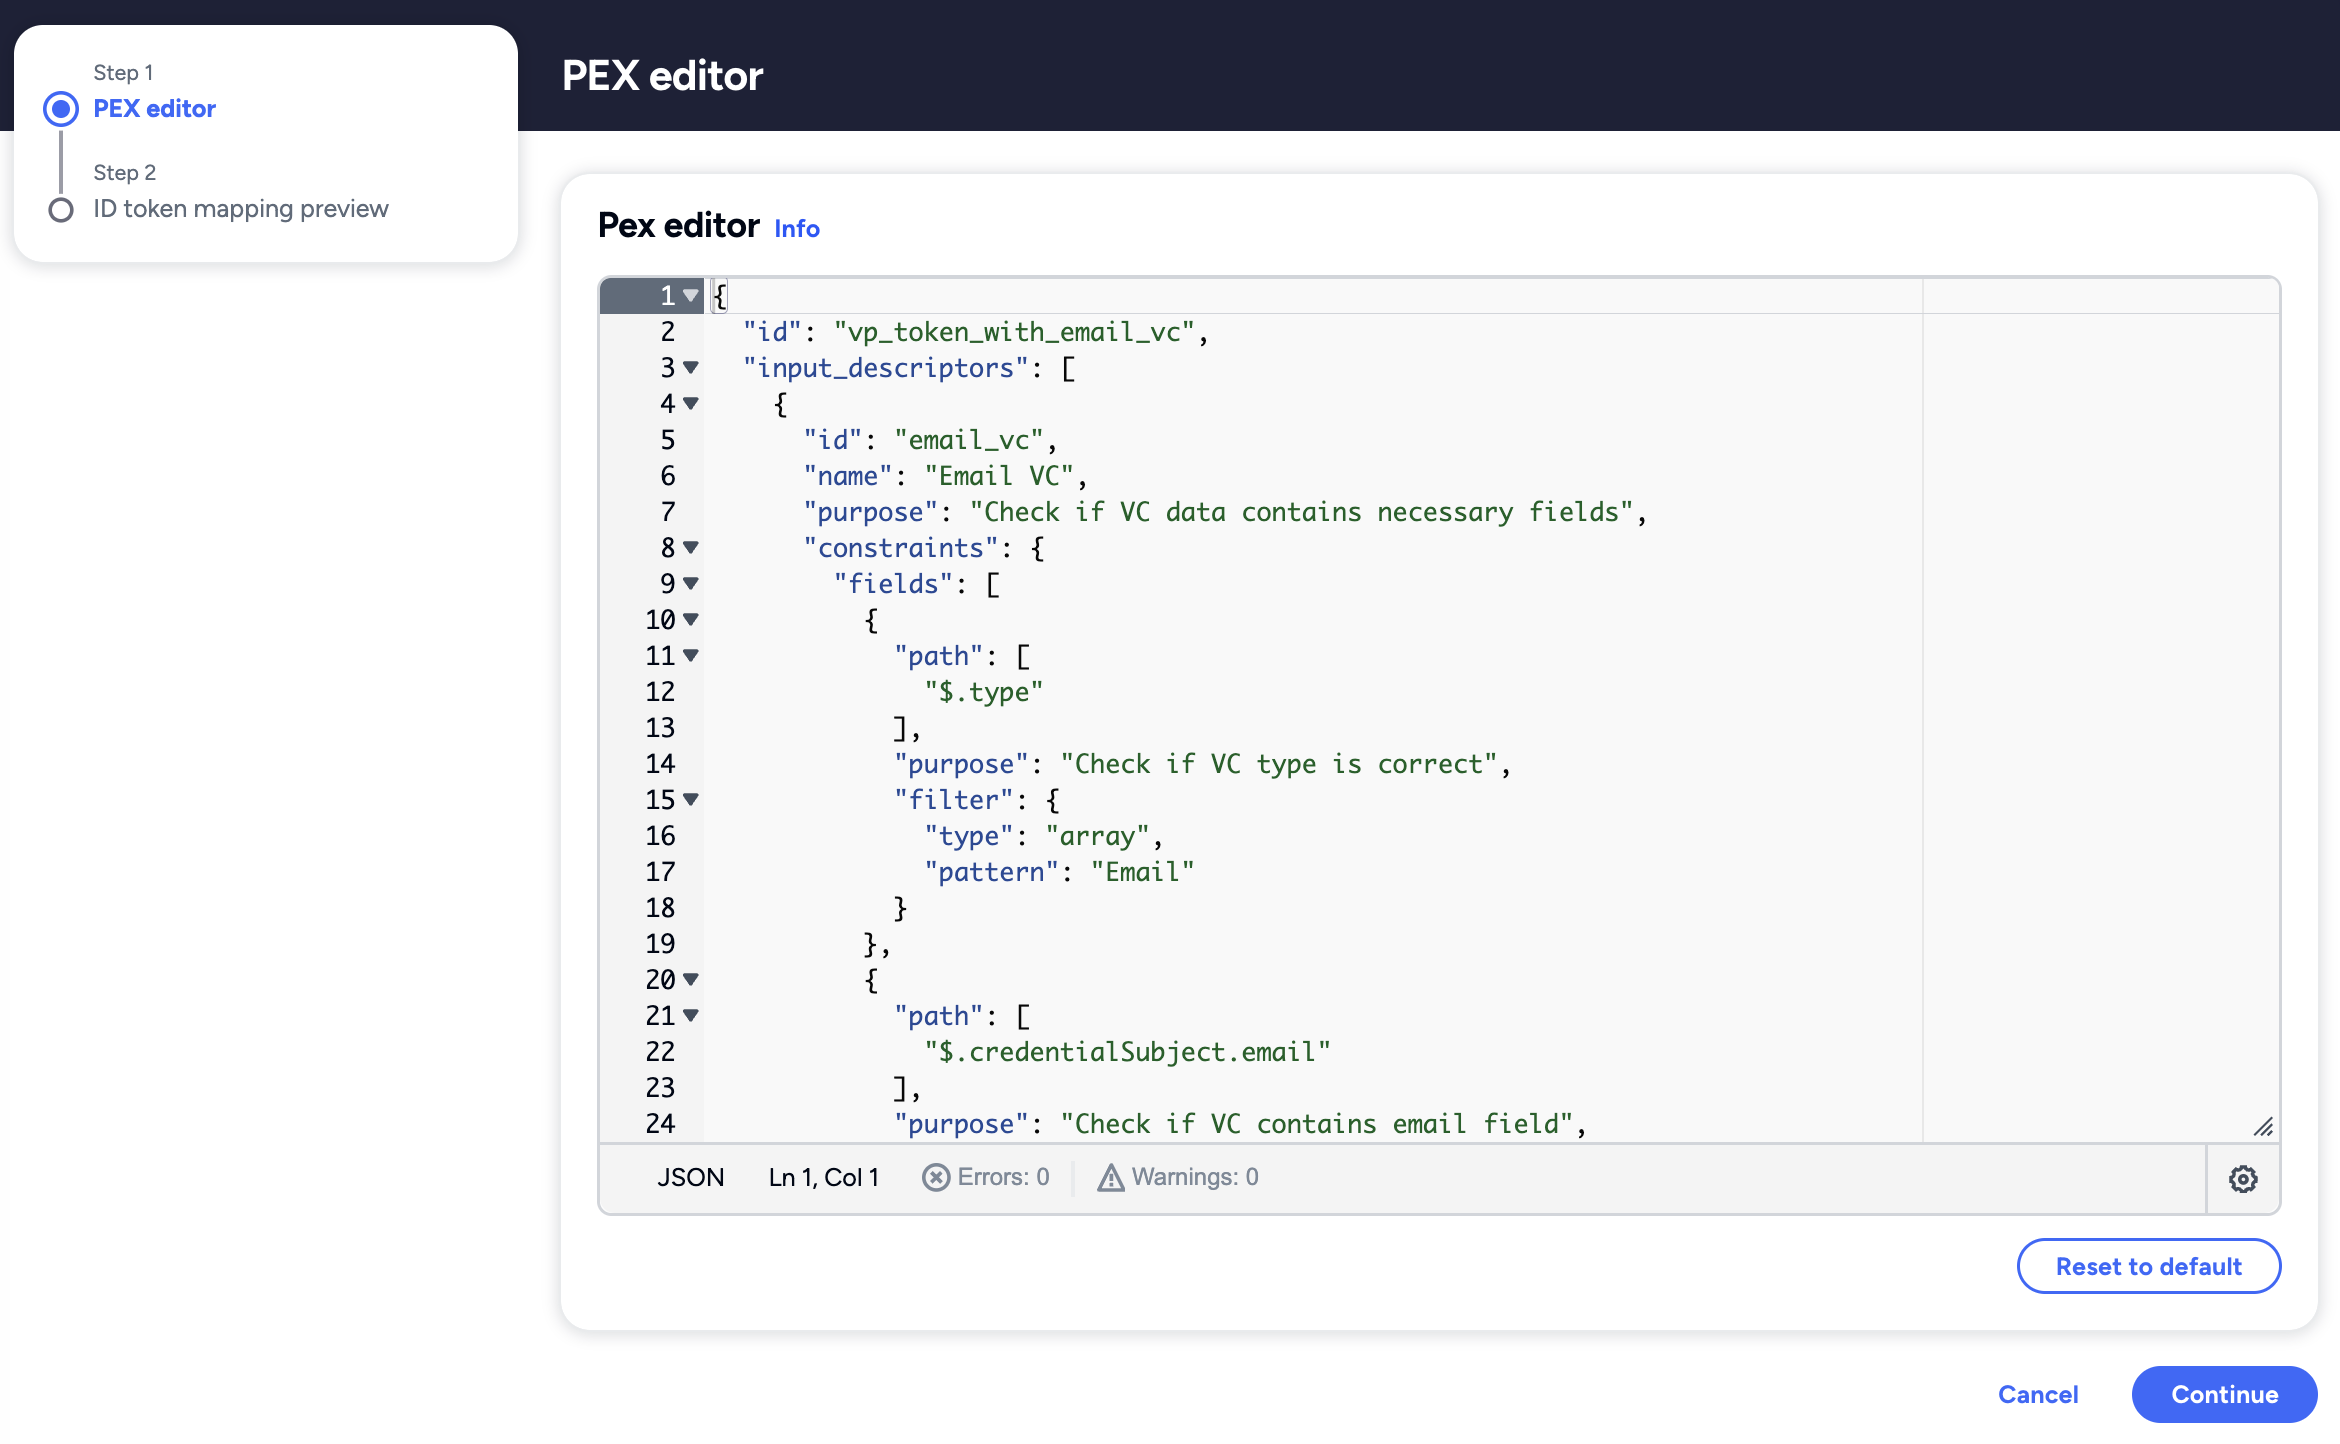
Customise your Presentation Definition and ID Token Mapping by expanding the Additional Configuration section and clicking on the Create New button
Copy the Presentation Definition below to request Email Address and Profile Information of the user. Paste it in PEX editor, then click on Continue button.
        {
  "id": "vp_email_user_profile",
  "submission_requirements": [
    {
      "rule": "pick",
      "min": 1,
      "from": "A"
    }
  ],
  "input_descriptors": [
    {
      "id": "email_vc",
      "name": "Email VC",
      "purpose": "Check if VC data contains necessary fields",
      "group": [
        "A"
      ],
      "constraints": {
        "fields": [
          {
            "path": [
              "$.type"
            ],
            "purpose": "Check if VC type is correct",
            "filter": {
              "type": "array",
              "contains": {
                "type": "string",
                "pattern": "Email"
              }
            }
          },
          {
            "path": [
              "$.credentialSubject.email"
            ],
            "purpose": "Check if VC contains email field",
            "filter": {
              "type": "string"
            }
          },
          {
            "path": [
              "$.issuer"
            ],
            "purpose": "Check if VC Issuer is Trusted",
            "filter": {
              "type": "string",
              "pattern": "^did:key:zQ3shtMGCU89kb2RMknNZcYGUcHW8P6Cq3CoQyvoDs7Qqh33N"
            }
          }
        ]
      }
    },
    {
      "id": "givenname_vc",
      "name": "givenname VC",
      "purpose": "Check if VC data contains necessary fields",
      "group": [
        "A"
      ],
      "constraints": {
        "fields": [
          {
            "path": [
              "$.type"
            ],
            "purpose": "Check if VC type is correct",
            "filter": {
              "type": "array",
              "contains": {
                "type": "string",
                "pattern": "HITGivenName"
              }
            }
          },
          {
            "path": [
              "$.credentialSubject.givenName"
            ],
            "purpose": "given Name",
            "filter": {
              "type": "string"
            }
          }
        ]
      }
    },
    {
      "id": "familyName_vc",
      "name": "familyName VC",
      "purpose": "Check if VC data contains necessary fields",
      "group": [
        "A"
      ],
      "constraints": {
        "fields": [
          {
            "path": [
              "$.type"
            ],
            "purpose": "Check if VC type is correct",
            "filter": {
              "type": "array",
              "contains": {
                "type": "string",
                "pattern": "HITFamilyName"
              }
            }
          },
          {
            "path": [
              "$.credentialSubject.familyName"
            ],
            "purpose": "family Name",
            "filter": {
              "type": "string"
            }
          }
        ]
      }
    }
  ]
}
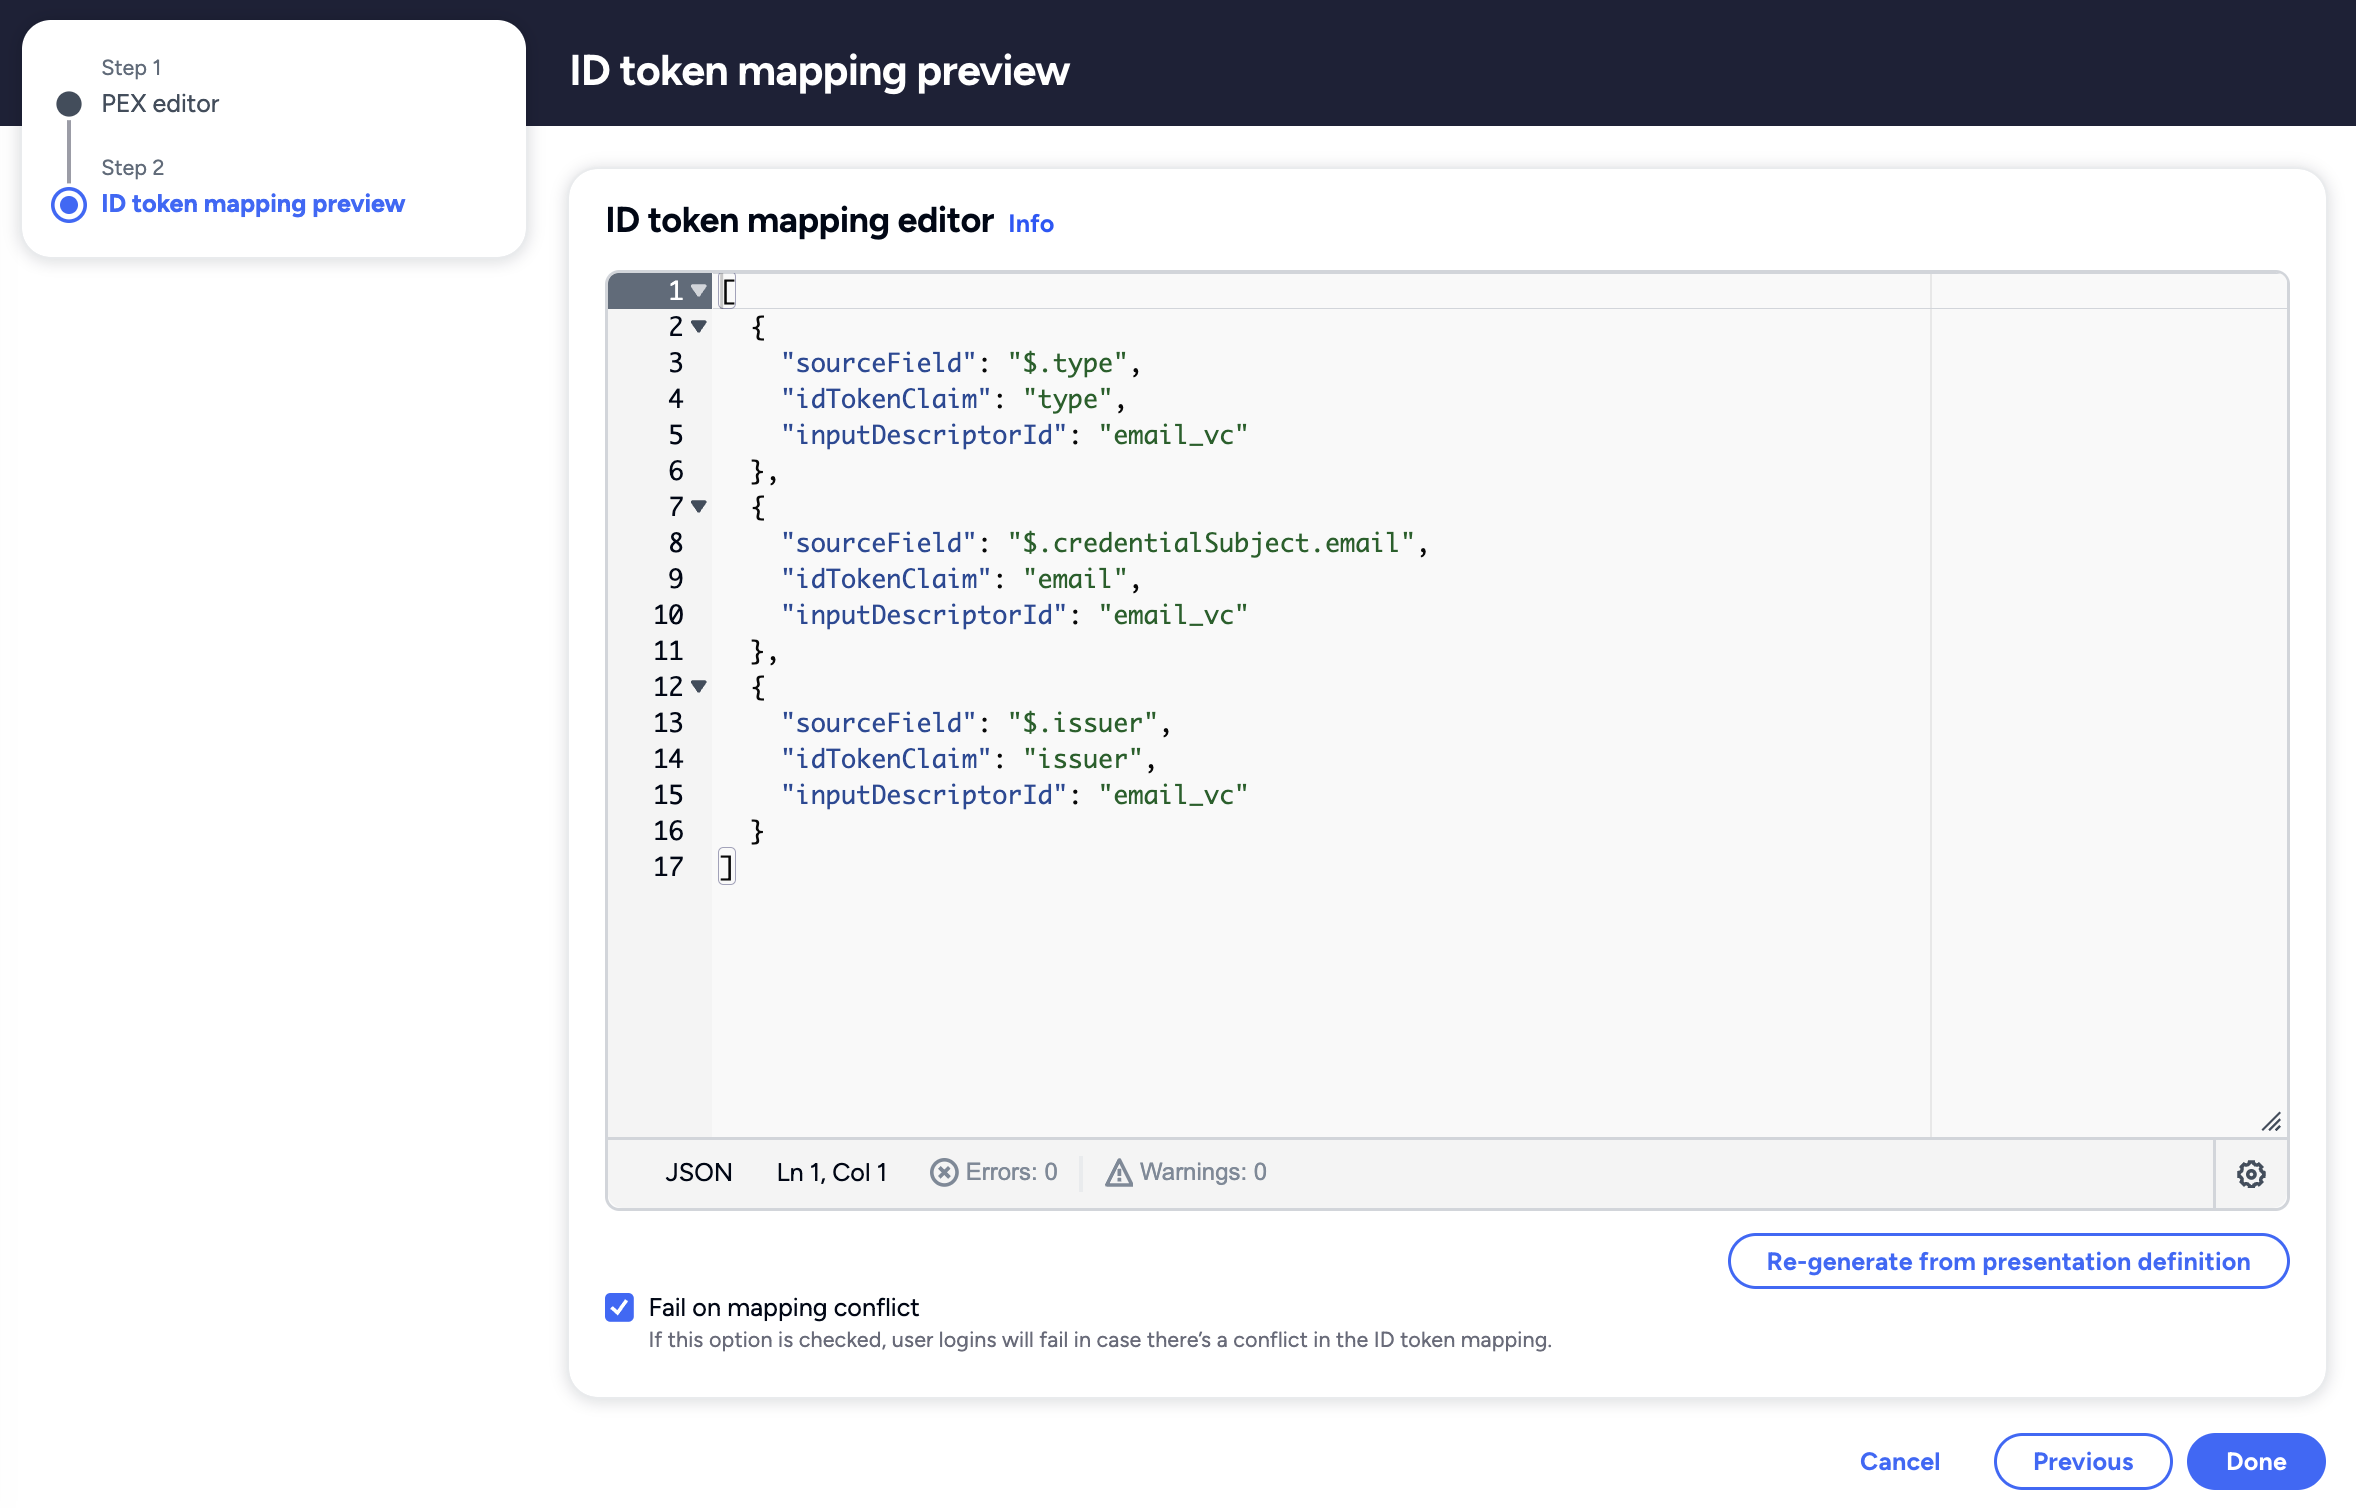
- Copy the ID Token Mapping below. Paste it in ID token mapping editor and click on Done button. This ID Token format is based on the Presentation Definition we defined from previous step.
        [
  {
    "sourceField": "$.credentialSubject.email",
    "idTokenClaim": "$.email",
    "inputDescriptorId": "email_vc"
  },
  {
    "sourceField": "$.credentialSubject.givenName",
    "idTokenClaim": "$.given_name",
    "inputDescriptorId": "givenname_vc"
  },
  {
    "sourceField": "$.credentialSubject.familyName",
    "idTokenClaim": "$.family_name",
    "inputDescriptorId": "familyName_vc"
  },
  {
    "sourceField": "$.issuer",
    "idTokenClaim": "$.custom[0].issuer",
    "inputDescriptorId": "email_vc"
  }
]
Confirm that all details are correct and save the Login Configuration.
After successfully saving the details, a popup will show the Client Credentials (Client ID and Issuer) for your Login Configuration. Copy the generated Client Credentials and configure your app to integrate with Affinidi Login.
After copying the Client ID & Issuer and closing the popup, you are redirected back to the Affinidi Login page.

Connect Affinidi Login with the Social Login App
- Open the installed app by clicking on
Appsand selectingminiOrange.
- Click on
SETUP IDPoption underminiOrangeApp, which will take your to miniOrange website, Click onAdd Identity Providerbutton and then click onOAuth 2.0tab.
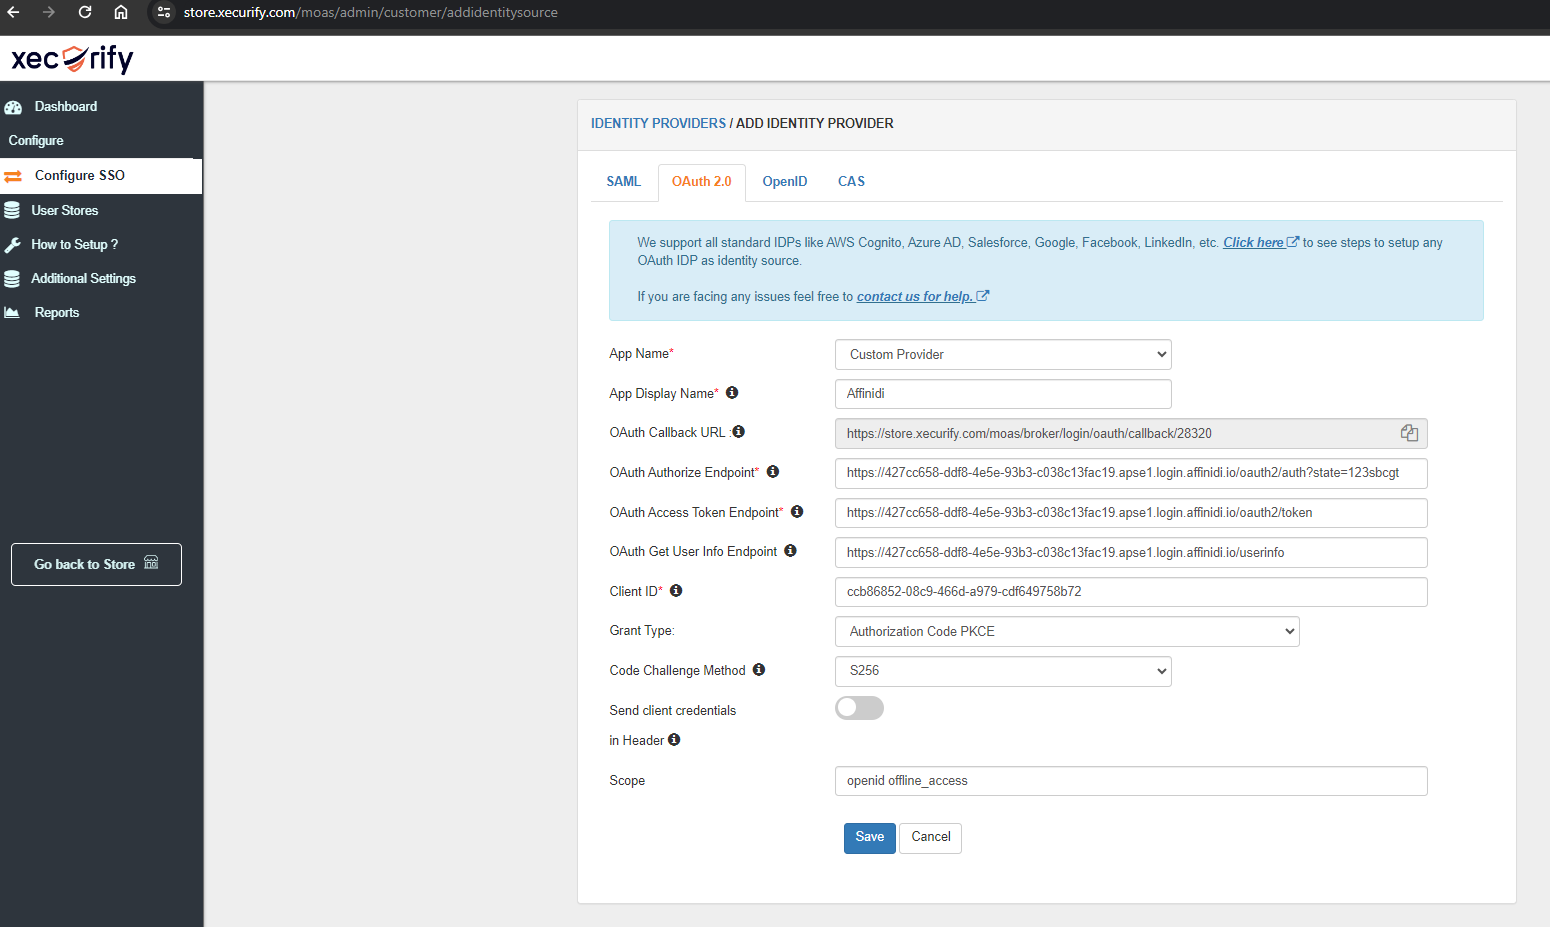
Enter the below details.
- App Name as the
Custom Provider - App Display Name as
Affinidi - OAuth Authorize Endpoint as
{ISSUER}/oauth2/auth?state=123abcdef(e.g.https://427cc658-ddf8-4e5e-93b3-c038c13fac19.apse1.login.affinidi.io/oauth2/auth?state=123abcdef) - OAuth Access Token Endpoint as
{ISSUER}/oauth2/token - OAuth Get User Info Endpoint as
{ISSUER}/userinfo - Client ID as your
Client IDobtained from your previous step - Grant Type as
Authorization Code PKCE - Scope as
openid offline_access
Replace {ISSUER} with your Issuer obtained from your previous step.
Click on Save button.
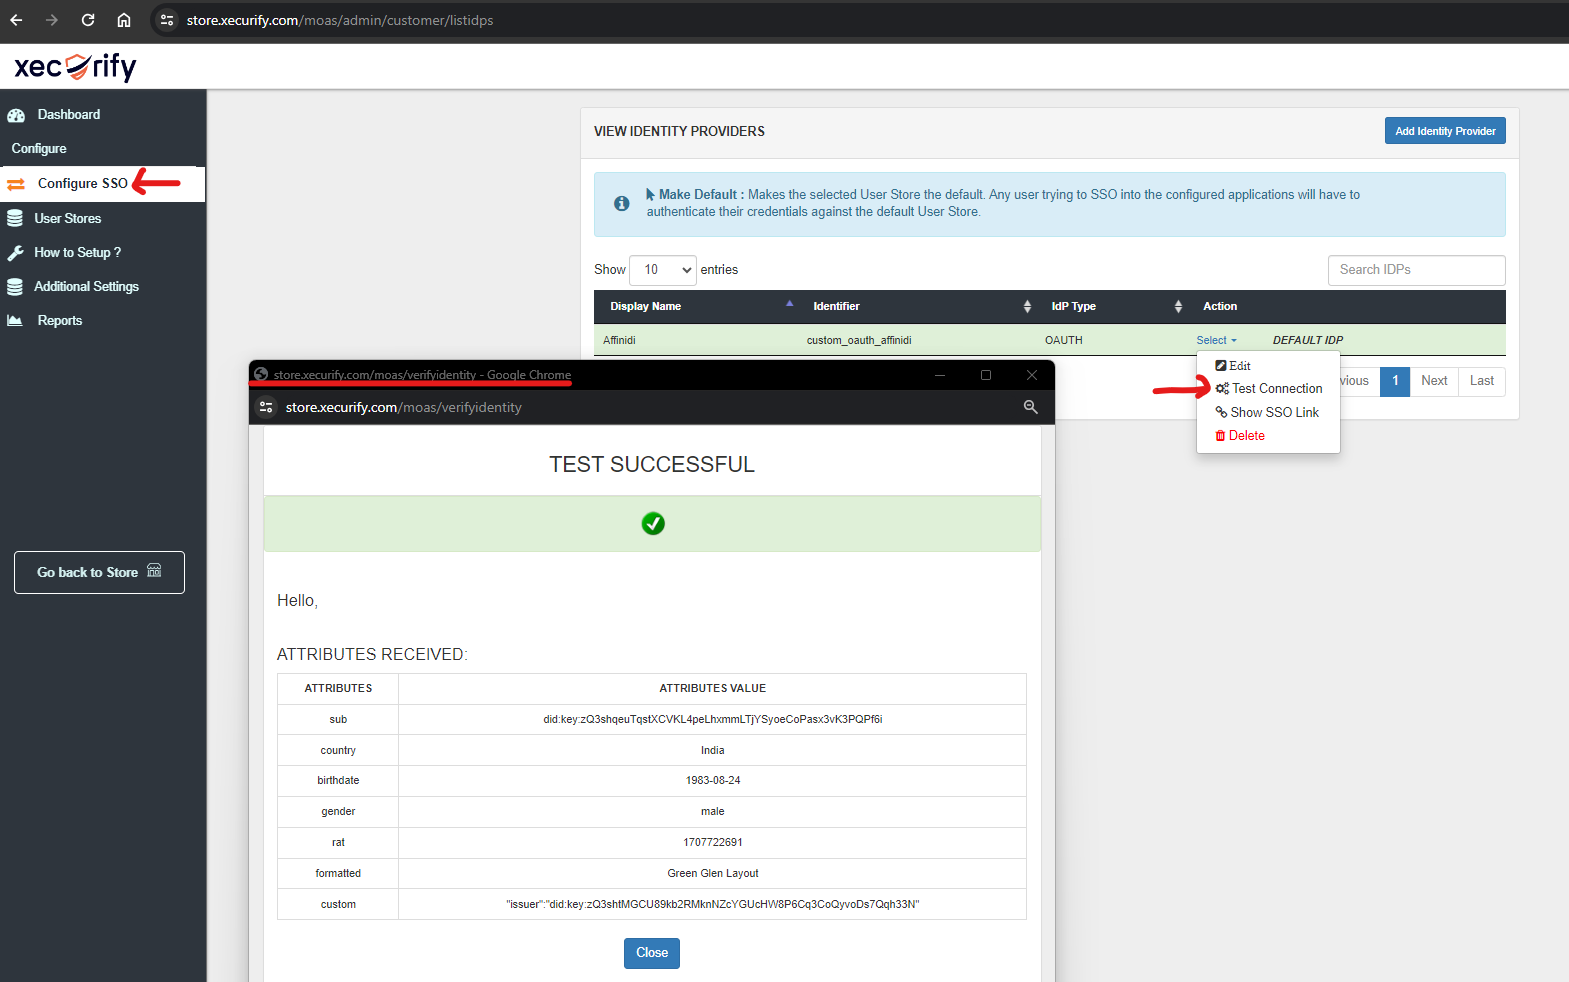
Validate the IdP setting by clicking on
Test Connection
Test Integration on Shopify
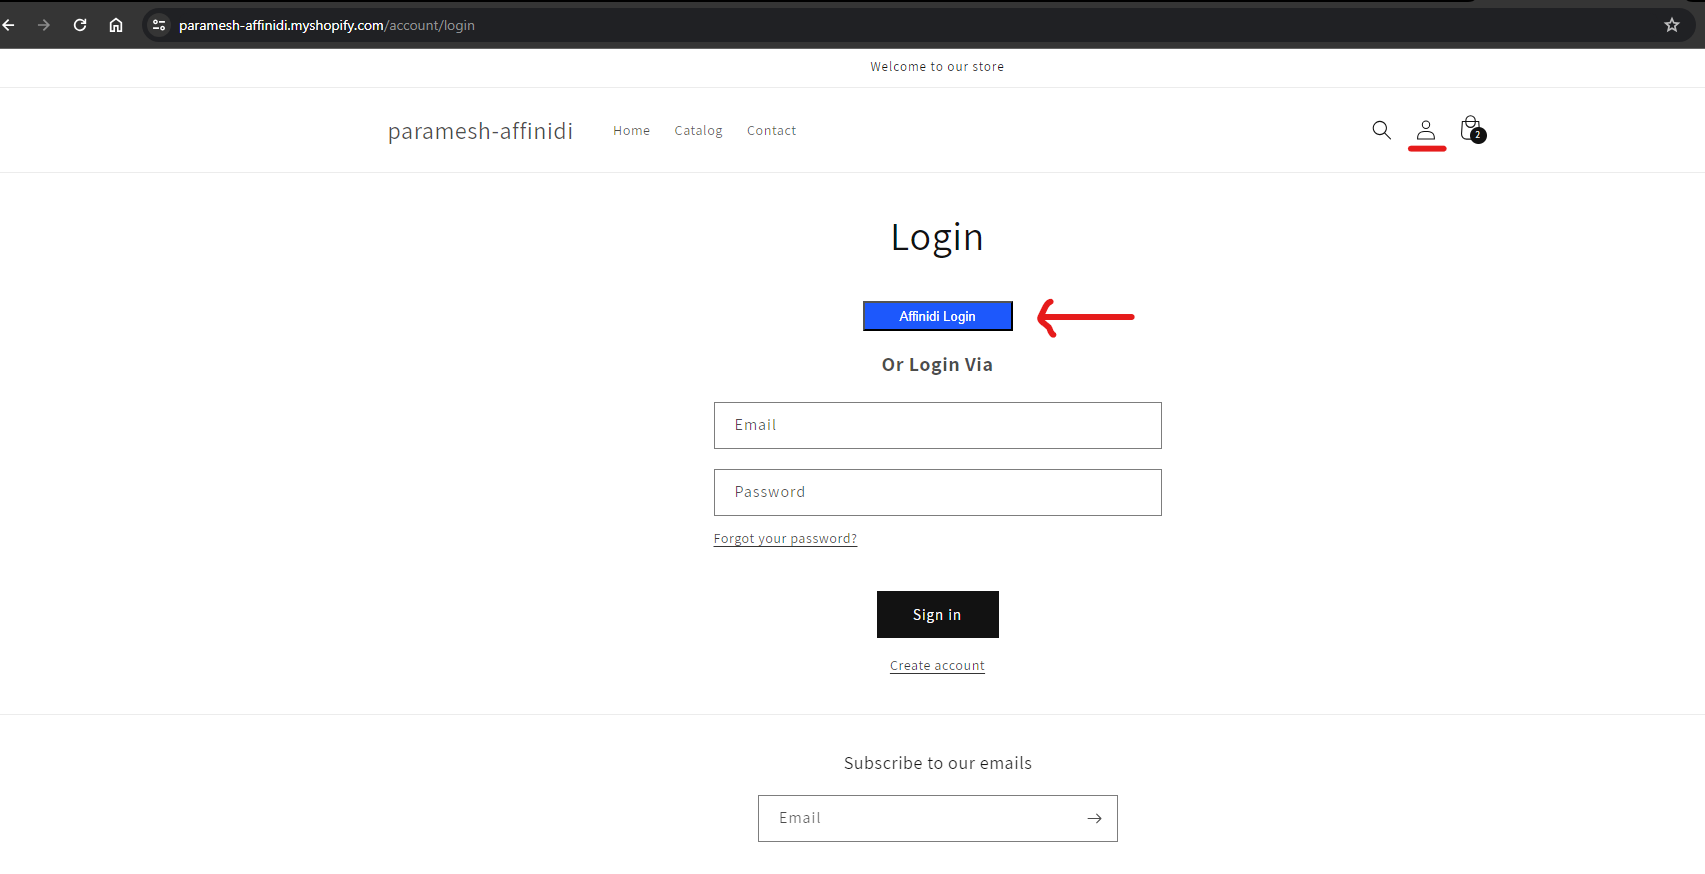
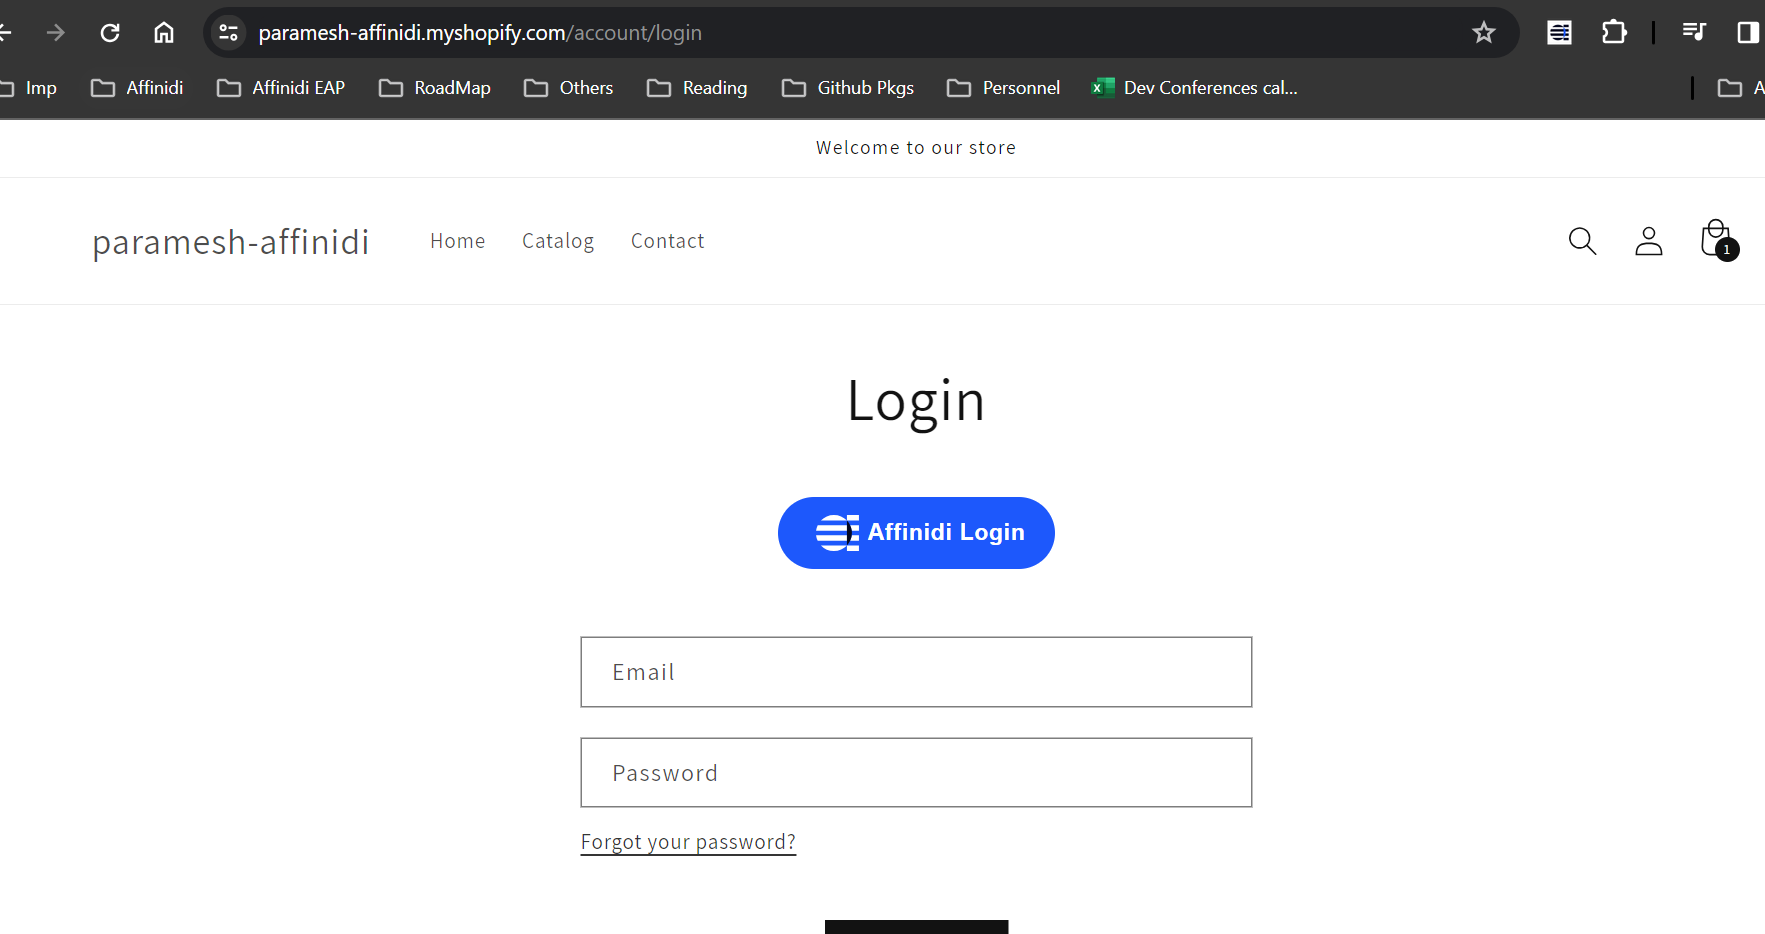
- Visit your Shopify Store website and browse the login page.
- Now, one should see the
Affinidi Loginbutton. - Click on the button to experience the Affinidi Login based authentication flow.
- After successfully logging in, as a Store Admin, you’ll find a new customer automatically created in the Shopify store.
You have completed the integration of Affinidi Login to provide a Passwordless Login experience into the Shopify Store with OIDC protocol. This feature will auto-create users and update user attributes like first name, last name, tags, address, etc., from Affinidi Login to your Shopify customer profile.
Optional Setup
Customisation
Depending on the app you choose, you may have options to customise the appearance of the social login buttons to match Affinidi’s style guide. Explore these customisation features if needed.
Customise the Shopify Theme to display Affinidi Login button as per the style guide by Affinidi.
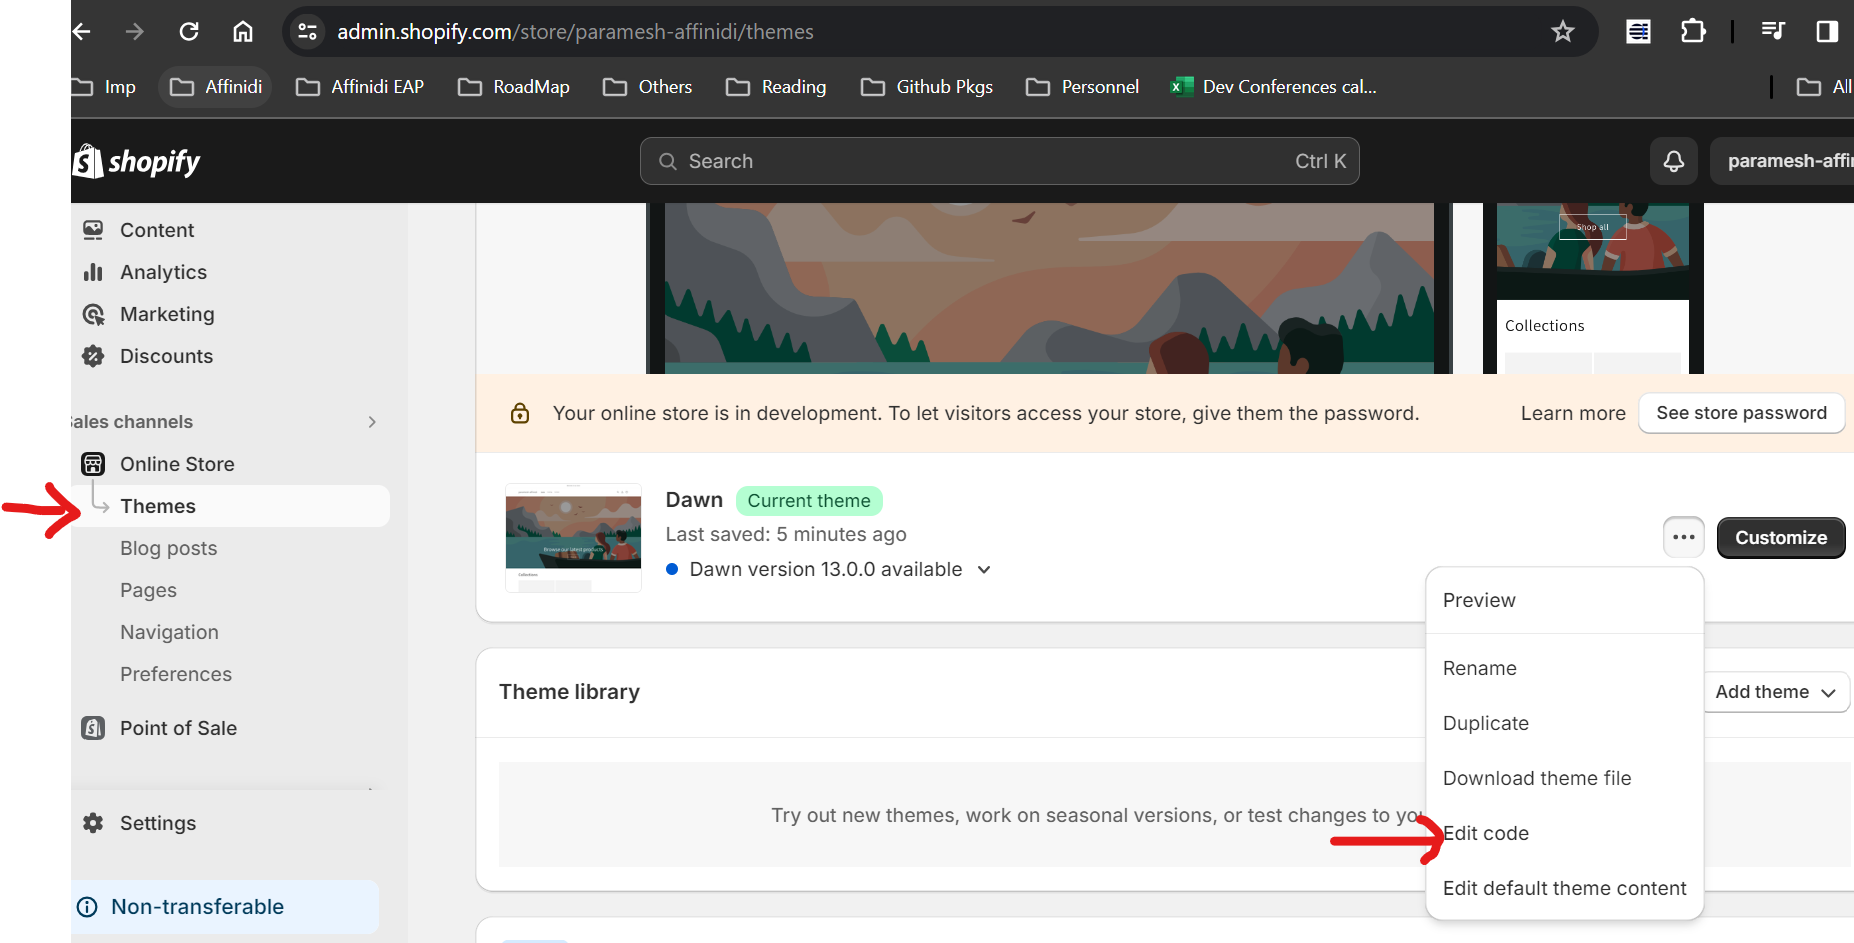
- Edit the Theme Code by opening the store -> Online Store -> Theme -> Edit Code
Take Backup of the theme before making any changes to existing Theme
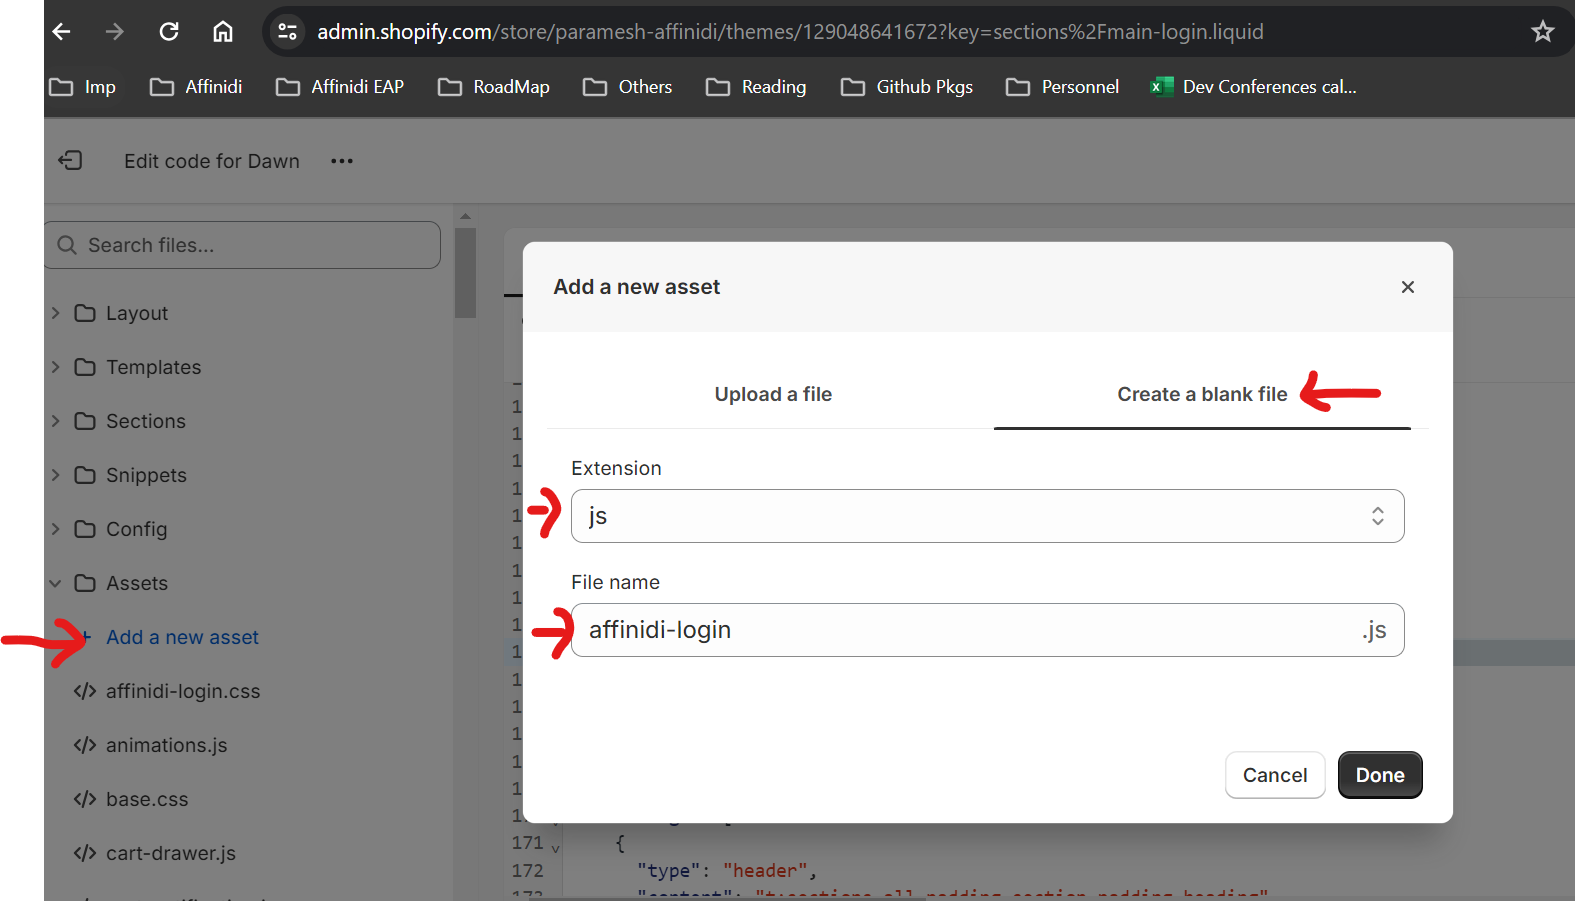
Click on option
Add a new assetunderAssetsmenuCreate a new Blank file with
JSas extension and file name asaffinidi-login
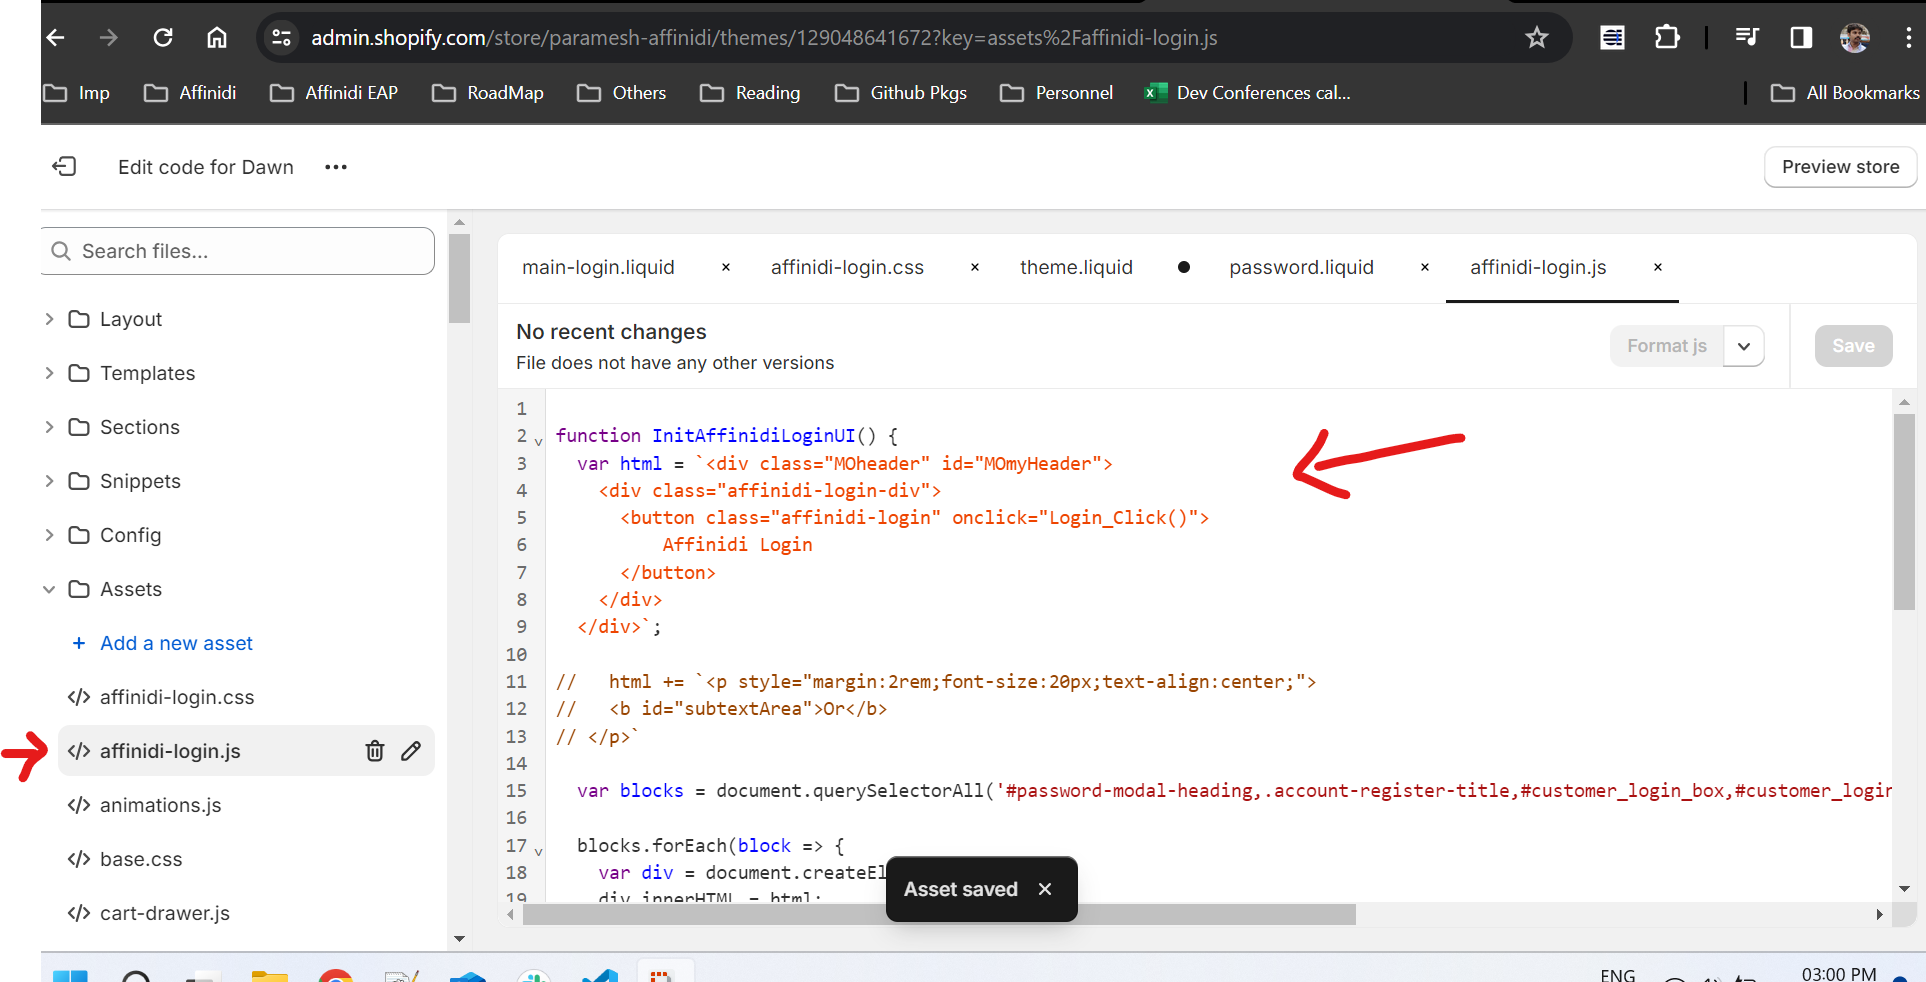
- Copy the below Javascript Code and paste in the above JS file just created and click on Save button
function InitAffinidiLoginUI() {
  var html = `<div class="MOheader" id="MOmyHeader">
    <div class="affinidi-login-div">
      <button class="affinidi-login" onclick="Login_Click()">
          Affinidi Login
      </button>
    </div>
  </div>`;

  // html += `<p style="margin:2rem;font-size:20px;text-align:center;">
  //   <b id="subtextArea">Or</b>
  // </p>`

  var blocks = document.querySelectorAll('#password-modal-heading,.account-register-title,#customer_login_box,#customer_login,#customer_loginlogin-sidebar,#customer_createlogin-sidebar,#create_customer');

  blocks.forEach(block => {
    var div = document.createElement('div');
    div.innerHTML = html;
    block.prepend(div);
  });


}

function Login_Click() {
  event.preventDefault();
  var shop_name = window.location.hostname;
  var queryString = window.location.search;
  console.log(queryString);
  var checkout_url;
  const urlParams = new URLSearchParams(queryString);
  if (urlParams.has('checkout_url')) {
    checkout_url = "/checkout";
  }
  else {
    checkout_url = "/account";
  }

  var cartValue = getCookie("cart");
  if (typeof cartValue !== 'undefined') {
    createCookie("cart", cartValue, 15);
  }

  location.href = "https://store.xecurify.com/moas/broker/login/shopify/" + shop_name + "/account?redirect_endpoint=" + checkout_url;

}

document.addEventListener("DOMContentLoaded", function (event) {
  InitAffinidiLoginUI();
});


function getCookie(cookieName) {
  let cookie = {};
  document.cookie.split(";").forEach(function (el) {
    let [key, value] = el.split("=");
    cookie[key.trim()] = value;
  })
  return cookie[cookieName];
}

function createCookie(name, value, days) {
  if (days) {
    var date = new Date();
    date.setTime(date.getTime() + (days * 24 * 60 * 60 * 1000));
    expires = "; expires=" + date.toGMTString();
  }
  else {
    expires = "";
  }
  document.cookie = name + "=" + value + expires + "; path=/";
}
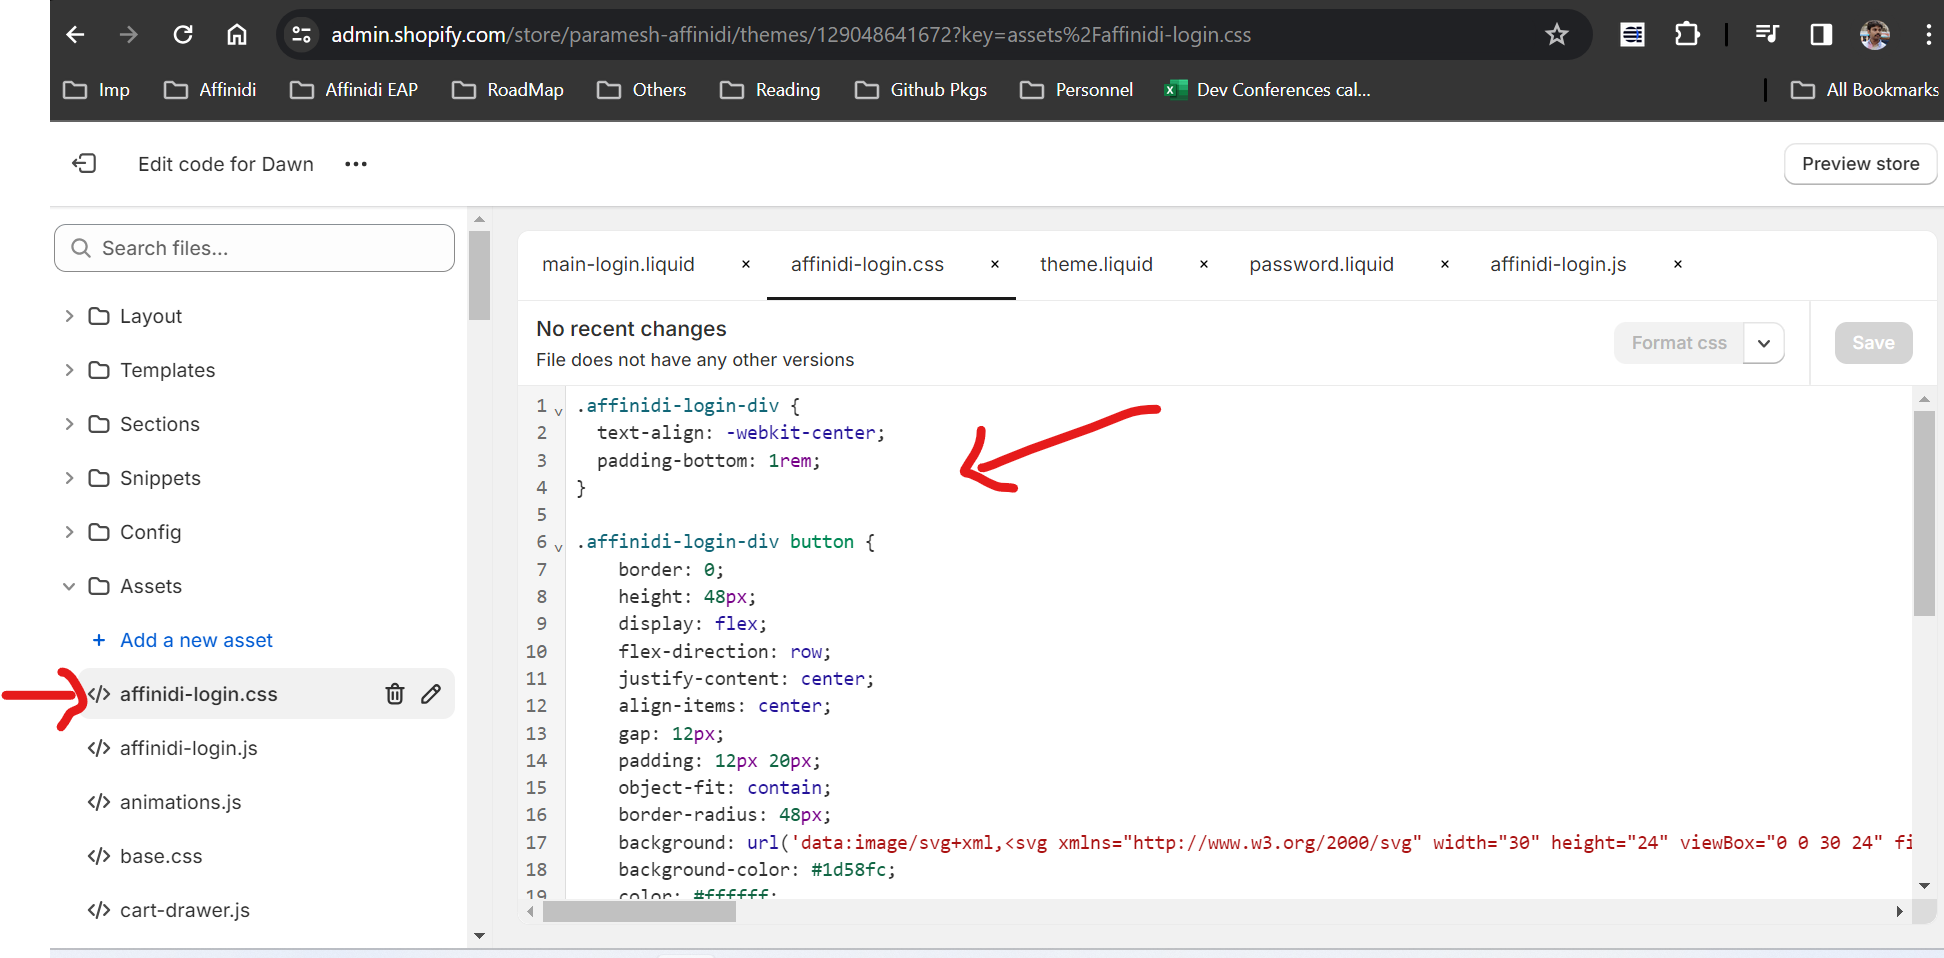
Create a new blank file with
CSSas extension and file name asaffinidi-loginCopy the below CSS code and paste in the CSS file just created and click on Save button
        .affinidi-login-div {
  text-align: -webkit-center;
  padding-bottom: 1rem;
}

.affinidi-login-div button {
    border: 0;
    height: 48px;
    display: flex;
    flex-direction: row;
    justify-content: center;
    align-items: center;
    gap: 12px;
    padding: 12px 20px;
    object-fit: contain;
    border-radius: 48px;
    background: url('data:image/svg+xml,<svg xmlns="http://www.w3.org/2000/svg" width="30" height="24" viewBox="0 0 30 24" fill="none"><path d="M3.927 20.281A11.966 11.966 0 0 0 12.61 24c3.416 0 6.499-1.428 8.684-3.719H3.926h.001zM21.295 6.762H1.813A11.933 11.933 0 0 0 .707 10.48h20.588V6.762zM21.293 3.719A11.967 11.967 0 0 0 12.609 0a11.966 11.966 0 0 0-8.683 3.719h17.367zM21.295 13.521H.707c.167 1.319.548 2.57 1.106 3.719h19.482v-3.718zM23.41 6.762c.558 1.148.94 2.4 1.106 3.718h4.78V6.762H23.41z" fill="%23fff"/><path d="M29.293 20.281h-8V24h8V20.28zM23.41 17.24h5.886v-3.718h-4.78a11.933 11.933 0 0 1-1.106 3.718zM29.293 0h-8v3.719h8V0z" fill="%23fff"/><path d="M24.514 10.48a11.934 11.934 0 0 0-1.106-3.72 12.017 12.017 0 0 0-2.115-3.041v16.563a12.05 12.05 0 0 0 2.115-3.042 11.935 11.935 0 0 0 1.2-5.24c0-.516-.031-1.023-.094-1.522v.001z" fill="%23040822"/></svg>') no-repeat 25px center;
    background-color: #1d58fc;
    color: #ffffff;
    padding-left: 60px;

    flex-grow: 0;
    font-family: 'Figtree', sans-serif;
    font-weight: 600;
    font-stretch: normal;
    font-style: normal;
    line-height: 1.25;
    letter-spacing: 0.6px;

    --border-offset: none;
    --border-opacity: none;
}

.affinidi-login-div button:hover {
    background-color: #4a79fd;
    filter: contrast(90%);
}

.affinidi-login-div button:active {
    background-color: #1d58fc;
}
Open the file
theme.liquidfile underLayoutmenuPaste the below code and paste it at the end of the
theme.liquidfile (right before the closing of body tag) as mentioned in the screenshot
        {{ 'affinidi-login.css' | asset_url | stylesheet_tag }}
<script src="{{ 'affinidi-login.js' | asset_url }}" defer="defer"></script>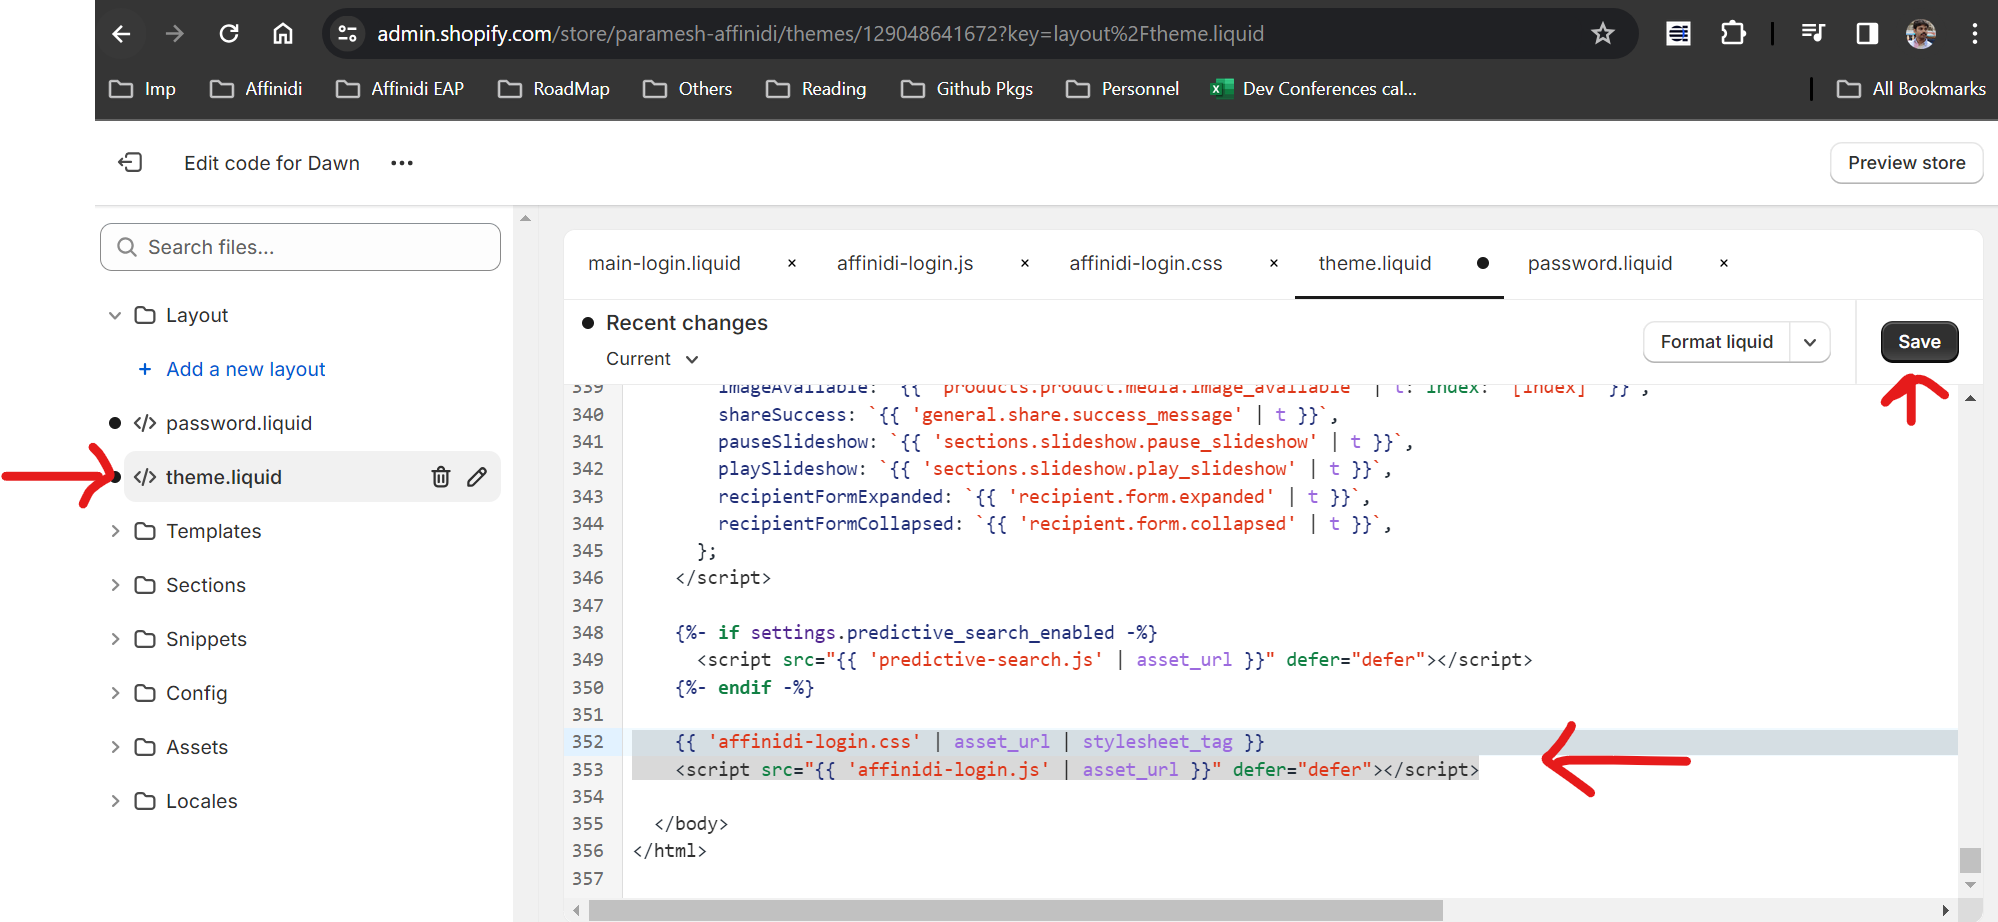
- Preview the store and should the see the Login Button
- Switch off the
Display Widgetin miniOrange App, as we have added our own SSO button styling
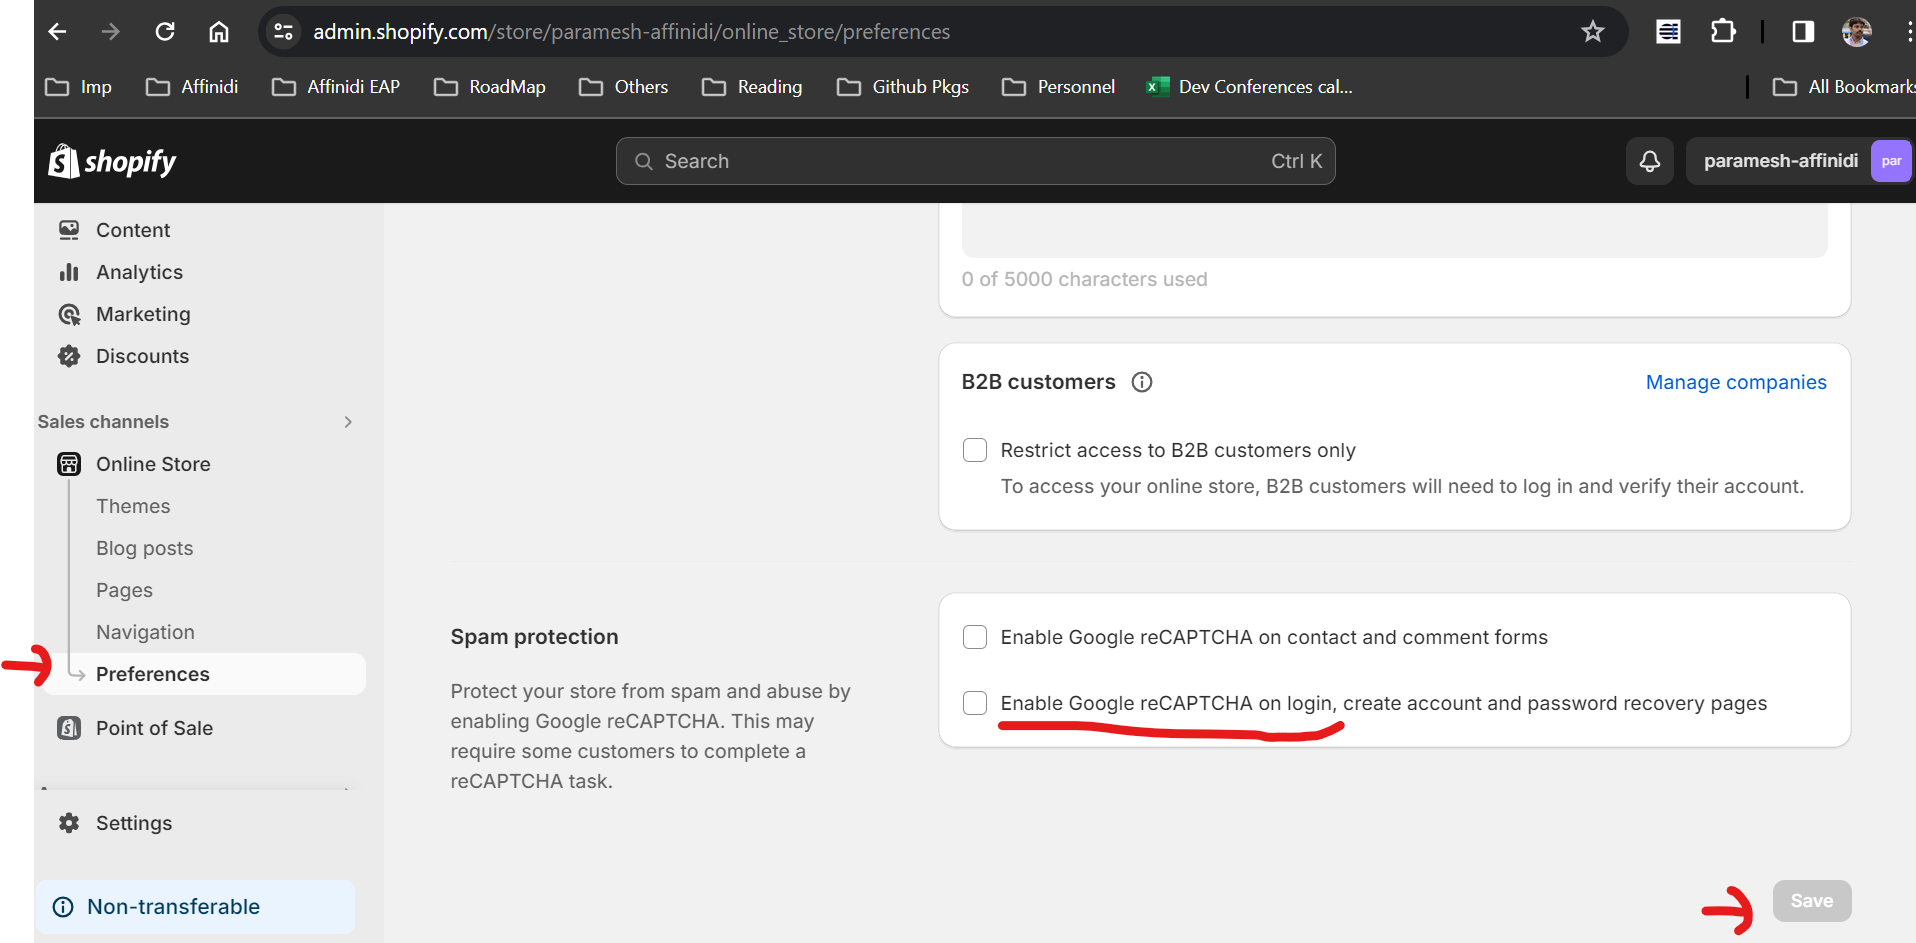
- Uncheck the Captcha option for Login/Register page, to avoid users to select captcha while Login into store.
Monitor and Analyse
Once social login is enabled, monitor its usage and analyse any relevant analytics the app provides. This information can help you understand customer preferences and optimise your store’s user experience. You can monitor usage Analytics from Affinidi Developer Portal as well.
Glad to hear it! Please tell us how we can improve more.
Sorry to hear that. Please tell us how we can improve.
Thank you for sharing your feedback so we can improve your experience.